Windows to Go–Consumer Preview Edition
 Windows 8 has a new feature called Windows to Go that allows an installation of Windows 8 to boot from a USB drive, or external hard drive. Potential uses are many. Corporate networks might require you to boot from a Windows to Go USB key before connecting to their network. Universities could hand out USB keys with installations tailored to specific majors. Perhaps someday you may just unplug your USB key and take it home, rather than taking an entire notebook. It could also prove useful for malware removal. However, maybe the most attractive use today, is to boot Windows 8 Consumer Preview on your current hardware, without the need to dual-boot, or upgrade an existing installation of Windows.
Windows to Go has safety and security features to prevent data theft, and exposure of the hosts OS. The system will shut down in 60 seconds if the USB drive is removed. Any drives on the host system must be mounted before they are accessible to Windows to Go.
The first time Windows to Go boots on a system it installs the drivers unique to that hardware. Subsequent boots are faster, and go straight to Windows 8. System performance on USB 2.0 or 3.0 is quite good. A great way to test Windows 8 using a ‘Live USB’, and leave your current system untouched.
The current process is pretty clunky. It requires a large download (WAIK), and some command line work. Arstechnica released a guide today to help create your own Windows to Go USB. This process will likely be much improved before the general availability release.

What’s needed?
- A PC running Windows 7 or Windows 8 beta (with a USB 2.0 or 3.0)
- The ISO image of Windows 8 Consumer Preview (32-bit for best compatibility)
- The Windows Automated Installation Kit (AIK) – warning 1.7 GB!
- A USB storage device of 32GB or greater
Prepare the USB device from a command prompt as administrator:
- Run
diskpart - At the
DISKPART>command prompt, enterLISTto find the USB device’s disk number. - Select the USB as active by entering
SELECT DISKand its disk number (for example, if the USB drive is listed as disk 2, enterSELECT DISK 2) - Purge all the existing partitions from the USB by entering
CLEAN - Create a new partition :
CREATE PARTITION PRIMARY - Quick-format the partition as bootable NTFS:
format fs=ntfs quick - Set the partition as active:
ACTIVE - Leave diskpart by typing in
EXIT
Next, extract the installer image file from Windows 8 Consumer Preview. To do this the ISO has to be mounted, burned to a DVD, or unpacked ( WinRAR will unpack ISOs - free trial). Once unpacked, find install.wim, that can be found in the \sources directory of the disk image. Copy it to a new folder on your system, or desktop.
Then, install the Windows Automated Install Kit downloaded above. WAIK contains a command line tool for extracting image from install.wim, and writing to USB device. It can be found at a path similar to C:\Program Files\Windows AIK\Tools\x86\imagex.exe Copy imagex.exe to the new folder you created above, or desktop.
Check the letter drive of your USB as it will be needed to run the following commands. Here we’ve D: as an example.
- From a command prompt run as administrator, enter the command:
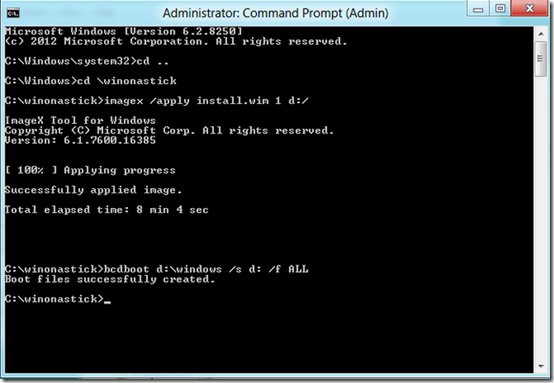
imagex.exe /apply install.wim 1 d:\(or substitute your USB’s drive letter for D if it’s elsewhere). - Once imagex has run its course, still at the administrative-level command prompt, add the boot record to the USB by entering at the C:> prompt:
bcdboot.exe d:\windows /s d: /f ALL
Congratulations! You’ve created a Windows to Go USB device. To boot on your system, you may have to change a BIOS setting, or press a key to chose boot options. Select your USB device. On first start you’ll need a product key. Windows 8 Developer Preview Product Key: NF32V-Q9P3W-7DR7Y-JGWRW-JFCK8
Enjoy Windows 8, to Go!
(image credit bfishadow via Flickr)

