
Corsair HX620W Power Supply: Review
 A while back I had the opportunity to review the Corsair TX750W Power supply. I found it to be of exceptional quality, but it was a bit tough to install cleanly because of the multitude of cables snaking their way out the back of the unit. It was difficult to find places to tuck them away where they were out of sight. To quote myself from my closing remarks in that review:
If Corsair were to offer this power supply as a modular unit to limit the tangle of leads to deal with when it’s installed, it would be nearly perfect.
Well now I’ve been given the opportunity to review one of Corsair’s new modular power supplies and it’s got a tough act to follow. The HX620W claims many of the same attributes of it’s bigger cousin, it’s powerful, efficient, quiet, cool, customizable, and it’s dual GPU ready.
The first thing I noticed when I opened the box is that the HX620W is not 100% modular. It has the 20/24 pin connector, a 4 pin connector, and an ATX 8/4 pin connector hard-wired to the unit. Still, this is a huge improvement when compared to the tangle of cables the TX750W sported. In all fairness, I installed this power supply in the same cases I used in the TX750W review, one a top mount and one a bottom mount. Let’s look at the top mount case first.
When installed as a top mounted unit, the few hard-wired cables it has are on the side nearest the mainboard, they are of adequate length to reach their intended connectors, and offer only the necessary connections to power the mainboard. The cables are not overly long and the extra length is easily routed cleanly. I then dug into the Corsair logo baring vinyl pouch and see what kind of cables I got to play with.
The cable assortment comes in it’s own pouch with a Velcro closure, and there’s quite a bunch to choose from. The HX620W is supplied with two PCIe cables, three SATA cables (8 connectors total), four 4 pin peripheral cables (8 connectors total), a peripheral to fan power adapter (2 connectors), and a peripheral to floppy cable (2 connectors). There are varying lengths of each, so this is looking very promising.
 A clean install in a top mount configuration is a snap! The cable are long enough, and short enough to make all the connections cleanly. I only needed a couple of cables in the AOpen case as it’s getting a little old, but the cabling turned out much cleaner using the HX620 than the TX750. No big wads of cables stuffed into every available drive bay with this unit and airflow in the case is not restricted at all.
Ok, we’ve got a definite improvement over the TX750W in the top mount configuration. Let’s see how it does in the Antec 900 case. That’s the one that caused so much grief with cables restricting the airflow. The only place to tuck them away was in front of the front mounted case fans. Not a good plan.
 Like the TX750W, the HX620W must be mounted upside down in the Antec case. This places the hard-wired cables to the outside, away from the mainboard, which caused problems with getting the cables routed to their intended targets cleanly. The 4 pin plug on the ASUS mainboard is clear at the top, right behind the input/output panel. About as far away from the cable as it can be. The TX750W spanned the distance, but just barely, and it took some creative cable routing to get it there cleanly. With the HX620W, this cable was a perfect fit as it is several inches longer than it’s counterpart on the TX750W. The 20/24 pin cable was also the perfect length for this installation. My ASUS board doesn’t require the 4/8 pin cable, but it tucked away nicely under the drive bays, leaving the fans completely unobstructed. Now for the modular cables.
There’s a peripheral connector at the back about midway up this board. Using the closest connector in the power supply and running the cable beneath it and up the back of the board, the last connector on the cable was just long enough to fit cleanly. That left one peripheral connector out in the open, but it’s tight against the back of the case and barely noticeable. There’s another peripheral connector required at the top front of the case to provide power to the front panel ports and the top mounted 250mm fan. No problem here, either. Using the longest peripheral cable from the Corsair goodie bag, I reached it with length to spare. Because the modular cables are flat, it was easy to tuck the extra length of cable above the optical drive bay.
That left the SATA drives to connect. Using the longest SATA cable to connect the optical drive was a cake walk. Again, the remaining length was tucked above the optical drive cage. One short cable connected the two SATA hard drives with a bend of cable tucked under the drive bays. Done deal! And it’s clean both in appearance and where air flow is a concern. While the cables could have been a couple inches longer in every case, they are adequate as they are… more so than those of the TX750W.
I was very impressed with the TX750W’s performance. Let’s see how the HX620W compares to it. I can already tell it’s quiet. My case fans drown it out completely. Efficiency is best measured over time, but Corsair has been awarded 80 PLUS Certification across the entire Corsair line of power supplies, including the award winning modular HX Series, powerful TX Series and value-performance VX Series, so I think we can take them at their word on that.
As the images below demonstrate, the HX620 is every bit as stable as it’s larger cousin. There were some slight voltage fluctuations at lower voltage levels, but none greater then .1 volts, well within listed specifications. There is no apparent difference in the unit’s output whether at rest or under load. Running in SLI has no effect on out put, though the PSU temperature rises slightly when using dual graphics cards and rendering complex graphics at high frame rates. Still, the HX620W does not get as hot as other unit’s I’ve tested under similar loads.
Corsair HX620W on the left – Corsair TX750W on the right
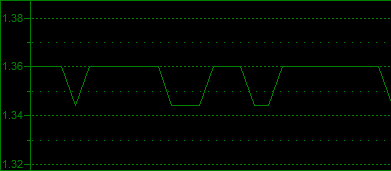
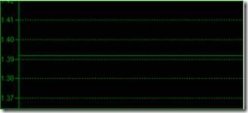
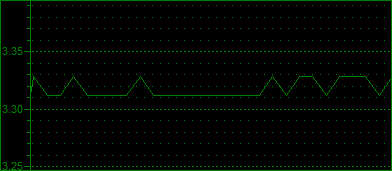
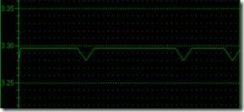
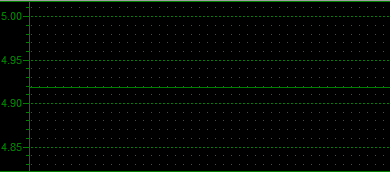
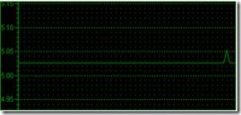
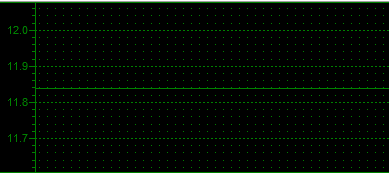
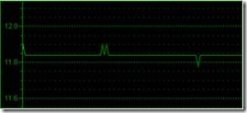
Top to bottom are Vcore1 voltage, +3.3v, +5v, and +12v legs.
The HX620W does, indeed, meet or exceed the claims of Quiet and Cool. The output is stable through all ranges and loads I was able to place it under and ripple voltage is nearly immeasurable. I found this to be a very strong running power supply under all the conditions I placed it under, but it’s actually the unit’s installation flexibility that sold me. Because of it’s modular design and lengthy cables, it’s very easy to install the HX620W cleanly to maximize air flow through the case…which is an important feature for anyone who uses their computer vigorously.
As one who isn’t happy until I’ve found something to complain about, I do have a complaint. In a bottom mount situation, the logo is upside down. This would be easily remedied by applying the offside logo upside down. It would not be seen in top mount applications and the logo would be right side up in a bottom mount application such as mine. Seriously, that’s the only thing I could find wrong with this power supply and at less than $170, I would not hesitate to recommend the HX620W to anyone wanting an exceptional power supply in this output range.
Rating: 


