Fan RPM's
#1

 Posted 11 March 2007 - 03:41 PM

#2

 Posted 11 March 2007 - 08:27 PM

can't get it over 2050 rpm's. Specs say 1800- 3200. My CPU runs at Idle- 54celcius, Online game(UT2K4)-70+celcius.
I was not able to see the revue Link - http://www.maximumpc..._master_v.html)
Can you briefly describe what the revue said -
Questions / Comments
1. What utility are you using to monitor Temperature & Fan Speed
2. Is Fan rotating properly Should be pushing air down thru the heat sink
3. This is using PWM Control Pulse Width Modulation Describe the Fan Connection 3-pin 4-pin what connector which power connector Using Motherboard or 4 pin Peripheral Connector
4. Sounds like it may be in error
5. Do you have any Fan Control Setup in BIOS Usually you have Fan Speed Ratio Speed up/down Response Time Usually you do not want to run this type control at full speed 100% of the time It needs to be able to vary the speed otherwise it will probably settle in at Mid Speed
6. What is Fan Speed at Idle @ 54°C This may appear high but it can only be trusted as a Relative Temperature Value If it rises above ~ 5°C ~ Cooling needs tweaking - 20°C is beyond tweaking -
7. I think maximum speed would be 2880 RPM [90% of 3200]
8. Efficient cooling should maintain Operating Temp within 5°C [CPU-Idle CPU-MAX]
9. How old is PC How long have you had problem Did you ever have reasonable temp Numbers Just looking for some Baseline Temperature I only have - 54°C and 74°C as reference -
10. Are you Over-clocking What is CPU Core Voltage CPU Power is directly related
11. This is a Hot running CPU 78 ° is probably ok you might want to decrease the Over-clocking somewhat Just to see what can be done
12. What is BIOS CPU Temp This could be higher BIOS is using a fixed Fan setting & could be lower than normal And even though the CPU is coasting in BIOS Fan is not working as efficient and the BIOS Temps could actually be the highest recorded See what you read Again I only consider these temp values to be relative values You do not know how valid the technique components used placement of components to say it is any thing but relative
13. Is this a stock PC Taken from a Box 0r is it a Build your own How was CPU Installed on Motherboard by Manufacturer or someone else This is a big factor -
Meantime I will do some research on this cooling fan & CPU Data
Jack123
Edited by Jack123, 11 March 2007 - 08:28 PM.
#3

 Posted 11 March 2007 - 11:42 PM

#4

 Posted 12 March 2007 - 10:28 AM

requested-----
I am using Mother Board Monitor( ver.MBM 5.3.7.o) to monitor the CPU and fan speed.
Fan is pushing air down thru heatsink.The fan is connected to the mother board 3 pin connector. The manual says the mother board is capable of
monitoring the CPU fan speed. The fan has a 4 pin(PWM) 3 pin(with out PWM) connector.
http://www.tigerdire...p?Sku=C283-1034
Right now at idle the fan speed is 1753 rpm's. Fan speed has never gone above 2088 rpm's.
Temp. at idle usually 54. Playing UT2K4 it's in excess of 70. I can't run MBM during game play as it causes game
to minimize to the task bar so by the time I close the game and open MBM the temp. is 70-72 degrees Celsius.
No I'm not OCing. too afraid to with these high temp's! The PC is only a couple of months old.
The CPU and mother Board I'm not sure as I purchased it from a private person.He
probably bought it new when it was first manufactured.
I built this PC myself. I installed the CPU myself following the Mother board instructions as closely as
possible.I used Ultra silver thermal compound. This is my first build.
Here's the link to the review on the fan- fan
OK, after restarting and going into BIOS-
System temp- 29*
CPU temp- 59*
PWM- 43*
CPU fan speed-1834
NB fan speed-4440/4218
OTES fan- 4440/4218
Active Temp- 70*
CPU shutdown temp-Disabled
CPU warning temp-85*
#5

 Posted 13 March 2007 - 12:16 AM

Ok Here is the data with a math viewpoint
The temperature rise from 54°C to 74°C is 20°C, which is 37% increase from idle
Fan speed rose from 1753 rpm to 1880 rpm, which is 127 RPM or 7Ό % rise in cooling
2050 rpm was a rise of 297 rpm or 17% rise in cooling
So there is not much of an increase in cooling Of course that is what you originally said.-
I built this PC myself. I installed the CPU myself following the Mother board instructions as closely as
possible.I used Ultra silver thermal compound.
OPTION 1 Adjust Fan Speed in BIOS-
Ok that should mean that you have a manual on the motherboard There should be a section on the BIOS Settings Intel QST Quiet System Technology Where Intel keeps the fan/s at low speed to eliminate noise Apparently they have your BIOS Fan speed control set at minimum speed. (Default Setting)
Also you probably have a CD on this motherboard Browse thru the CD for Manual BIOS Information and some Online Help website how to adjust the QST Fan speed in BIOS - Also you may find a more suited Temp Monitor Utility on the CD
I have not been able to locate a lot of info on this motherboard on fan control other then this low fan speed is a real common problem. Looks as if this is designed to run warm?? Or maybe Use a Water Cooler What was the Stock Cooling Fan that came with CPU Chip and/or motherboard?
OPTION 2 See if Speedfan Utility can take control of the fan
Here is a link for Speedfan This will read Temps Fan speed & voltages. And it is supposed to be able to control Fan speed?? This is a free download maybe there is a purchased version for speed control?? I do not know if it can override the motherboard or not But it stated it can do it?
Speedfan-Using SMART Self Monitoring Analysis and Reporting Technology for Hard drives -
http://www.almico.com/sfdownload.php
OPTION 3 Hardwire Fan to +12 VDC
Here is a 12 VDC 4-Pin to 3-Pin Fan Adapter Cable with Motherboard RPM Speed Sensor
Performance PCS .com - Model: 3TO4FANRPM
http://www.performan...products_id=284
This will run fan at full speed (+12 VDC) and provide a RPM Sensor Feedback to Motherboard for Fan Speed Measurement by a Monitor Utility ( $5.00 + Shipping ) Probably can be purchased a local Computer Store -
Photo -
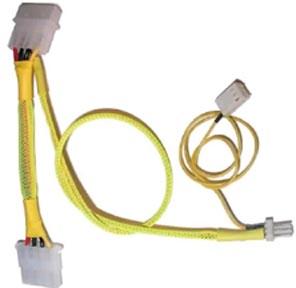
See attachment for connection -
 4_PIN_TO_3_PIN_FAN_CONNECTOR_WITH_RPM_SENSOR.pdf 21.32KB
607 downloads
4_PIN_TO_3_PIN_FAN_CONNECTOR_WITH_RPM_SENSOR.pdf 21.32KB
607 downloadsOk some questions -
PWM- 43* What fan is this referring to Video/graphics Card Fan? or Hard drive ? or Chipset?
NB fan speed-4440/4218 Is this the fan on the Northbridge Chipset?
OTES fan- 4440/4218 Outside Thermal Exhaust System Fan the Video/graphics Card Fan?
CPU shutdown temp-Disabled Is that a Status or an Option
CPU warning temp-85* Ever receive a warning? -
Jack123
Edited by Jack123, 13 March 2007 - 01:12 AM.
#6

 Posted 13 March 2007 - 10:07 AM

Adding 2nd Adapter Attachment with connection info
Jack123
Attachment -
 4_PIN_to_3_PIN_FAN_MINI_CONNECTOR_ADAPTER_WITH_RPM.pdf 38.68KB
448 downloads
#7

 Posted 13 March 2007 - 02:55 PM

how to adjust the QST Fan speed in BIOS--- I don't have a cd for this mother board, It was given to me by a friend along with the CPU. There wasn't a heat sink/fan either. I purchased that separtely.
See if Speedfan Utility can take control of the fan I installed this program and it didn't appear to make a difference.
Hardwire Fan to +12 VDC I finally got to the diagram and the web page after many tries!(?). Says- Connects a high powered three pin fan to a four pin power supply connector
My CPU fan has a 4 pin connector. Will this still work?
PWM- 43* What fan is this referring to Video/graphics Card Fan? or Hard drive ? or Chipset?- I don't know. How can I find out?
NB fan speed-4440/4218 Is this the fan on the Northbridge Chipset? There is a small fan in the middle of the MoBo over what I assume is the chipset.
CPU shutdown temp-Disabled Is that a Status or an Option This is the default setting. can be changed but I never did.
CPU warning temp-85* Ever receive a warning? - When I first put the machine together and installed XP Home Windows only recognized 137 gig out of a 250 HDD so I tried to do a clean install again. Part way thru the alarm went off. I think it was set to 75*( how do u get the degree symbol?) I ended up powering down-off button- as I didn't want to screw up the computer. Did I do right or wrong? Windows still only see's 137 gigs out of 250. It will let me use the remaining unused portion as D drive but I wanted to use the whole drive.
Fan Speed at 54 degrees-- 1795 to 1834. Switches back and forth every few seconds.
#8

 Posted 13 March 2007 - 03:37 PM

#9

 Posted 13 March 2007 - 08:54 PM

(1)
Hardwire Fan to +12 VDC I finally got to the diagram and the web page after many tries!(?). Says- Connects a high powered three pin fan to a four pin power supply connector
What was problem Downloading Internet Connection Firewall -
The reference to High Powered Fan means a 12 VDC Fan You need a 12V fan with a mini 3-pin connector power plug.
(2)
My CPU fan has a 4 pin connector. Will this still work?
NO that is a special PWM Fan Plug, that requires motherboard PWM Support, which you do not have
You said that your Fan had both connectors
You must use the mini 3-socket female plug on fan This will mate with the 3-Male Pin Header Receptacle of the adapter assembly Instead of connecting the Fan to the motherboard You connect to this connector This is the to 3-pin Adapter component of the adapter cable. Pin 1 is GND. Pin 2 is +12V. Pin 3 of the Fan Connector must be vacant. It is the RPM Sensor Output of the fan. It is now being separated from the adapter power connector, and will be connected to the motherboard in the next step.
Next connect the 3-mini male connector [using female sockets], with the single white wire to the mini 3-pin CPU header assembly on the Motherboard. This is connecting the white RPM Sensor to the motherboard. Pin 3 is the Sensor input pin on the motherboard mini connector.
Now connect the standard size 4-male pin plug, that has the (2) 24ga. power wires, to a standard size Power Supply 4 female socket receptacle Peripheral Power Connector This is the 4-pin Adapter component
Pin 1 = Yellow +12V
Pin 2 = Black GND
Pin3 3 = Black GND
Pin 4 = Red +5V
I need to label Connectors as [P1 J1] & [P2 & J2] and add more detail on my drawing I will attach Power Connectors info in next post or two -
Now you have your Fan connected directly to the +12 VDC of your Power Supply And you have the RPM Sensor white wire connected to the Motherboard CPU Fan Connector pin 3. This connection is required in order for your Temperature/Voltage Utility to monitor your Fan Speed There will be no speed control The fan is connected directly to +12 Volt Supply
This should be ok There will be more in rush current on fan startup, but PS will be Ok There will be more noise with this circuit but fan should be cooling better now -
I probably can come up with a speed control circuit but lets see if this works 1st
Now the shipping will probably cost more than the adapter cable You should be able to find this cable locally. If not Antec has 12V fans that have this adapter supplied with fan You can buy a cheap Antec fan locally for about $7 Just buy it for the adapter cable. I do not know where you are living but Staples, carries the Antec fans with the adapter cable -
Just make sure the color codes & power pins match up -
The CPU fan is set to 90% in the BIOS.
1880 rpm is only 58% ??
This should get your fan running faster now I will look at the Giga-Byte G-Power Pro Universal Cooler later.
I think I looked at that before.
I want to investigate the Intel temperature sensor and its placement + the motherboard CPU temperature support.
Download the free Home Edition of Everest and follow the instructions for making the 4 reports & uploading into an attachment and inserting in your next post You have to make HTML reports and attach You cannot copy into post they are too long for Forum to handle They will truncate the post & cut most of the report will be lost in cyber space ??
I cheat I use word - ° - Use Menu Insert Symbol Locate ° and insert Then I copy & paste into post Actually I keep a whole list of this symbols on notepad -( how do u get the degree symbol?)
To make a quoted statement - Add the word - quote - enclosed with [ ] brackets at the beginning of the statement to be quoted - and then add this /quote enclosed with [ ] brackets at the end of the statement - -
Download the Free Home Edition of [EVEREST] so I can analyze your motherboard CPU Temperature support
http://www.filehippo...d_everest_home/
Download & Run [EVEREST] & do the following steps to obtain 4 [REPORTS] Need to [Create] & [Save] 4 Separate [Reports] as HTML Documents by using Quick Report Summary Mode Save these in a Folder that you can find - & Attach all 4 to your next Post
Do not use Text Format Nor do you want to embed these [Reports] in your Post Only use [Attachment] Mode These [Reports] are Too Long to place in Post as text The Forum will truncate the [Reports] + The Report can be >20 pages
Complete the Following 2 Procedures [How to Make Everest HTML Reports] & [How to Attach Files to your Post]
____________________________________________________________________
PROCEDURE 1-[How to Make Everest HTML Reports]
Report-1: [wfelter-CPU]
1 Expand [COMPUTER] Folder
2 Click on [COMPUTER] Folder to Highlight
3 On Main Menu Click on [REPORT] >On Pop Up/Down menu Highlight [Quick Report-Summary] >Click on [HTML]
4 Save to File as [wfelter-CPU] & attach to POST See attachment instructions
Report 2: [wfelter-Mobo]
1 Expand [MOTHERBOARD] Folder
2 Click on [MOTHERBOARD] Folder [Main Folder] to Highlight
3 Click [REPORT] >[Quick Report-Motherboard] > [HTML]
4 Save to File as [wfelter-Mobo] & attach to POST See attachment instructions
Report 3 : [wfelter-Devices]
1 Expand [DEVICES] Folder
2 Click on [DEVICES] Folder to Highlight
3 Click [REPORT]>[Quick Report-Devices]> [HTML]
4 Save as File [wfelter-Devices] & attach to Post See attachment instructions
Report-4: [wfelter-SENSOR]
1 Expand [COMPUTER] Folder
2 Click on [SENSOR] Folder to Highlight
3 On Main Menu Click on [REPORT] >On Pop Up/Down menu Highlight [Quick Report-SENSOR] >Click on [HTML]
4 Save to File as [wfelter-Sensor] & attach to POST See attachment instructions
_______________________________________________________________________
PROCEDURE-2 [How to Add Attachment to Post]
1- Click On [Add a Reply]
2- Scroll down to bottom of [Reply Window] to [File Attachments]
3- Click [Browse] and then locate the [Everest Report Files] That you saved on your PC you will have to repeat this 4 times [1 for each report]
4- Click on file and open - it should now appear in [File Attachment] Window
5- Click on [UPLOAD] Button
6-Wait until it is added in [Manage Attachment] Window above
7- Right Click [Manage Attachment] Button Click on [Add Attach File] Drop down Icon (has green spot)
8- Repeat Steps [3 thru 7] to add the other attachments to attach to Post Otherwise skip & Go to step 9
9- You should be able to view all the attachments in your post - Click [Add Reply] Button to send Post
__________________________________________________________
Jack123
Edited by Jack123, 13 March 2007 - 09:57 PM.
#10

 Posted 14 March 2007 - 01:52 PM

It kept telling me I didn't have permission.What was problem Downloading Internet Connection Firewall -
Yeah. It's set at 90% in the BIOS and 100% with Fanspeed! With the adaptor on the fan it's 2058 RPM's. The CPU temp is still around 55* at idle.1880 rpm is only 58% ??
Attached Files
#11

 Posted 14 March 2007 - 06:32 PM

Well I went to Staples and purchased the fan with the adaptor. Hooked it up and can't get anymore speed out of the CPU fan. Can this be a defect in the fan?
Bummer No the fan is good I think it is a design feature? Probably have pin 2 of the 3-pin mini connector clamped at 6.0 VDC .
The problem with the PWM speed control If you get the fan running too fast & try to slow it down You get what you call [b[REGEN[/b] which is a braking action which puts power back into the line which your motherboard might not be too happy about This reverse voltage can be doubled or reaching 24V so by clamping at 6 volts the motherboard would be ok with 12V
I should have known that! I have seen that Movie Before Getting old I guess -
I think this fan was taken off the market?? You did not have much cooling with this fan It probably took ~ 3 VDC to get fan to rotate & then only had 3 Volts control you were operating in the lower 1/3rd range -
You just need a normal CPU Fan & use normal fan speed circuitry where you are working in the upper 1/3rd
I will look over the fan from Giga-Byte guess the fan fits your heat sink or do you have to change that also I havent looked at it yet -
You have to log/sign in first before you have permission It kept telling me I didn't have permission.
Here I revised the Adapter wiring a little Dont need it now but maybe one of the other views may find it useful I am upset that I left this problem sneak past me Can you send me some photos on this fan It has to have some electronics on it I just need to see the relationship of the input wiring electronics fan housing It needs to be neutered/bypassed
Revised Wiring Diagram
 01_REV_4_PIN_to_3_PIN_FAN_MINI_CONNECTOR_ADAPTER_WITH_RPM.pdf 41.45KB
503 downloads
01_REV_4_PIN_to_3_PIN_FAN_MINI_CONNECTOR_ADAPTER_WITH_RPM.pdf 41.45KB
503 downloadsJack123
Edited by Jack123, 14 March 2007 - 06:48 PM.
#12

 Posted 15 March 2007 - 12:42 AM

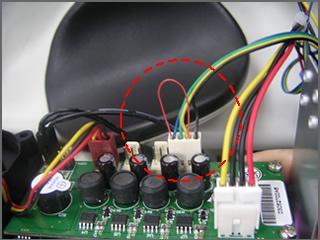 My only prob is the wires arn't colored. their all clear covering. Guess I could figure it out by the pin order though.
Vortex TX [ RR-UMR-P9U1 ]
Q: My cooler is used 4 PIN PWM fan, but my motherboard is not compatible with 4 PIN PWM function. Therefore, the PWM fan is working on the lowest speed. Do you have any solution to increase the speed of PWM fan?
A: You can find an extra wire and connect the 12V plus pin and PWM pin. Then PWM fan will work on the fastest speed.
The PIN function of PWM fan is:
P1 / Black color > Ground pin
P2 / Yellow color > Voltage Plus pin (12V)
P3 / Green color > Tachometer pin
P4 / Blue color > PWM pin
Note: It is possible the color of wires is different from ours, because it is set by manufacturer.
Edited by wfelter2000, 15 March 2007 - 12:47 AM.
#13

 Posted 15 March 2007 - 11:13 AM

Yeah I saw that, but there is more to it than just adding that jumper maybe I did not read enough of the answer before here is what I see
The PIN function of [4-pin PWM fan connector] is:
Pin-1 / Black color > Ground pin
Pin-2 / Yellow color > Voltage Plus pin (12V)
Pin-3 / Green color > Tachometer pin
Pin-4 / Blue color > PWM pin
The PIN function of [3-pin fan plug] for motherboard is:
Pin-1 / Black color > Ground pin
Pin-2 / Yellow color > Voltage Plus pin (12V)
Pin-3 / Green color > Tachometer pin
Photo attached -
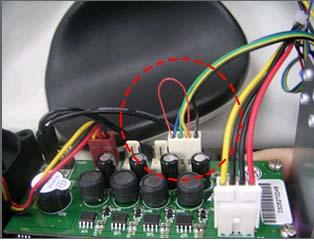
They key procedure of this operation is the How the 4-pin Connector is connected to the 3-pin motherboard connector
They are connecting the drive signal of the PWM fan to +12V. This drive signal is feed back from the PWM supported circuitry which you do have. So they tie this signal to +12 which is commanding the fan for full rpm.
Then they connect the 4-pin connector in such a manner that only pin 3- of motherboard is the only pin connected. This is the rpm sensor feedback for recording fan speed and to increase/decrease fan speed BUT It is connected to the FAN SENSE line and not the rpm sensor pin of the 4-pin PWM connector A little slight-of-the-hand black magic trick. That only the trained eye can see.
I do not know how detailed the connection instructions were. That is what I need for you to tell me. Right now all I think that you have to do is Connect this jumper on the 4-pin PWM connector and leave unconnected
Now if you have a DC Voltmeter Pins 1-(minus) & 2- (plus) will record 12 VDC whatever the 2 end pins that read 12 VDC means that the other end pin will be the Blue Wire-Pin-4 that you will jumper to Pin-2 Yellow
Now this is where I am not sure but I do not think you have to connect this 4-pin PWM connector You just need to tie those 2 pins together That goes with my explanation of the clamping to 6 volt theory
Apparently the clamping 6-volt-zener diode is between pin-4 and pin-2?? By shorting these 2 pins out negates the component.
Now it is possible that you need to feed pin-3 back with 12 Volt also this would give full fan speed recorded, but having a steady +12V state instead of a pulsating state may have a significant effect depending if tri-state circuitry is used?? Might be a reset when in a steady state -
I am getting old This knowledge used to be right there now I have to think about it Book cracking time -
I will get back with you later If you dont have a voltmeter I can direct you in another manner to determine proper pin out arrangement motherboard is too expensive to guess!!
Jack123
Edited by Jack123, 15 March 2007 - 11:28 AM.
#14

 Posted 15 March 2007 - 12:13 PM

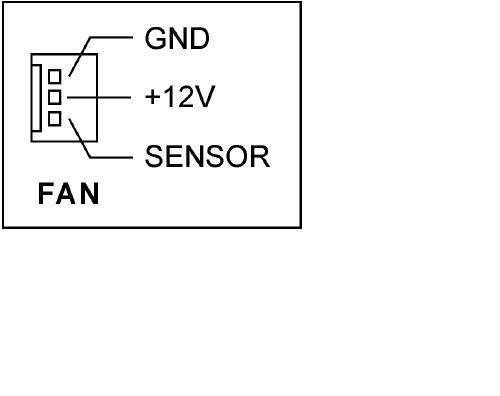 This is the connection for CPU1 fan. The cable on my cpu fan isn't color coded. It's a clear sheathed 4 wire cable. When hooked to mother board Pins 1,2,3 line up with mother board cpu1 fan connector, pin 4 on fan connector doesn't hook to anything. I hope I'm not confusing you as I've been using computers for 10 years now but never worked on them. This is my first build.
I have a craftsman digital voltmeter. I just have to pull the computer out so I can remove the side panel. Not much cable to work with.
#15

 Posted 16 March 2007 - 05:54 PM

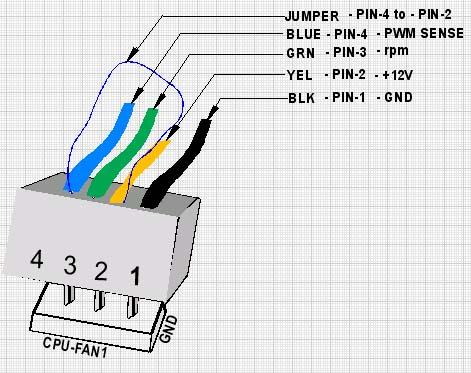
This is the connection for CPU1 fan. The cable on my cpu fan isn't color coded. It's a clear sheathed 4 wire cable. When hooked to mother board Pins 1,2,3 line up with mother board cpu1 fan connector, pin 4 on fan connector doesn't hook to anything.
Ok All you have to do is Jumper that unconnected pin 4 over to pin-2 This will permit the fan to work in the higher rpm range -
The 4-pin connector is uniquely keyed, so that it will correctly connect to the 3-pin or 4-pin motherboard fan connection
To correctly locate pin 4, simply connect the plug to the 3-pin connector The pin with no connection will be pin-4 -
Do not be concerned because pin-4 has no connection You are completing the circuit by connecting the +12V signal instead of the motherboard fan drive -
Refer to picture below -
Jack123
Edited by Jack123, 16 March 2007 - 06:01 PM.
Similar Topics
0 user(s) are reading this topic
0 members, 0 guests, 0 anonymous users
As Featured On:


 Sign In
 Create Account

