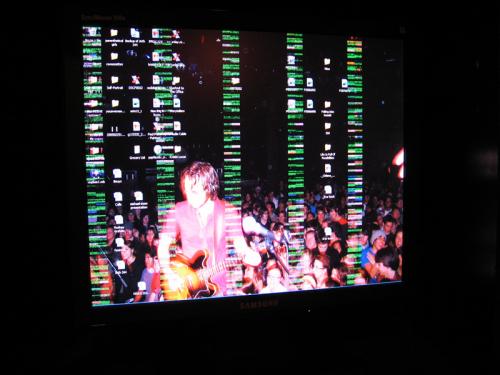
Display Problems (Not Mionitor's Fault)
Started by
gerrygauthier
, Apr 18 2007 09:01 PM
#1

 Posted 18 April 2007 - 09:01 PM

#2

 Posted 19 April 2007 - 05:51 AM

Hi gerrygauthier! Welcome to G2G!
I am betting that something in your computer is overheating. Lets confirm this...
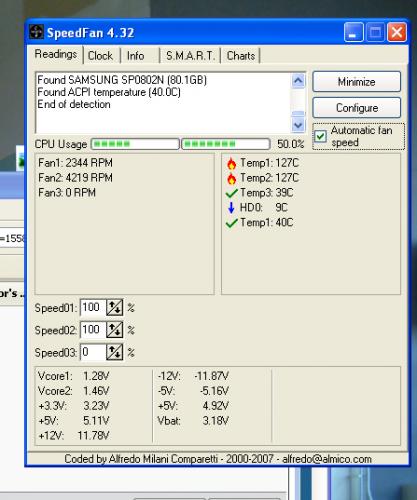
Download Speedfan (The download link is in the first line of the second paragraph), and install it. Once it's installed, run the program and post here the information it shows. The information I want you to post is the stuff that is circled in the example picture I have attached.

Fenor
I am betting that something in your computer is overheating. Lets confirm this...
Download Speedfan (The download link is in the first line of the second paragraph), and install it. Once it's installed, run the program and post here the information it shows. The information I want you to post is the stuff that is circled in the example picture I have attached.

Fenor
#3

 Posted 19 April 2007 - 10:12 AM

127
127
34
10
40
I'll post again later after my computer stays on for a little while. I have to go to school now.
127
34
10
40
I'll post again later after my computer stays on for a little while. I have to go to school now.
#4

 Posted 19 April 2007 - 10:23 AM

127??? That is VERY high! 
Please post what each of those numbers correspond to. ie - Temp1, Temp2, HDD0, Remote, etc...
FEnor
Please post what each of those numbers correspond to. ie - Temp1, Temp2, HDD0, Remote, etc...
FEnor
#5

 Posted 19 April 2007 - 12:14 PM

the 127's are for my fans, the 10 was for my hard drive, but the comp was only on for about five minutes, I'm not at home now, so I forget what the other two temps were unfortunately. I know that there were only two fan temps. Does it sound like they are the problem.
#6

 Posted 19 April 2007 - 12:23 PM

Fan's don't have temperatures. Can you post a screenshot of the program like I did above?
Fenor
Fenor
#7

 Posted 19 April 2007 - 01:10 PM

I'll be home in about two hours, I'll do it for you then. Thank you for all the help though. Will you be availabe in two hours?
#8

 Posted 19 April 2007 - 11:54 PM

#9

 Posted 20 April 2007 - 12:01 AM

#10

 Posted 20 April 2007 - 05:51 AM

Temp1 and Temp2 are definitely way too hot. Those two temperatures usually pertain to your CPU and System temperatures. I would check and make sure the heatsink is properly seated on the processor. I would remove it and reapply some thermal paste (good Artic Silver Thermal Compound is best) and then reseat the heatsink on the processor.
Fenor
Fenor
#11

 Posted 20 April 2007 - 12:13 PM

Thanks for the help, but I have no idea how to do that at all. Is that something I would be able to figure out and do on my own?
#12

 Posted 20 April 2007 - 12:46 PM

If you haven't done anything with the insides of a computer before, besides just replacing a hard drive or cd-rom drive, I would suggest that you have a friend who is more experienced take a look at it, because you can cause all sorts of damage to your system if you don't know what you are doing.
Now that being said, if you still want to try to do it, give me the make and model # of your computer if it's a prebuilt computer (like a Dell, HP, eMachine, etc...), or give me the motherboard make and model if it is a custom built computer and I will try to find you instructions on how you could do it yourself.
Fenor
#13

 Posted 20 April 2007 - 02:12 PM

The computer was custom built through Office Depot, it's a Systemax, the procesor is a P4 3.2ghz, and the Motherboard says P4TSV. I bought it about two years ago and have not upgraded since then.
#14

 Posted 20 April 2007 - 03:46 PM

The manual that is out on Biostar's website for your motherboard is pretty vague on doing anything with it (you can read the PDF HERE).
DO THE FOLLOWING AT YOUR OWN RISK!! I HAVE TRIED TO EXPLAIN IT AS BEST I CAN, BUT I DO NOT CLAIM RESPONSIBILITY FOR ANY DAMAGE HAPPENING TO YOUR COMPUTER RESULTING FROM THE FOLLOWING OF THE DIRECTIONS BELOW. IF YOU ARE UNCERTAIN ABOUT WHAT TO DO, THEN DON'T DO IT AND ASK SOMEONE ELSE YOU KNOW THAT IS MORE KNOWLEDGABLE ON THESE MATTERS.
Basically the heatstink is attached to the motherboard by a clip on the top and bottom of the processor slot on the motherboard. (Note: Top and Bottom are referring to the top and bottom if you were looking at your motherboard while your computer tower is standing upright). You need to release these clips one at a time. Of course do not release the clips unless the motherboard is flat on the ground with the heatstink facing up, and the power cord is disconnected from the computer. Also make sure you don't accidentally touch, scratch or bend any part on the motherboard. ALSO MAKE SURE THAT YOU ARE GROUNDED, MEANING THAT BEFORE YOU TOUCH ANYTHING INSIDE THE CASE, MAKE SURE YOU ARE NOT WEARING ONLY SOCKS, ARE NOT ON A CARPETED SURFACE AND THAT YOU TOUCH PART OF THE INSIDE OF THE CASE THAT IS METAL BUT NOT A COMPONENT OF THE COMPUTER OR ANY PERIPHERAL (AKA HARD DRIVE, VIDEO CARD, SOUND CARD, ETC...) BEFORE TOUCHING ANY PART OF THE MOTHERBOARD OR OTHER COMPUTER COMPONENT.
Once you release both of the clips, unplug the fan power cord from the motherboard and remove the heatsink from the motherboard by lifting up and away from the motherboard so you don't damage anything. Once you have the heatsink removed, take a paper tower and GENTLY remove the hardened thermal compound from the top of the processor. Again making sure you don't touch, scratch or bend any part of the motherboard.
Once you have removed all the thermal compound from the processor, take some new thermal compound (preferably some Arctic Silver, which is what I recommend.) and spread it evenly (but THINLY!) over the processor, making sure not to get any of it any other part of the motherboard. DO NOT use your fingers to spread the thermal compound around, because the oils on your fingers counteract the heat dissipating properties of the thermal compound. What I have found best for spreading the thermal compound around is to take a small zip lock (or any plastic) bag and turn it inside out and stick your hand inside and use just ONE finger to GENTLY and evenly spread the thermal compound over the ENTIRE surface of the processor.
Once you have the thermal compound evenly spread over the processor, you can reseat the heatsink by hooking the top clip and then pushing down the other clip (ONLY ON THE METAL PART OF THE CLIP, NOT ANY PART OF THE HEATSINK) to lock it into place on the motherboard. Once the heatsink is attached, reattach the power cord for the fan on the heatstink to the motherboard.
Now turn the computer upright, move it back to where it normally is, plug in everything and then turn it on and post back how the temperatures are now.
Fenor
Edited by Fenor, 20 April 2007 - 03:50 PM.
#15

 Posted 20 April 2007 - 07:03 PM

Before I do this, are you sure that it is what is causing the problem.
Similar Topics
0 user(s) are reading this topic
0 members, 0 guests, 0 anonymous users
As Featured On:


 Sign In
 Create Account

