Jump to content

Welcome to Geeks to Go - Register now for FREE

Need help with your computer or device? Want to learn new tech skills? You're in the right place!
Geeks to Go is a friendly community of tech experts who can solve any problem you have. Just create a free account and post your question. Our volunteers will reply quickly and guide you through the steps. Don't let tech troubles stop you. Join Geeks to Go now and get the support you need!

How it Works Create Account
Photo

hp officejet d135 printer: "scanner failure"


  • Please log in to reply

#1
radiorunner

radiorunner

    Member

  • Member
  • PipPip
  • 60 posts
get following message on older hp officejet d135 printer: "Scanner failure. Turn power off then turn on again." message after printer is turned on. even with this message it prints good looking documents from the pc & I can receive faxes but haven't been able to copy or send out faxes in some time.

i read that scanner failure message is common on those hp officejet printers & that it may be caused by a dirty scanner glass & scanner bulb, & if they are cleaned then the message may go away & copy features restored.

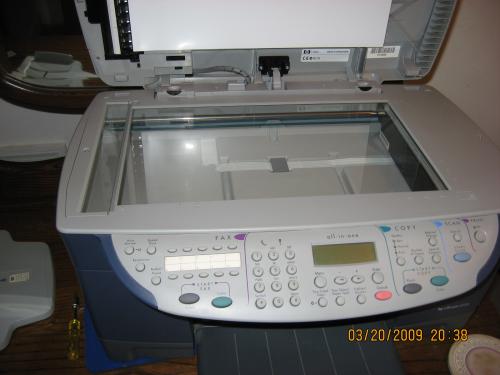
I can remove the 4 torx head screws but can't figure out how to remove the scanner glass to clean it. attached is a photo of printer. sure appreciate hearing if anyone has any ideas how i can gently remove the glass (from underneath? or from top? I can't seem to lift it out from the top)

thanks!

Attached Thumbnails

  • Picture_033.jpg

  • 0

Advertisements


#2
happyrock

happyrock

    Tech Moderator

  • Retired Staff
  • 9,285 posts
go here and get your TWAIN drivers...install them...
you will have to Enter a product name / number first
  • 0

#3
st0ll3n

st0ll3n

    Member

  • Member
  • PipPip
  • 12 posts
radio runner,

make sure the scanner lamp is comming on.. If not scratch the rest and take to a copier shop.

You will have to take all the lower skins off, the wiring to the scanner unit are under these skins, then there are a few screws that allow the scanner unit to move to either the back front or the side once removed, so the scanner can be removed from the print portion of the machine. Label everything. Once off, the screws that allow you to get into the optics are on the bottom of the scanner, the bottom comes off(up side down) then you flip over, and dissasemble the scanner unit... which are a bunch of picky mirrors(dust free rag, and no streaks)... once you pull the mirrors out and clean, clean the scan slit glass, and the main glass, also, there is a white plate under side of the scanner top skin... this white plate lets the machine see true white... if it can't read a measurable true white, then it throws a code, so clean the white plate just the same as the mirrors. Also make sure there is no dust on the lense inside the scanner unit(looks like a camera lense) do not touch the lense if you don't have to, just blow(spitless) on the lense if you can to remove any dust.

I have worked on this machine before, and even an expierienced tech it takes some time to go through.. prolly about an hour for the whole machine. You might consider taking it to your local printer repair shop.. Most give a 50-100$ initial cost without parts... since this seems to be a no parts issue, it should be cheep
  • 0


Similar Topics

0 user(s) are reading this topic

0 members, 0 guests, 0 anonymous users

As Featured On:

Microsoft Yahoo BBC MSN PC Magazine Washington Post HP