Jump to content

Welcome to Geeks to Go - Register now for FREE

Need help with your computer or device? Want to learn new tech skills? You're in the right place!
Geeks to Go is a friendly community of tech experts who can solve any problem you have. Just create a free account and post your question. Our volunteers will reply quickly and guide you through the steps. Don't let tech troubles stop you. Join Geeks to Go now and get the support you need!

How it Works Create Account
Photo

Random Restarts


  • Please log in to reply

#1
cphillips

cphillips

    Member

  • Member
  • PipPip
  • 63 posts
Hi,

I recently had a Mal-Ware problem, which I was helped with here and I am also having problems with random restarts of my computer. I was referred over here by jwang01 as he feels that someone here would be better equipped to assist me.

Sometimes Flash will restart my computer, but other times it will just restart. One of those times appears to be when my AVG starts for it's scheduled scan at 3 AM. When I get to the computer in the morning it has been restarted and looking at the AVG history it appears that the scan starts but no files are ever scanned.

I do not get the blue screen of death, just a restart of my computer.
  • 0

Advertisements


#2
rshaffer61

rshaffer61

    Moderator

  • Moderator
  • 34,114 posts
Hi Cphillips and lets see what we can find. Please do the following in order and reply with the requested logs.

Download Autoruns from the link in my signature below:
1: Extract the Autoruns Zip file contents to a folder.
2: Double-click the "Autoruns.exe".
3: Click on the "Everything" tab
4: Remove any entries that mention "File Not Found" by right-clicking the entry and select Delete.
5: Go to File then to Export As or Save in some versions.
6: Save AutoRuns.txt file to known location like your Desktop.
7: Attach to your next reply.


Download WhoCrashed from the link in my signature below
This program checks for any drivers which may have been causing your computer to crash....

Click on the file you just downloaded and run it.
Put a tick in Accept then click on Next
Put a tick in the Don't create a start menu folder then click Next
Put a tick in Create a Desktop Icon then click on Install and make sure there is a tick in Launch Whocrashed before clicking Finish
Click Analyze
It will want to download the Debugger and install it Say Yes
WhoCrashed will create report but you have to scroll down to see it
Copy and paste it into your next reply


Download Speedfan (The download link is to the right), and install it. Once it's installed, run the program and post here the information it shows.
The information I want you to post is the stuff that is circled in the example picture I have attached.
To make sure we are getting all the correct information it would help us if you were to attach a screenshot like the one below of your Speedfan results.

To do a screenshot please have click on your Print Screen on your keyboard.
  • It is normally the key above your number pad between the F12 key and the Scroll Lock key
  • Now go to Start and then to All Programs
  • Scroll to Accessories and then click on Paint
  • In the Empty White Area click and hold the CTRL key and then click the V
  • Go to the File option at the top and click on Save as
  • Save as file type JPEG and save it to your Desktop
  • Attach it to your next reply

Posted Image
  • 0

#3
cphillips

cphillips

    Member

  • Topic Starter
  • Member
  • PipPip
  • 63 posts
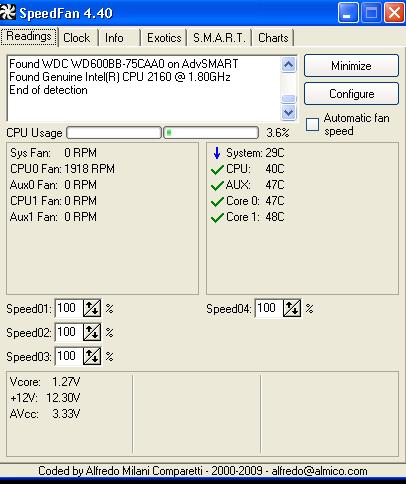
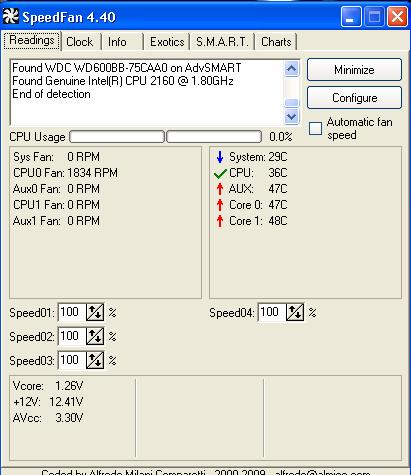
Hi, thanks for trying to help me. Here is the information you requested. I am attaching two screencaps of the Speedfan as it didn't stay constant.

Attached File  AutoRuns_012910.txt   112.87KB   139 downloads

--------------------------------------------------------------------------------
Analysis
--------------------------------------------------------------------------------

Crash dump directory: C:\WINDOWS\Minidump

Crash dumps are enabled on your computer.


On Fri 8/21/2009 1:02:16 PM your computer crashed
This was likely caused by the following module: ntoskrnl.exe
Bugcheck code: 0xC5 (0x0, 0x2, 0x0, 0x8055159A)
Error: DRIVER_CORRUPTED_EXPOOL
Dump file: C:\WINDOWS\Minidump\Mini082109-01.dmp
file path: C:\WINDOWS\system32\ntoskrnl.exe
product: Microsoft® Windows® Operating System
company: Microsoft Corporation
description: NT Kernel & System
The crash took place in a standard Microsoft module. Your system configuration may be incorrect, possibly the culprit may be another driver on your system which cannot be identified at this time.


On Wed 10/19/2005 1:50:21 AM your computer crashed
This was likely caused by the following module: stihp2k.sys
Bugcheck code: 0x1000007E (0xC0000005, 0xF580BAB7, 0xF9C7592C, 0xF9C75628)
Error: SYSTEM_THREAD_EXCEPTION_NOT_HANDLED_M
Dump file: C:\WINDOWS\Minidump\Mini101805-01.dmp
file path: C:\WINDOWS\system32\drivers\stihp2k.sys
product: Parallel Port Scanner Driver(EP1284)
company: Scm Microsystems Inc.
description: Parallel Port Scanner Driver(EP1284)


On Sat 5/10/2003 11:20:04 PM your computer crashed
This was likely caused by the following module: ntoskrnl.exe
Bugcheck code: 0x7F (0x0, 0x0, 0x0, 0x0)
Error: UNEXPECTED_KERNEL_MODE_TRAP
Dump file: C:\WINDOWS\Minidump\Mini051003-01.dmp
file path: C:\WINDOWS\system32\ntoskrnl.exe
product: Microsoft® Windows® Operating System
company: Microsoft Corporation
description: NT Kernel & System
The crash took place in a standard Microsoft module. Your system configuration may be incorrect, possibly the culprit may be another driver on your system which cannot be identified at this time.


--------------------------------------------------------------------------------
Conclusion
--------------------------------------------------------------------------------

3 crash dumps have been found and analyzed. Note that it's not always possible to state with certainty whether a reported driver is really responsible for crashing your system or that the root cause is in another module. Nonetheless it's suggested you look for updates for the products that these drivers belong to and regularly visit Windows update or enable automatic updates for Windows. In case a piece of malfunctioning hardware is causing trouble, a search with Google on the bug check errors together with the model name and brand of your computer may help you investigate this further.


012910_Speedfan.jpg


012910_Speedfan_945P.jpg
  • 0

#4
rshaffer61

rshaffer61

    Moderator

  • Moderator
  • 34,114 posts
Open Autoruns, click on "Logon" tab, and UN-check:

"igfxpers"
"igfxtray"
"iTunesHelper"
"QuickTime Task"
"Google Update"
"swg"


The next file needs to be manually disabled and is only needed if you use multi language on your keyboard. If you do then skip the step.


To turn off just ctfmon.exe go to:

Control Panel then to Regional and Language Options

Click on the Languages Tab then click the Details button

Click on the Advanced tab

Check the box that says Turn off advanced text services option

Click A and then OK


When done restart computer and then:


Download TFC by OldTimer to your desktop
  • Please double-click TFC.exe to run it. (Note: If you are running on Vista, right-click on the file and choose Run As Administrator).
  • It will close all programs when run, so make sure you have saved all your work before you begin.
  • Click the Start button to begin the process. Depending on how often you clean temp files, execution time should be anywhere from a few seconds to a minute or two. Let it run uninterrupted to completion.
  • Once it's finished it should reboot your machine. If it does not, please manually reboot the machine yourself to ensure a complete clean.


Download Auslogics Defrag from the link in my signature below. Auslogics Defrag in my opinion is better because:
It does a more comprehensive job at Defragging
It will actually show you what it is doing
At the end of working it will show you how much speed you picked up
You can view a online log of the files that Auslogics defragged


Let me know how the system is now running

Edited by rshaffer61, 30 January 2010 - 09:45 PM.

  • 0

#5
rshaffer61

rshaffer61

    Moderator

  • Moderator
  • 34,114 posts
Go to
Start and then to Run
Type in Chkdsk /r Note the space between k and /
Click Enter ...It will probably ask if you want to do this on the next reboot...click Y
If the window doesn't shutdown on its own then reboot the system manually. On reboot the system will start the chkdsk operation
This one will take longer then chkdsk /f

Note... there are 5 stages...
It may appear to hang at a certain percent for a hour or more or even back up and go over the same area...this is normal...
DO NOT SHUT YOUR COMPUTER DOWN WHILE CHKDSK IS RUNNING OR YOU CAN HAVE SEVERE PROBLEMS
This can take several hours to complete.
When completed it will boot the system back into windows.

Let me know if this fixes the problem
  • 0

#6
cphillips

cphillips

    Member

  • Topic Starter
  • Member
  • PipPip
  • 63 posts

Go to
Start and then to Run
Type in Chkdsk /r Note the space between k and /
Click Enter ...It will probably ask if you want to do this on the next reboot...click Y
If the window doesn't shutdown on its own then reboot the system manually. On reboot the system will start the chkdsk operation
This one will take longer then chkdsk /f

Note... there are 5 stages...
It may appear to hang at a certain percent for a hour or more or even back up and go over the same area...this is normal...
DO NOT SHUT YOUR COMPUTER DOWN WHILE CHKDSK IS RUNNING OR YOU CAN HAVE SEVERE PROBLEMS
This can take several hours to complete.
When completed it will boot the system back into windows.

Let me know if this fixes the problem


I followed these steps and when I did the restart of my computer a blue screen that said it was checking C came up and it was done within seconds saying the disk was clean and then Windows finished starting and nothing else happened. You said it could take hours, but this was literally seconds.
  • 0

#7
rshaffer61

rshaffer61

    Moderator

  • Moderator
  • 34,114 posts
Did you type it in exactly like this?

Type in Chkdsk /r Note the space between k and /

If not then it didn't do a full testing. There should have been 5 different test it ran.
  • 0

#8
cphillips

cphillips

    Member

  • Topic Starter
  • Member
  • PipPip
  • 63 posts
Yes, I typed it just like you indicated with the space.

Chkdsk_run_image.jpg

I keep looking at it and it looks correct to me.
  • 0

#9
rshaffer61

rshaffer61

    Moderator

  • Moderator
  • 34,114 posts
Is the system restarting still on its own?
  • 0

#10
The Skeptic

The Skeptic

    Trusted Tech

  • Technician
  • 4,075 posts
Download Memtest from here. Download the first option, unzip the file and burn the ISO file to a CD. For the CD burning download and install BurnCDCC from my links. It is a very simple program used only for ISO files burning. Boot the computer with the CD and let it run at least one full pass. There should not be any errors (red lines).
  • 0

Advertisements


#11
cphillips

cphillips

    Member

  • Topic Starter
  • Member
  • PipPip
  • 63 posts

Is the system restarting still on its own?

It has not restarted itself today. Had I done the chkdsk correctly?
  • 0

#12
rshaffer61

rshaffer61

    Moderator

  • Moderator
  • 34,114 posts
Well it finished a lot faster then it should have but if it is working now then it must have done something.
  • 0

#13
rshaffer61

rshaffer61

    Moderator

  • Moderator
  • 34,114 posts
I would add testing the memory would be something to check also just to make sure there is no problems there. just to add to The Skeptics instructions i am including the full set of what you will be looking at.

If you have more than one RAM module installed, try starting computer with one RAM stick at a time.

NOTE Keep in mind, the manual check listed above is always superior to the software check, listed below. DO NOT proceed with memtest, if you can go with option A

B. If you have only one RAM stick installed...
...run memtest...

1. Download - Pre-Compiled Bootable ISO (.zip)
2. Unzip downloaded memtest86+-2.11.iso.zip file.
3. Inside, you'll find memtest86+-2.11.iso file.
4. Download, and install ImgBurn: http://www.imgburn.com/
5. Insert blank CD into your CD drive.
6. Open ImgBurn, and click on Write image file to disc
7. Click on Browse for a file... icon:

Posted Image

8. Locate memtest86+-2.11.iso file, and click Open button.
9. Click on ImgBurn green arrow to start burning bootable memtest86 CD:

Posted Image

10. Once the CD is created, boot from it, and memtest will automatically start to run.

The running program will look something like this depending on the size and number of ram modules installed:


Posted Image

It's recommended to run 5-6 passes. Each pass contains very same 8 [b]tests
.

This will show the progress of the test. It can take a while. Be patient, or leave it running overnight.

Posted Image

The following image is the test results area:

Posted Image

The most important item here is the “errors” line. If you see ANY errors, even one, most likely, you have bad RAM.
  • 0

#14
cphillips

cphillips

    Member

  • Topic Starter
  • Member
  • PipPip
  • 63 posts

Download Memtest from here. Download the first option, unzip the file and burn the ISO file to a CD. For the CD burning download and install BurnCDCC from my links. It is a very simple program used only for ISO files burning. Boot the computer with the CD and let it run at least one full pass. There should not be any errors (red lines).


Nothing started when I restarted my computer. Maybe I am not doing this correctly but a bit more detail of what I should be looking for might be helpful.

What should be on the disc, what should it say.

Sorry, but I am not going to start pulling my computer apart and removing RAM, I do have two pieces installed.

Edited by cphillips, 31 January 2010 - 02:10 PM.

  • 0

#15
rshaffer61

rshaffer61

    Moderator

  • Moderator
  • 34,114 posts
Did you reset the bios so the cdrom was the first boot device?

To change Boot Sequence in your BIOS
Reboot the system and at the first post screen (where it is counting up memory) start tapping the DEL button
This will enter you into the Bios\Cmos area.
Find the Advanced area and click Enter
Look for Boot Sequence or Boot Options and highlight that click Enter
Now highlight the first drive and follow the directions on the bottom of the screen on how to modify it and change it to CDrom.
Change the second drive to the C or Main Drive
Once that is done then click F10 to Save and Exit
You will prompted to enter Y to verify Save and Exit. Click Y and the system will now reboot with the new settings.

Hopefully you have already put the Memtest86 cd in the drive before all this.
The cd will start with no help then

  • 0


Similar Topics

0 user(s) are reading this topic

0 members, 0 guests, 0 anonymous users

As Featured On:

Microsoft Yahoo BBC MSN PC Magazine Washington Post HP