

virus
Started by
ace in the hole
, Jan 16 2011 10:34 PM
-
 This topic is locked
#1

 Posted 16 January 2011 - 10:34 PM
ace in the hole
-
- Member
-

- 2 posts
New Member

#2
Posted 16 January 2011 - 10:37 PM
ace in the hole
- Topic Starter
-
- Member
-
- 2 posts
New Member
THIS IS WHAT MY NOTE BOOK BLUE SCREEN SAYS LIKE THE 1 SHOWN ON HERE WHEN I HIT F8AND THEN WENT TO STOP RESTARTING OR SOMETHING LIKE THAT
#3
 Posted 16 January 2011 - 11:19 PM
JSntgRvr
-

- Global Moderator
-

- 11,579 posts
Global Moderator
Hi, ace in the hole

IMPORTANT:
You will need a flash drive with a size of 512 Mb or bigger. Make sure that you do not leave anything important on the flash drive, as all data on it will be deleted during the following steps.
Save these instructions in the USB drive and keep it as reference.
Your bootable flash drive should now be ready!
IMPORTANT:
You will need a flash drive with a size of 512 Mb or bigger. Make sure that you do not leave anything important on the flash drive, as all data on it will be deleted during the following steps.
Save these instructions in the USB drive and keep it as reference.
- Download OTLPEStd.exe from the following link and save it to your Desktop: mirror1.
- Download eeepcfr.zip from the following link and save it to your Desktop: the mirror
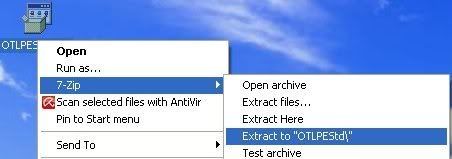
- Finally, if you do not have a file archiver like 7-zip or Winrar installed, please download 7-zip from the following link and install it: the mirror
- Download OTLPEStd.exe from the following link and save it to your Desktop: mirror1.
- Once you have 7-zip install, decompress OTLPEStd.exe by rightclicking on the folder and choosing the options shown in the picture below. Please use a dedicated folder, for example OTLPE, on your Desktop
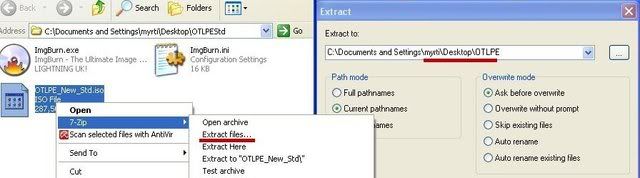
- Open the folder OTLPEStd which will be created in the same location as OTLPEStd.exe and right-click OTLPE_New_Std.iso. Select 7-Zip and from the submenu select Extract files... and extract the content onto your Desktop in a OTLPE folder:
- Please also decompress eeepcfr to your systemroot (usually C:\).
- Empty the flash drive you want to install OTLPE on, except for these instructions.
- Go to C:\eeecpfr and double-click usb_prep8.cmd to launch it.
- Press any key when asked to in the black window that opens.
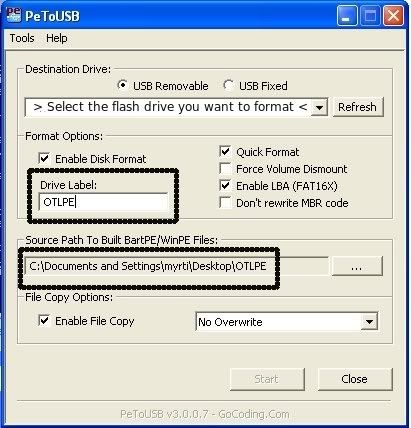
- As indicated in the image, make sure you have selected the correct flash drive, before proceeding.
For Drive Label: type in OTLPE.
Under Source Path to built BartPE/WinPE Files click ... and select the folder OTLPE that you created on your Desktop.
Finally check Enable File Copy.
- Click on Start, accept the disclaimers and wait for the program to finish.
Your bootable flash drive should now be ready!
- Boot the sick computer using the boot USB you just created. You must set the notebook to boot from the USB Drive. Consult the Notebook's documentation.
- Your system should now display a Reatogo desktop.
Note : as you are running from a USB drive it is not exactly speedy - Double-click on the OTLPE icon.
- When asked "Do you wish to load the remote registry", select Yes
- When asked "Do you wish to load remote user profile(s) for scanning", select Yes
- Ensure the box "Automatically Load All Remaining Users" is checked and press OK
- OTL should now start. Change the following settings
- Change Drivers to All
- Change Standard Registry to All
- Under the Custom Scan box paste this in
/md5start
UXTHEME.DLL
eventlog.dll
scecli.dll
netlogon.dll
cngaudit.dll
sceclt.dll
ntelogon.dll
logevent.dll
iaStor.sys
nvstor.sys
atapi.sys
IdeChnDr.sys
viasraid.sys
AGP440.sys
vaxscsi.sys
nvatabus.sys
viamraid.sys
nvata.sys
nvgts.sys
iastorv.sys
ViPrt.sys
eNetHook.dll
ahcix86.sys
KR10N.sys
nvstor32.sys
ahcix86s.sys
nvrd32.sys
userinit.exe
explorer.exe
winlogon.exe
ntoskrnl.exe
/md5stop
%SYSTEMDRIVE%\*.*
%systemroot%\*. /mp /s
%systemroot%\System32\config\*.sav
- Press Run Scan to start the scan.
- When finished, the file will be saved in drive C:\OTL.txt
- Copy this file to your USB drive.
- Please post the contents of the C:\OTL.txt file in your reply.


Similar Topics
0 user(s) are reading this topic
0 members, 0 guests, 0 anonymous users
As Featured On:


 Sign In
 Create Account
