Jump to content

Welcome to Geeks to Go - Register now for FREE

Need help with your computer or device? Want to learn new tech skills? You're in the right place!
Geeks to Go is a friendly community of tech experts who can solve any problem you have. Just create a free account and post your question. Our volunteers will reply quickly and guide you through the steps. Don't let tech troubles stop you. Join Geeks to Go now and get the support you need!

How it Works Create Account
Photo

System not booting because of virus


  • This topic is locked This topic is locked

#1
amnewone

amnewone

    New Member

  • Member
  • Pip
  • 6 posts
Hi

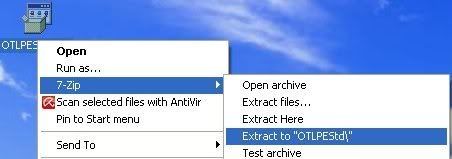
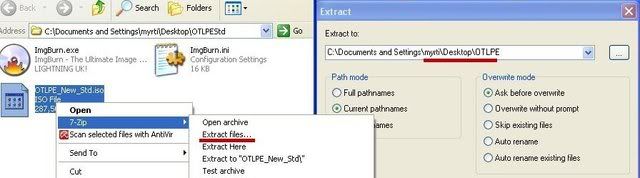
The day before yesterday I found viewdrive.exe (hidden file) in my C and D drives. On some search I immediately found that it's a virus. I tried to get some anti virus but found out that i am unable to open any antivirus website. I tried logging in in safe mode ( by going to msconfig and checking safe mode in boot.ini tab). when the system restarted it showed options to log in in safe mode or safe mode with networking etc. I tried all the option one by one and all the time a blue screen appears for a few seconds and system restarts once again. and it goes on and on.....

I am having windows Xp with service pack 3
and I have benq joylite with no CD ROM in it :D

Looking fwd for some help plzzz
  • 0

Advertisements


#2
Salagubang

Salagubang

    Trusted Helper

  • Malware Removal
  • 3,891 posts
Hi amnewone,

Sorry for the delay.

Welcome to Geekstogo. My name is Salagubang and I'll be helping you with this problem.

  • Please read all of my response through at least once before attempting to follow the procedures described. I would recommend printing them out, if you can, as you can check off each step as you complete it. If there's anything you don't understand or isn't totally clear, please come back to me for clarification.
  • Please do not attach any log files to your replies unless I specifically ask you. Instead please copy and paste so as to include the log in your reply. You can do this in separate posts if it's easier for you
  • English is not my first language, so please do not use slang or idioms, as this makes it difficult to understand for me.

Do you have an XP installation disk handy?

Restart your computer with Automatic Restart on System Failure disabled
  • You can do this by restarting your computer and continually tapping the F8 key until a menu appears.
    Use your up arrow key to highlight "Disable Automatic Restart on System Failure" then hit enter
    .

  • If windows failed to boot, windows will not restart and will show a blue screen indicating the source of the error as shown in the example below

    Posted Image
  • Copy the technical information (as shown in the above example enclosed in red boxes) and post it on your next response.

  • 0

#3
amnewone

amnewone

    New Member

  • Topic Starter
  • Member
  • Pip
  • 6 posts
thank you Salagubang

here is the information you asked for:

1- Stop: 0x0000007b
2- (0xF7A64524,0xC0000034,0x00000000,0x00000000)
3- there is nothing below this stop message so nothing for this option 3
  • 0

#4
Salagubang

Salagubang

    Trusted Helper

  • Malware Removal
  • 3,891 posts
Hi,

IMPORTANT:
You will need a flash drive with a size of 512 Mb or bigger. Make sure that you do not leave anything important on the flash drive, as all data on it will be deleted during the following steps.

    • Download OTLPEStd.exe from one of the following links and save it to your Desktop: mirror1 or mirror2
    • Download PetoUSB from the following link and save it to your Desktop: http://www.4shared.c...ToUSB_3008.html
    • Finally, if you do not have a file archiver like 7-zip or Winrar installed, please download 7-zip from the following link and install it: the mirror
  • Once you have 7-zip install, decompress OTLPEStd.exe by rightclicking on the folder and choosing the options shown in the picture below. Please use a dedicated folder, for example OTLPE, on your Desktop

    Posted Image
  • Open the folder OTLPEStd which will be created in the same location as OTLPEStd.exe and right-click OTLPE_New_Std.iso. Select 7-Zip and from the submenu select Extract files... and extract the content onto your Desktop in a OTLPE folder:

    Posted Image
  • Please also decompress PetoUSB to your Desktop.
  • Empty the flash drive you want to install OTLPE on.
  • Double-click PEtoUSB on your desktop to launch it.

    • Note: If you are using Windows 7, you must run PEtoUSB using XP compatibility mode. To do this:

      • Right-click on the PEtoUSB icon on your desktop and choose properties
      • Then, select Compatibility from the tabbed menu at the top of the properties page
      • Now, tick the "Run this program in compatibility mode for..." box and select the OS you wish to emulate. For most applications, it will be Windows XP SP2. Once you are done, click OK
      .
  • As indicated in the image, make sure you have selected the correct flash drive, before proceeding.
    For Drive Label: type in OTLPE.
    Under Source Path to built BartPE/WinPE Files click ... and select the folder OTLPE that you created on your Desktop.
    Finally check Enable File Copy.

    Posted Image
  • Click on Start, accept the disclaimers and wait for the program to finish.
Your bootable flash drive should now be ready!

Download the attached scan.txt and save it in your USB.
Attached File  scan.txt   384bytes   367 downloads

On the infected computer.

  • Reboot your system using USB you just created.
    Note : If you do not know how to set your computer to boot from USB follow the steps here
  • Your system should now display a Reatogo desktop.
  • Double-click on the OTLPE icon.
  • Select the Windows folder of the infected drive if it asks for a location
  • When asked "Do you wish to load the remote registry", select Yes
  • When asked "Do you wish to load remote user profile(s) for scanning", select Yes
  • Ensure the box "Automatically Load All Remaining Users" is checked and press OK
  • OTL should now start.
  • Double click Custom scans and fixes box, a dialogue box will appear. Choose the scan.txt saved previously on your USB drive.
  • Press Run Scan to start the scan.
  • When finished, the file will be saved in drive C:\OTL.txt
  • Copy this file to your USB drive if you do not have internet connection on this system.
  • Right click the file and select send to : select the USB drive.
  • Confirm that it has copied to the USB drive by selecting it
  • You can backup any files that you wish from this OS
  • Please post the contents of the C:\OTL.txt file in your reply.
[/indent]
  • 0

#5
amnewone

amnewone

    New Member

  • Topic Starter
  • Member
  • Pip
  • 6 posts
In PeToUSB when I am unable to select the source path...the "OK" is not enabled...also enable LBA option is disabled...
screen views are attached

Attached Thumbnails

  • SD1.jpg
  • SD2.jpg

  • 0

#6
Salagubang

Salagubang

    Trusted Helper

  • Malware Removal
  • 3,891 posts
In PEtoUSB sourcepath selection, try expanding the "Desktop" and see if you can locate where you extracted the OTLPE folder.
  • 0

#7
amnewone

amnewone

    New Member

  • Topic Starter
  • Member
  • Pip
  • 6 posts
i can locate the folder , but the OK button is not active whn i click that folder , OK button is never activated
moreover if i try to copy paste the path , it doesnt paste as well....
  • 0

#8
Salagubang

Salagubang

    Trusted Helper

  • Malware Removal
  • 3,891 posts
Alright, well try another tact.

On the clean computer.

Creating a bootable USB using xPUD
  • Please download the following files and save it to the desktop
  • Insert the USB device to be made bootable to the computer. (Make sure that no other USB's are inserted)
  • Double-click on unetbootin.exe to run
  • Select Disk Image, ISO and in the space provided, enter the path location of xpud-0.9.2.iso (ex. C:\Documents and Settings\yourusername\Desktop\xpud-0.9.2.iso)
    Alternatively, you can click on the browse button and locate the .iso file manually.
  • Select USB Drive type and the drive letter assigned to your USB stick.
  • Click "OK" and wait until the program finishes. You now have a bootable xPUD.
  • Download the following tool and save it inside the bootable USB


On the infected computer.
  • Reboot your system using the xPUD bootable USB you just created.
    Note : If you do not know how to set your computer to boot from USB follow the steps here
  • Your system should now display a xPUD desktop.
  • Select on the File icon; on the right pane click on the "mnt" folder and highlight "sdb1" - this is your USB device.
  • Click on the "Tool" menu and select Open Terminal
    Posted Image
  • In the open terminal window, type in the following:

    bash rst.sh
  • Press "Enter" and let it run uninterrupted.
    (The program lists available Restore Points and will save a report enum.log located in the USB drive.)
  • The program is finished when it say's "Done".
  • Next type

    bash driver.sh
  • Press Enter
  • After it has finished a report will be located on your USB drive named report.txt
  • Type "Exit" to close the terminal window.
  • Please attached the enum.log and the report.txt in your reply. (You may remove your USB drive when transferring log to a clean computer).

  • 0

#9
Salagubang

Salagubang

    Trusted Helper

  • Malware Removal
  • 3,891 posts
Due to lack of feedback, this topic has been closed.

If you need this topic reopened, please contact a staff member. This applies only to the original topic starter. Everyone else please begin a New Topic.
  • 0


Similar Topics

0 user(s) are reading this topic

0 members, 0 guests, 0 anonymous users

As Featured On:

Microsoft Yahoo BBC MSN PC Magazine Washington Post HP