Jump to content

Welcome to Geeks to Go - Register now for FREE

Need help with your computer or device? Want to learn new tech skills? You're in the right place!
Geeks to Go is a friendly community of tech experts who can solve any problem you have. Just create a free account and post your question. Our volunteers will reply quickly and guide you through the steps. Don't let tech troubles stop you. Join Geeks to Go now and get the support you need!

How it Works Create Account
Photo

Computer will randomly shutdown all the time :(


  • Please log in to reply

#1
BDahlin

BDahlin

    Member

  • Member
  • PipPip
  • 12 posts
About 2-3 times a day, it doesnt matter what I am doing on my computer, it will just shut down. It will close all my open windows and proceed to shutdown.
I have no idea whats wrong with it or why it is doing this? What can I do? Bad driver somewhere, hardware, or other software problem? What other information do you need? Running Windows 7. Thanks All!! :D

Edited by BDahlin, 30 March 2011 - 02:34 PM.

  • 0

Advertisements


#2
rshaffer61

rshaffer61

    Moderator

  • Moderator
  • 34,114 posts
Hello BDahlin.... Welcome to
GeeksToGo, :D
:D ;)

I'm sorry to hear about your issue. We will try to help you resolve this as soon as possible.
  • Please understand we are all volunteers and we are not here all the time.
  • Sometimes it may be a extended amount of time to get back to you. If it has been
    more then 3 days please shoot me a PM and I will try to get back to you quickly
    then.
  • Please do the following and supply the requested information as needed. If you
    don't understand my instructions please ask and I will try to explain them
    clearer for you.
  • Do not attempt any steps unless instructed or ask before to
    make sure they will not cause any further issues.


Please edit your original post and delete the log as we don't use them here in the Tech forums. Next please do the following and attach the requested screenshot.

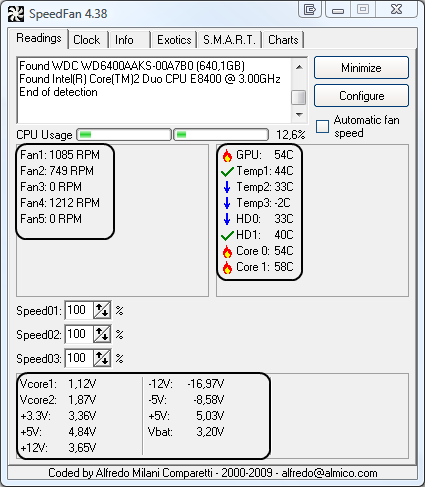
Download Speedfan (The download link is to the right), and install it. Once it's installed, run the program and post here the information it shows.
The information I want you to post is the stuff that is circled in the example picture I have attached.
To make sure we are getting all the correct information it would help us if you were to attach a screenshot like the one below of your Speedfan results.

To do a screenshot please have click on your Print Screen on your keyboard.
  • It is normally the key above your number pad between the F12 key and the Scroll Lock key
  • Now go to Start and then to All Programs
  • Scroll to Accessories and then click on Paint
  • In the Empty White Area click and hold the CTRL key and then click the V
  • Go to the File option at the top and click on Save as
  • Save as file type JPEG and save it to your Desktop
  • Attach it to your next reply

Posted Image
  • 0

#3
BDahlin

BDahlin

    Member

  • Topic Starter
  • Member
  • PipPip
  • 12 posts
Thanks RShaffer!

Screenshot of Speedfan
My CPU Usage % is all up and down all over the place

Attached Thumbnails

  • speedfan.jpg

  • 0

#4
rshaffer61

rshaffer61

    Moderator

  • Moderator
  • 34,114 posts
Well that didn't give me much info. Try this and lets see if we get more readings.

Motherboard Info:

Download SIW from HERE and get the Standalone English version
It will install itself and when finished

Then Click on SIW Icon to run program
On the left side click on the Motherboard directory and then on the right, copy and paste the information in your next reply
On the left side click on the Sensors directory and then on the right, copy and paste the information in your next reply

http://www.gtopala.c...w-download.html
  • 0

#5
BDahlin

BDahlin

    Member

  • Topic Starter
  • Member
  • PipPip
  • 12 posts
Haha, okay here :D


Motherboard:

Property Value
Manufacturer Gateway
Model SJV51_DN
Version V2.07
Serial Number LXWM80200201841F791601

North Bridge AMD 785GX Revision 00
South Bridge AMD SB850 Revision 00

CPU AMD Athlon™ II P320 Dual-Core Processor
Cpu Socket Socket S1 (638)

System Slots 1 PCI

Memory Summary
Maximum Capacity 4096 MBytes
Maximum Memory Module Size 4096 MBytes
Memory Slots 2
Error Correction None

Warning! Accuracy of DMI data cannot be guaranteed


Sensor:
Sensor Value Min Max
JACK-PC
ACPI
Temperatures
THRM 57 °C (134 °F) 57 °C (134 °F) 65 °C (148 °F)
AMD K10
Temperatures
Core #0 56 °C (133 °F) 55 °C (130 °F) 63 °C (145 °F)
Core #1 56 °C (132 °F) 55 °C (130 °F) 63 °C (145 °F)
Powers
Processor 12.75 W 5.32 W 21.15 W
TOSHIBA MK3265GSX
Temperatures
Assembly 37 °C (98 °F) 37 °C (98 °F) 37 °C (98 °F)
Battery 1
Voltages
Current Voltage 11.73 V 11.73 V 11.73 V
Capacities
Designed Capacity 47520 mWh 47520 mWh 47520 mWh
Full Charge Capacity 40889 mWh 40889 mWh 40889 mWh
Current Capacity 18814 mWh 18814 mWh 18814 mWh
Level
Wear Level 14 % 14 % 14 %
Charge Level 46 % 46 % 46 %
JACK-PC (Gateway NV53A)
ACPI
Temperatures
THRM 60 °C (139 °F) 57 °C (134 °F) 65 °C (148 °F)
AMD K10
Temperatures
Core #0 56 °C (132 °F) 55 °C (130 °F) 63 °C (145 °F)
Core #1 56 °C (131 °F) 55 °C (130 °F) 63 °C (145 °F)
Powers
Processor 5.32 W 5.32 W 21.15 W
TOSHIBA MK3265GSX
Temperatures
Assembly 37 °C (98 °F) 37 °C (98 °F) 37 °C (98 °F)
Battery 1
Voltages
Current Voltage 11.73 V 11.73 V 11.73 V
Capacities
Designed Capacity 47520 mWh 47520 mWh 47520 mWh
Full Charge Capacity 40889 mWh 40889 mWh 40889 mWh
Current Capacity 18814 mWh 18814 mWh 18814 mWh
Level
Wear Level 14 % 14 % 14 %
Charge Level 46 % 46 % 46 %
  • 0

#6
rshaffer61

rshaffer61

    Moderator

  • Moderator
  • 34,114 posts
OK moving on to the next item to test which is the memory.

If you have more than one RAM module installed, try starting computer with one RAM stick at a time.

NOTE Keep in mind, the manual check listed above is always superior to the software check, listed below. DO NOT proceed with memtest, if you can go with option A

B. If you have only one RAM stick installed...
...run memtest...

1. Download - Pre-Compiled Bootable ISO (.zip)
2. Unzip downloaded memtest86+-2.11.iso.zip file.
3. Inside, you'll find memtest86+-2.11.iso file.
4. Download, and install ImgBurn: http://www.imgburn.com/
5. Insert blank CD into your CD drive.
6. Open ImgBurn, and click on Write image file to disc
7. Click on Browse for a file... icon:

Posted Image

8. Locate memtest86+-2.11.iso file, and click Open button.
9. Click on ImgBurn green arrow to start burning bootable memtest86 CD:

Posted Image

10. Once the CD is created, boot from it, and memtest will automatically start to run. You may have to change the boot sequence in your BIOS to make it work right.

To change Boot Sequence in your BIOS

Reboot the system and at the first post screen (where it is counting up memory) start tapping the DEL button
This will enter you into the Bios\Cmos area.
Find the Advanced area and click Enter
Look for Boot Sequence or Boot Options and highlight that click Enter
Now highlight the first drive and follow the directions on the bottom of the screen on how to modify it and change it to CDrom.
Change the second drive to the C or Main Drive
Once that is done then click F10 to Save and Exit
You will prompted to enter Y to verify Save and Exit. Click Y and the system will now reboot with the new settings.


The running program will look something like this depending on the size and number of ram modules installed:


Posted Image

It's recommended to run 5-6 passes. Each pass contains very same 8 tests.

This will show the progress of the test. It can take a while. Be patient, or leave it running overnight.

Posted Image

The following image is the test results area:

Posted Image

The most important item here is the “errors” line. If you see ANY errors, even one, most likely, you have bad RAM.
  • 0


Similar Topics

0 user(s) are reading this topic

0 members, 0 guests, 0 anonymous users

As Featured On:

Microsoft Yahoo BBC MSN PC Magazine Washington Post HP