Jump to content

Welcome to Geeks to Go - Register now for FREE

Need help with your computer or device? Want to learn new tech skills? You're in the right place!
Geeks to Go is a friendly community of tech experts who can solve any problem you have. Just create a free account and post your question. Our volunteers will reply quickly and guide you through the steps. Don't let tech troubles stop you. Join Geeks to Go now and get the support you need!

How it Works Create Account
Photo

PC Won't Boot - CPU fans runs for a second and then stops


  • Please log in to reply

#1
Delemetri

Delemetri

    New Member

  • Member
  • Pip
  • 2 posts
Hello All,
I am a newbie to this forum, but I have a specific issue that I need your help with. My desktop has stopped booting. When I press the power button to power up, the CPU fan runs for about 1/2 second and then the stops and the process shuts down.
Diagnostic Steps I have taken so far.
I started by cleaning all of the dust out of the machine, paying special attention to the CPU sink. No Change
I unplugged all drives except main SATA hard drive and tried to boot. No Change
I unplugged the memory sticks one at a time and tried to boot. No Change
I tried the CMOS battery jumper reset and then tried to boot. No Change

Now I am thinking that I have narrowed it down to a couple of possible issues.
1. Power supply may be bad. This would normally be my first thought, but the exhibited behavior just doesn't seem right somehow. It is a new(6 months), but I have not way to test it for sure.
2. Mother Board/CPUIssue. Right now my best guess is that it is a motherboard or CPU issue of some sort. A couple of months ago, the computer kept resetting the date and time, so I figure that my CMOS battery is bad, but I dont see how that could cause the boot issue that I am having(I could be wrong though).

Any thoughts anyone could give would be great. I would hate to go get a new MC/CPU if it is not necessary.

System Vitals
MB - Asus M2N4-SLI
CPU - AMD ATHLON 64X2
VC - ASUS EN7600GS
HD - WD3200AAJS
RAM - 2 GIG KINGSTON DDR800
POWER SUPPLY - OCZ700SXS
  • 0

Advertisements


#2
Macboatmaster

Macboatmaster

    7k

  • Member
  • PipPipPipPipPipPipPipPip
  • 7,237 posts
Welcome to GeekstoGo

1.

I started by cleaning all of the dust out of the machine, paying special attention to the CPU sink. No Change

Was there a severe build up of dust please.?

2. With ONLY the motherboard and PSU, having removed the graphics and disconnected all drives etc and all I/O connections does the power then remain ON and the fans spin.

3.

A couple of months ago, the computer kept resetting the date and time

Indicates a flat CMOS battery if it is reset when powered off.
If however it is then powered on and the time and date reset and whilst the computer is ON - the time and date is then corrupted - a different issue entirely.

Re the power supply - there is no reliable way of testing that power supply without a PSU tester. Please forget any idea of using a muti-meter.

Please see this from our Power Supply expert here on GeesktoGo
- Digerati

To properly and conclusively test a power supply unit (PSU), it must be tested under various realistic "loads" then analyzed for excessive ripple and other anomalies. This is done by a qualified technician using an oscilloscope or power analyzer - sophisticated (and expensive) electronic test equipment requiring special training to operate, and a basic knowledge of electronics theory to understand the results. Therefore, conclusively testing a power supply is done in properly equipped electronic repair facilities.

Fortunately, there are other options that are almost as good. I keep a FrozenCPU Ultimate PSU Tester in my tool bag when I am "in the field" and don't have a good spare power supply to swap in. While not a certain test, they are better than nothing. The advantage of this model is that it has an LCD readout of the voltage. With an actual voltage readout, you have a better chance of detecting a "failing" PSU, or one barely within specified ATX Form Factor Standard tolerances. Lesser models use LEDs to indicate the voltage is just within some "range". These are less informative, considerably cheaper, but still useful for detecting PSUs that have already "failed". Newegg has several testers to choose from. All these testers contain a "dummy load" to fool the PSU into thinking it is connected to a motherboard, and therefore allows the PSU to power on, if able, without being attached to a motherboard - great for testing fans, but again, it is not a true load or suitable for conclusive testing.

Note the required voltage tolerance ranges:Posted Image
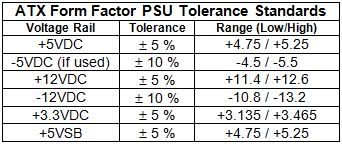
NOTE: Disregard the -5VDC reading. It is no longer used.

Swapping in a known good supply is a tried and true method of troubleshooting used for years, even by pros. If you have access to a suitably sized, spare power supply, carefully remove the suspect supply and replace it with the known good one, and see if the problem goes away.

I do not recommend using a multimeter to test power supplies. To do it properly, that is, under a realistic load, the voltages on all the pins must be measured while the PSU is attached to the motherboard and the computer powered on. This requires poking (with some considerable force) two hard and sharp, highly conductive meter probes into the main power connector, deep in the heart of the computer. One tiny slip can destroy the motherboard, and everything plugged into it. It is not worth the risk considering most multimeters, like plug-in testers, do not measure, or reveal any unwanted and potentially disruptive AC components to the DC voltages.

Note the ATX Form Factor standard does not "require" specific color coding for power supply connector wiring. It has recommendations but manufacturers often do not follow them. Sadly, many testing guides or tutorials will refer to wire color only and that can lead to improper testing.

The voltages can be checked in the BIOS Setup Menus of most motherboards but they do not reveal ripple or other anomalies either.

As always, before working in the interior of the computer case, take necessary ESD precautions to ensure static buildup in your body does not discharge through and destroy any sensitive devices. Unplug from the wall and touch bare metal of the case before reaching in. And remember, anything that plugs into the wall can kill. Do not open the power supply's case unless you are a qualified electronics technician. There are NO user-serviceable parts inside a power supply. If you do not have a tester or a suitable spare to swap in, take the PSU to a qualified technician for testing.

Edited by Macboatmaster, 03 September 2011 - 11:09 AM.

  • 1

#3
Macboatmaster

Macboatmaster

    7k

  • Member
  • PipPipPipPipPipPipPipPip
  • 7,237 posts
Further to my post above you may find this useful

Battery Failure
  • 1 Watch for a BIOS warning. If your system is equipped with a CMOS battery monitor, upon boot up, a warning message will appear to replace your CMOS battery. This will indicate imminent battery failure and the CMOS battery should be replaced. Most standard or home computers do not have this feature, however.
  • 2 Look for incorrect or changing time settings. One function of the CMOS is to maintain system time. If the CMOS battery is failing, a noticeable symptom is an invalid time showing within the operating system. This symptom is confirmed if time resets after the computer is restarted. Under these circumstances, the CMOS battery should be replaced.
  • 3 Watch for unexpected computer shut down or invalid hardware errors. Another function of the CMOS is to retain settings for your system's hardware, such as hard drives and RAM. If these stored setting are not available during operation, it can cause the computer system to unexpectedly shut off. To verify this symptom, check that all cables, both inside and outside the computer, are firmly attached. If the symptoms continue, replace the CMOS battery.
  • 4 Check the CMOS voltage. If you have a voltmeter or multimeter, the direct method of determining CMOS battery failure is to check the CMOS battery's voltage. Most new CMOS batteries produce 3 volts. When this voltage drops below 2.5, depending on the system, problems can appear. If the battery's voltage drops below 1.8 volts, CMOS battery failure is imminent. The following section will describe checking your CMOS battery with a voltmeter.
Checking the CMOS Battery Voltage
  • 1 Record the CMOS settings before you remove the battery. When your CMOS battery is removed, hardware settings stored in the CMOS will be lost. To record these settings, boot up your computer and enter the BIOS utility. Pressing the delete or F10 on most systems will start the BIOS utility. Write down any customized settings, such as hard drive configuration, CPU speed adjustments and external port deactivation.
  • 2 Shut off the computer and then remove the external cover using a Phillips screwdriver. Attach the antistatic wrist strap clip to the case housing. This will discharge any static electricity and preserve the computer's delicate electronics. Unplug the AC power cable from the power supply.
  • 3 Locate the CMOS battery on the motherboard (see picture). Remove any peripheral cards or cables that obscure access. Using a jeweler's flat-blade screwdriver, slowly pry back the metal holding clip while lifting the CMOS battery with a fingernail.
  • 4 Check the voltage of CMOS battery. Determine positive and negative polarity by the plus or negative sign engraved on top of the battery. Set the voltmeter to the lowest range above 3 volts. Apply the positive multimeter lead to the positive side and negative lead to the negative side. Read the voltage. If the meter reads below 2.5 volts, consider replacing. If it reads below 1.8 volts, replace CMOS battery.
  • 5 Place a new or functioning CMOS battery by pressing it firmly into the battery casing until the metal holding clip snaps into place. Replace any removed peripheral cards or cables. Replace the computer case and re-attach the power cable.
  • 6 Restart the computer and enter the BIOS, as described earlier. Select "load default BIOS settings" and then reconfigure customized settings to you wrote down earlier. Save settings and exit the BIOS utility.

Edited by Macboatmaster, 03 September 2011 - 11:21 AM.

  • 1

#4
Delemetri

Delemetri

    New Member

  • Topic Starter
  • Member
  • Pip
  • 2 posts
Thanks Mac, that was...comprehensive. To answer your question, yes there was considerable dust build-up.
I have not tried to start it with just the MB & PSU, but I will give it a shot.
The date/time only reset when comp was off for a while, and then booted. I will try replacing the CMOS battery today and see if that helps.
  • 0

#5
Macboatmaster

Macboatmaster

    7k

  • Member
  • PipPipPipPipPipPipPipPip
  • 7,237 posts
Delemetri

How are you going on with this please.
  • 0


Similar Topics

0 user(s) are reading this topic

0 members, 0 guests, 0 anonymous users

As Featured On:

Microsoft Yahoo BBC MSN PC Magazine Washington Post HP