

How to fix windows memory diagnostics, a disk read occured press ctrl+
Started by
MIse*
, Dec 25 2011 06:39 AM
#1

 Posted 25 December 2011 - 06:39 AM
MIse*
-
- Member
-

- 17 posts
Member

#2
Posted 25 December 2011 - 06:52 AM
rshaffer61
-

- Moderator
-

- 34,114 posts
Moderator
Two sets of instructions included. The first will determine if there is a hard drive error and the second is the memory diagnostics tool we use here at GTG most of the time.
Run hard drive diagnostics: http://www.tacktech....ay.cfm?ttid=287
Make sure, you select tool, which is appropriate for the brand of your hard drive.
Depending on the program, it'll create bootable floppy, or bootable CD.
If downloaded file is of .iso type, use ImgBurn: http://www.imgburn.com/ to burn .iso file to a CD (select "Write image file to disc" option), and make the CD bootable.
NOTE. If your hard drive is made by Toshiba, try the Hitachi DFT CD Image version of the software
Thanks to Broni for the instructions
If you have more than one RAM module installed, try starting computer with one RAM stick at a time.
NOTE Keep in mind, the manual check listed above is always superior to the software check, listed below. DO NOT proceed with memtest, if you can go with option A
B. If you have only one RAM stick installed...
...run memtest...
1. Download - Pre-Compiled Bootable ISO (.zip). If you prefer to use the USB version then use this link USB KEY
2. Unzip downloaded /memtest86+-4.20.iso.zip file.
3. Inside, you'll find /memtest86+-4.20.iso file.
4. Download, and install ImgBurn: http://www.imgburn.com/
5. Insert blank CD into your CD drive.
6. Open ImgBurn, and click on Write image file to disc
7. Click on Browse for a file... icon:

8. Locate memtest86+-4.20.iso file, and click Open button.
9. Click on ImgBurn green arrow to start burning bootable memtest86 CD:

10. Once the CD is created, boot from it, and memtest will automatically start to run. You may have to change the boot sequence in your BIOS to make it work right.
To change Boot Sequence in your BIOS
Reboot the system and at the first post screen (where it is counting up memory) start tapping the DEL button
This will enter you into the Bios\Cmos area.
Find the Advanced area and click Enter
Look for Boot Sequence or Boot Options and highlight that click Enter
Now highlight the first drive and follow the directions on the bottom of the screen on how to modify it and change it to CDrom.
Change the second drive to the C or Main Drive
Once that is done then click F10 to Save and Exit
You will prompted to enter Y to verify Save and Exit. Click Y and the system will now reboot with the new settings.
The running program will look something like this depending on the size and number of ram modules installed:

It's recommended to run 5-6 passes. Each pass contains very same 8 tests.
This will show the progress of the test. It can take a while. Be patient, or leave it running overnight.

The following image is the test results area:

The most important item here is the errors line. If you see ANY errors, even one, most likely, you have bad RAM.
Run hard drive diagnostics: http://www.tacktech....ay.cfm?ttid=287
Make sure, you select tool, which is appropriate for the brand of your hard drive.
Depending on the program, it'll create bootable floppy, or bootable CD.
If downloaded file is of .iso type, use ImgBurn: http://www.imgburn.com/ to burn .iso file to a CD (select "Write image file to disc" option), and make the CD bootable.
NOTE. If your hard drive is made by Toshiba, try the Hitachi DFT CD Image version of the software
Thanks to Broni for the instructions
If you have more than one RAM module installed, try starting computer with one RAM stick at a time.
NOTE Keep in mind, the manual check listed above is always superior to the software check, listed below. DO NOT proceed with memtest, if you can go with option A
B. If you have only one RAM stick installed...
...run memtest...
1. Download - Pre-Compiled Bootable ISO (.zip). If you prefer to use the USB version then use this link USB KEY
2. Unzip downloaded /memtest86+-4.20.iso.zip file.
3. Inside, you'll find /memtest86+-4.20.iso file.
4. Download, and install ImgBurn: http://www.imgburn.com/
5. Insert blank CD into your CD drive.
6. Open ImgBurn, and click on Write image file to disc
7. Click on Browse for a file... icon:
8. Locate memtest86+-4.20.iso file, and click Open button.
9. Click on ImgBurn green arrow to start burning bootable memtest86 CD:
10. Once the CD is created, boot from it, and memtest will automatically start to run. You may have to change the boot sequence in your BIOS to make it work right.
To change Boot Sequence in your BIOS
Reboot the system and at the first post screen (where it is counting up memory) start tapping the DEL button
This will enter you into the Bios\Cmos area.
Find the Advanced area and click Enter
Look for Boot Sequence or Boot Options and highlight that click Enter
Now highlight the first drive and follow the directions on the bottom of the screen on how to modify it and change it to CDrom.
Change the second drive to the C or Main Drive
Once that is done then click F10 to Save and Exit
You will prompted to enter Y to verify Save and Exit. Click Y and the system will now reboot with the new settings.
The running program will look something like this depending on the size and number of ram modules installed:
It's recommended to run 5-6 passes. Each pass contains very same 8 tests.
This will show the progress of the test. It can take a while. Be patient, or leave it running overnight.
The following image is the test results area:
The most important item here is the errors line. If you see ANY errors, even one, most likely, you have bad RAM.
#3
Posted 25 December 2011 - 07:51 AM
MIse*
- Topic Starter
-
- Member
-
- 17 posts
Member
Four questions
1,what can cause bad ram ?
2,if i have bad ram is it a must to change it ?
3,how do i know who made my hard drive ?
4,can't i just re install windows 7 and format my computer ? If i can,HOW ?
1,what can cause bad ram ?
2,if i have bad ram is it a must to change it ?
3,how do i know who made my hard drive ?
4,can't i just re install windows 7 and format my computer ? If i can,HOW ?
Edited by MIse*, 25 December 2011 - 07:54 AM.
#4
Posted 25 December 2011 - 08:23 AM
rshaffer61
-
- Moderator
-
- 34,114 posts
Moderator
Like any electronic component it can eventually go bad overtime or may be defective1,what can cause bad ram ?
Yes as it can cause more then just BSOD's. Freezing, loss of data, shutdowns, slowness are only a few of the indications of bad memory.2,if i have bad ram is it a must to change it ?
On the bottom of the laptop you can see a cover that is marked as HDD or Hard Drive. You remove the screw holdign the cover in place and you can then see your hard drive. The manufacturer should be marked on the drive. If not the model number will help me tell you who made it.3,how do i know who made my hard drive ?
Reinstallation of the OS will not resolve the issue if the problem is a bad hard drive or memory. The issue also is if the hard drive is bad then then recovery partition may be damaged also which may cause any reinstallation to fail.4,can't i just re install windows 7 and format my computer ? If i can,HOW ?
#5
Posted 26 December 2011 - 11:00 AM
MIse*
- Topic Starter
-
- Member
-
- 17 posts
Member
I am kind of busy this whole weak so i will post back what happend next week thanks guys
#6
Posted 27 December 2011 - 10:44 AM
MIse*
- Topic Starter
-
- Member
-
- 17 posts
Member
I know i said i was busy but you know i am so anxious to know what would happen if memtest has know error meaning i don't have bad ram what should i do then,and how can i stop windows memory dignoastic before booting cause i can't boot in
#7
Posted 27 December 2011 - 11:15 AM
rshaffer61
-
- Moderator
-
- 34,114 posts
Moderator
Let me know when memtest has been run and what the results are.
#8
Posted 19 January 2012 - 08:32 AM
MIse*
- Topic Starter
-
- Member
-
- 17 posts
Member
i am so sorry i had a test and so much [bleep] on my [bleep] any ways i managed to download memtest and my memory came up with no errors so what should i do next remember that i dont have a windows cd so tell me everything step by step also if you know any free downloadable repair software that might help me with this problem tell me everything you know because the final exam is this weekend and i may not post back for quite while thx and bye oh also will one toshiba repair disk work on all toshiba brands
Edited by MIse*, 19 January 2012 - 08:36 AM.
#9
Posted 19 January 2012 - 08:33 AM
MIse*
- Topic Starter
-
- Member
-
- 17 posts
Member
Thx for understanding
Edited by MIse*, 19 January 2012 - 08:38 AM.
#10
Posted 19 January 2012 - 08:50 AM
rshaffer61
-
- Moderator
-
- 34,114 posts
Moderator
I don't see any reference to the hard drive test being done. 
If you are not sure what manufacturer it is I suggest you follow the instructions from post 2 and download the Sea Tools Dos CD ISO and burn it per the instructions.
Run it to test the hard drive as it is compatible with most hard drive manufacturers.
If you are not sure what manufacturer it is I suggest you follow the instructions from post 2 and download the Sea Tools Dos CD ISO and burn it per the instructions.
Run it to test the hard drive as it is compatible with most hard drive manufacturers.
#11
Posted 02 February 2012 - 07:15 AM
MIse*
- Topic Starter
-
- Member
-
- 17 posts
Member
So,i run hard drive sentinel from hiren's boot cd then it says my hard disk has 83 bad sectors and is 52% healthy the thing is i messed up the partition and accidently deleted it using HBCD it self,now after reboot it says,missing operating systeam,the thing is in HBCD there is a mini xp and in there i can mount my deleted partition and backup my files in a flash disk,now my question is should i format my hard disk,the partion and every thing and install windows freash in a new partion ? Thx
#12
Posted 02 February 2012 - 07:18 AM
rshaffer61
-
- Moderator
-
- 34,114 posts
Moderator
Please use the manufacturers hard drive diagnostics as that will be more accurate then Hirens. We do not recommend using Hirens because of a issue with programs included in the disk.
Run hard drive diagnostics: http://www.tacktech....ay.cfm?ttid=287
Make sure, you select tool, which is appropriate for the brand of your hard drive.
Depending on the program, it'll create bootable floppy, or bootable CD.
If downloaded file is of .iso type, use ImgBurn: http://www.imgburn.com/ to burn .iso file to a CD (select "Write image file to disc" option), and make the CD bootable.
NOTE. If your hard drive is made by Toshiba, try the Hitachi DFT CD Image version of the software
Thanks to Broni for the instructions
The data can be retrieved as long as the drive mechanically is working by using a Linux Live cd.
Use Puppy Linux Live CD to Recover Your Data:
===================
***Required Hardware***
CD Burner (CDRW) Drive,
Blank CD,
Extra Storage Device (USB Flash Drive, External Hard Drive)
===================
1. Save these files to your Desktop/Burn Your Live CD:
2. Set your boot priority in the BIOS to CD-ROM first, Hard Drive Second
3. Recover Your Data
Remember to only click once! No double clicking! Once you drag and drop your first folder, you will notice a small menu will appear giving you the option to move or copy. Choose COPY each time you drag and drop.
YOU ARE DONE!!! Simply click Menu >> Mouse Over Shutdown >> Reboot/Turn Off Computer. Be sure to plug your USB Drive into another working windows machine to verify all data is there and transferred without corruption. Congratulations!
If you're doing this to recovery from a virus or malware infection, (or even if you're not), DO NOT copy executable files (.exe, .scr. etc...) if any of these files are infected you could be copying the corruption over to any new device/computer. just copy documents, pictures, music, or videos.
Run hard drive diagnostics: http://www.tacktech....ay.cfm?ttid=287
Make sure, you select tool, which is appropriate for the brand of your hard drive.
Depending on the program, it'll create bootable floppy, or bootable CD.
If downloaded file is of .iso type, use ImgBurn: http://www.imgburn.com/ to burn .iso file to a CD (select "Write image file to disc" option), and make the CD bootable.
NOTE. If your hard drive is made by Toshiba, try the Hitachi DFT CD Image version of the software
Thanks to Broni for the instructions
The data can be retrieved as long as the drive mechanically is working by using a Linux Live cd.
Use Puppy Linux Live CD to Recover Your Data:
===================
***Required Hardware***
CD Burner (CDRW) Drive,
Blank CD,
Extra Storage Device (USB Flash Drive, External Hard Drive)
===================
1. Save these files to your Desktop/Burn Your Live CD:
- Download Latest Puppy Linux ISO (i.e.: lupu-520.iso)
Download BurnCDCC ISO Burning Software
- Open BurnCDCC with Windows Explorer
- Extract All files to a location you can remember
- Double Click
 BurnCDCC
 - Click Browse
 and navigate to the Puppy Linux ISO file you just downloaded
 - Open/Double Click that file
IMPORTANT: Adjust the speed bar to CD: 4x DVD: 1x - Click Start

- Your CD Burner Tray will open automatically
- Insert a blank CD and close the tray
- Click OK
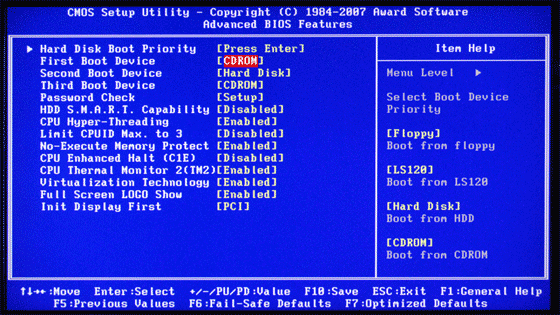
2. Set your boot priority in the BIOS to CD-ROM first, Hard Drive Second
- Start the computer/press the power button
- Immediately start tapping the appropriate key to enter the BIOS, aka "Setup"
(Usually shown during the "Dell" screen, or "Gateway" Screen) - Once in the BIOS, under Advanced BIOS Options change boot priority to:
CD-ROM 1st, Hard Drive 2nd - Open your ROM drive and insert the disk
- Press F10 to save and exit
- Agree with "Y" to continue
- Your computer will restart and boot from the Puppy Linux Live CD
3. Recover Your Data
- Once Puppy Linux has loaded, it is actually running in your computer's Memory (RAM). You will see a fully functioning Graphical User Interface similar to what you normally call "your computer". Internet access may or may not be available depending on your machine, so it is recommended you print these instructions before beginning. Also, double clicking is not needed in Puppy. To expand, or open folders/icons, just click once. Puppy is very light on resources, so you will quickly notice it is much speedier than you are used to. This is normal. Ready? Let's get started.
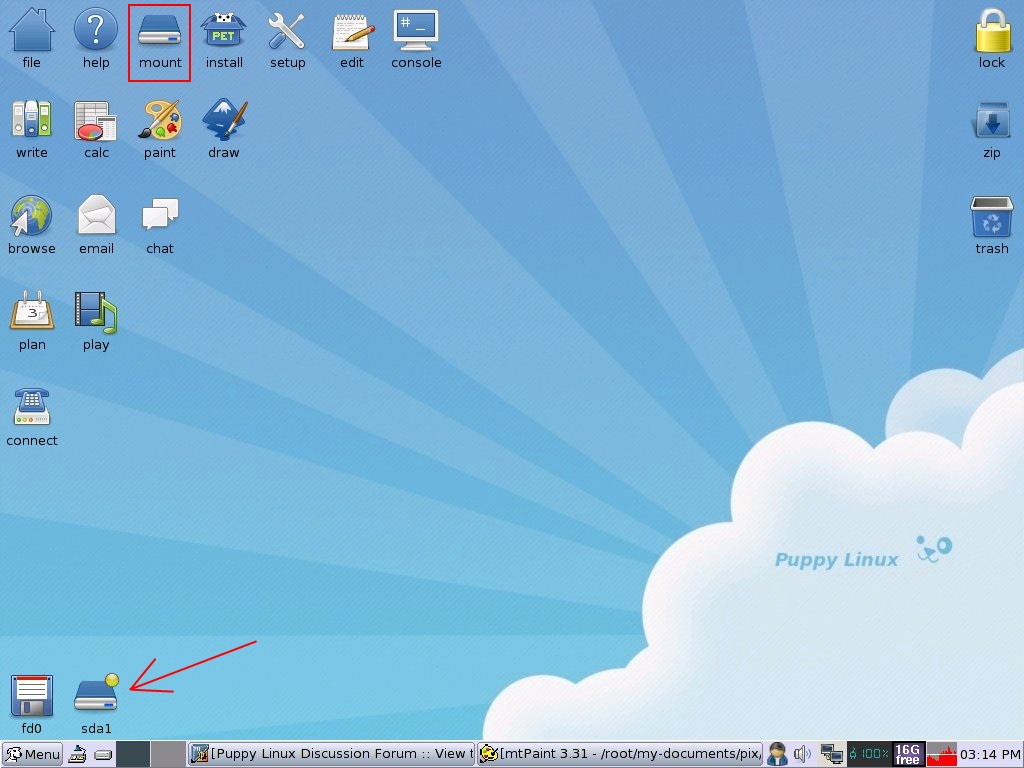
3a. Mount Drives - Click the Mount Icon located at the top left of your desktop.

- A Window will open. By default, the "drive" tab will be forward/highlighted. Click on Mount for your hard drive.
- Assuming you only have one hard drive and/or partition, there may be only one selection to mount.
- USB Flash Drives usually automatically mount upon boot, but click the "usbdrv" tab and make sure it is mounted.
- If using an external hard drive for the data recovery, do this under the "drive" tab. Mount it now.
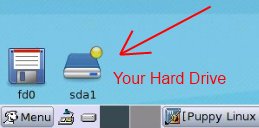
- At the bottom left of your desktop a list of all hard drives/partitions, USB Drives, and Optical Drives are listed with a familiar looking hard drive icon.
- Open your old hard drive i.e. sda1
- Next, open your USB Flash Drive or External Drive. i.e. sdc or sdb1
- If you open the wrong drive, simply X out at the top right corner of the window that opens. (Just like in Windows)
- From your old hard drive, drag and drop whatever files/folders you wish to transfer to your USB Drive's Window.
Remember to only click once! No double clicking! Once you drag and drop your first folder, you will notice a small menu will appear giving you the option to move or copy. Choose COPY each time you drag and drop.
YOU ARE DONE!!! Simply click Menu >> Mouse Over Shutdown >> Reboot/Turn Off Computer. Be sure to plug your USB Drive into another working windows machine to verify all data is there and transferred without corruption. Congratulations!
If you're doing this to recovery from a virus or malware infection, (or even if you're not), DO NOT copy executable files (.exe, .scr. etc...) if any of these files are infected you could be copying the corruption over to any new device/computer. just copy documents, pictures, music, or videos.


Similar Topics
0 user(s) are reading this topic
0 members, 0 guests, 0 anonymous users
As Featured On:


 Sign In
 Create Account
