Jump to content

Welcome to Geeks to Go - Register now for FREE

Need help with your computer or device? Want to learn new tech skills? You're in the right place!
Geeks to Go is a friendly community of tech experts who can solve any problem you have. Just create a free account and post your question. Our volunteers will reply quickly and guide you through the steps. Don't let tech troubles stop you. Join Geeks to Go now and get the support you need!

How it Works Create Account
Photo

Advanced boot options loop, repair console won't work, need to ext


  • Please log in to reply

#1
jencwu

jencwu

    Member

  • Member
  • PipPip
  • 60 posts
Trying to help hubby with his laptop (Win XP, Compaq Presario V3016US Notebook, about 7 yrs old). It's had various issues off and on for awhile and we've known it was on its last legs. A couple days ago he had the computer on, fell asleep, and when he woke up it was on the advanced boot options screen. Ever since then the following has occurred:
-every time the computer is turned on it goes to the advanced boot options screen
-all safe mode options get stuck at mup.sys
-last known good config & normal options get stuck on the Windows logo screen
-tried running diagnostics from BIOS and it failed almost immediately; can't remember which fail code it gave--I think either #1-07 or #2-07
-tried opening the recovery console from Windows cd; said it couldn't find a hard disk drive

I've looked up info about each of these issues and basically the conclusion I've come to is the hard drive is more or less dead. Again, no surprise, the laptop is old and we knew it was coming. In fact, I had the exact same laptop, purchased at the same time, and mine bit the dust about 2 years ago, though via different circumstances. When that happened to mine, I was able to extract all my files through linux. I don't remember how to do that (still have the cd I made for linux, though), and I'm not sure if it would work in this situation since his hd seems to be worse off than mine was. Luckily he backed it up fairly frequently with an external hd, so not too much needs to get pulled off.

So in summary, I'm not really looking to fix the problem, since I'm pretty much convinced the hard drive is a goner (unless you experts think it is salvageable). Mainly I would just like to know how to get the files he needs off of it.
  • 0

Advertisements


#2
rshaffer61

rshaffer61

    Moderator

  • Moderator
  • 34,114 posts
Run hard drive diagnostics: http://www.tacktech....ay.cfm?ttid=287
Make sure, you select tool, which is appropriate for the brand of your hard drive.
Depending on the program, it'll create bootable floppy, or bootable CD.
If downloaded file is of .iso type, use ImgBurn: http://www.imgburn.com/ to burn .iso file to a CD (select "Write image file to disc" option), and make the CD bootable.

NOTE. If your hard drive is made by Toshiba, try the Hitachi DFT CD Image version of the software

Thanks to Broni for the instructions
  • 0

#3
jencwu

jencwu

    Member

  • Topic Starter
  • Member
  • PipPip
  • 60 posts
Thanks for your response. I believe you are the main one who helped me when my Compaq died a couple years ago. Running a long test right now. It's at 7% with 92 errors already... yikes. Will report back when it's completed.
  • 0

#4
rshaffer61

rshaffer61

    Moderator

  • Moderator
  • 34,114 posts
I would say the hard drive is toast. Is there data you need to hopefully save?
  • 0

#5
jencwu

jencwu

    Member

  • Topic Starter
  • Member
  • PipPip
  • 60 posts
At 74% with 99 errors, test stopped and a "Long Test Errors" box popped up saying the hard drive failed the diagnostic test, "possibly caused by problem sectors which are difficult to read.... Seagate recommends that you consider repairing the problem sectors. SeaTools for Dos may be able to save you from the inconvenience and down time of exchanging the drive. For more information on this subject see our help topic 'Bad Sector Found'." When I clicked "done" on that box it attempted a short test, then said "Errors detected on NON Seagate Drive. It is suggested that you contact the maker of disc drive for more information." When I clicked "done" on that box, another box popped up saying "Sector Repair Failure" and that "Repair was unsuccessful on the hard drive. For more information on this subject see our help topic 'Bad Sector Found'." The hd is WD but I used the SeaTools diagnostic as I believe the WD diagnostic didn't work on my Compaq when I was having similar problems, but I think I used the SeaTools one successfully at that time. I will attempt the WD one though as I have not tried it on this computer.

Edited by jencwu, 15 June 2012 - 12:04 PM.

  • 0

#6
jencwu

jencwu

    Member

  • Topic Starter
  • Member
  • PipPip
  • 60 posts

I would say the hard drive is toast. Is there data you need to hopefully save?

Yes, he was regularly backing up the data onto an external hd since he knew the computer was on its way out. But there is some newer data that hadn't yet been backed up that we need to try to save.
  • 0

#7
rshaffer61

rshaffer61

    Moderator

  • Moderator
  • 34,114 posts
OK then I suggest you do the following NOW to try and save any data before the drive completely shuts down.


Use Puppy Linux Live CD to Recover Your Data:

===================
***Required Hardware***
CD Burner (CDRW) Drive,
Blank CD,
Extra Storage Device (USB Flash Drive, External Hard Drive)

===================

1. Save these files to your Desktop/Burn Your Live CD:
  • Download Latest Puppy Linux ISO (i.e.: lupu-528.iso)
    Download BurnCDCC ISO Burning Software

    There are instructions on how to boot from flash drive with puppy here; http://www.pendrivel...e-from-windows/

  • Open BurnCDCC with Windows Explorer
  • Extract All files to a location you can remember
  • Double Click Posted Image BurnCDCC
  • Click Browse Posted Image and navigate to the Puppy Linux ISO file you just downloaded
  • Open/Double Click that file
    IMPORTANT: Adjust the speed bar to CD: 4x DVD: 1x
  • Click Start Posted Image
  • Your CD Burner Tray will open automatically
  • Insert a blank CD and close the tray
  • Click OK
Puppy Linux Live CD will now be created
2. Set your boot priority in the BIOS to CD-ROM first, Hard Drive Second
  • Start the computer/press the power button
  • Immediately start tapping the appropriate key to enter the BIOS, aka "Setup"
    (Usually shown during the "Dell" screen, or "Gateway" Screen)
  • Once in the BIOS, under Advanced BIOS Options change boot priority to:
    CD-ROM 1st, Hard Drive 2nd
  • Open your ROM drive and insert the disk
  • Press F10 to save and exit
  • Agree with "Y" to continue
  • Your computer will restart and boot from the Puppy Linux Live CD

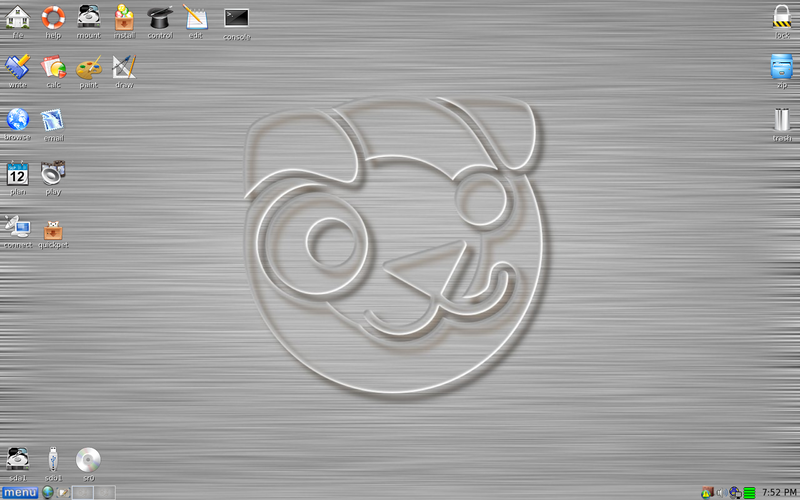
    Posted Image

3. Recover Your Data
  • Once Puppy Linux has loaded, it is actually running in your computer's Memory (RAM). You will see a fully functioning Graphical User Interface similar to what you normally call "your computer". Internet access may or may not be available depending on your machine, so it is recommended you print these instructions before beginning. Also, double clicking is not needed in Puppy. To expand, or open folders/icons, just click once. Puppy is very light on resources, so you will quickly notice it is much speedier than you are used to. This is normal. Ready? Let's get started.

    3a. Mount Drives
  • Click the Mount Icon located at the top left of your desktop. Posted Image
  • A Window will open. By default, the "drive" tab will be forward/highlighted. Click on Mount for your hard drive.
  • Assuming you only have one hard drive and/or partition, there may be only one selection to mount.
  • USB Flash Drives usually automatically mount upon boot, but click the "usbdrv" tab and make sure it is mounted.
  • If using an external hard drive for the data recovery, do this under the "drive" tab. Mount it now.
3b. Transfer Files.
  • At the bottom left of your desktop a list of all hard drives/partitions, USB Drives, and Optical Drives are listed with a familiar looking hard drive icon.
  • Open your old hard drive i.e. sda1
  • Next, open your USB Flash Drive or External Drive. i.e. sdc or sdb1
  • If you open the wrong drive, simply X out at the top right corner of the window that opens. (Just like in Windows)
  • From your old hard drive, drag and drop whatever files/folders you wish to transfer to your USB Drive's Window.
For The Novice: The common path to your pictures, music, video, and documents folders is: Documents and Settings >> All Users (or each idividual name of each user. CHECK All Names!) >> Documents >> You will now see My Music, My Pictures, and My Videos.

Remember to only click once! No double clicking! Once you drag and drop your first folder, you will notice a small menu will appear giving you the option to move or copy. Choose COPY each time you drag and drop.

YOU ARE DONE!!! Simply click Menu >> Mouse Over Shutdown >> Reboot/Turn Off Computer. Be sure to plug your USB Drive into another working windows machine to verify all data is there and transferred without corruption. Congratulations!


Posted Image

If you're doing this to recover from a virus or malware infection, (or even if you're not), DO NOT copy executable files (.exe, .scr. etc...) if any of these files are infected you could be copying the corruption over to any new device/computer. just copy documents, pictures, music, or videos.

  • 0

#8
jencwu

jencwu

    Member

  • Topic Starter
  • Member
  • PipPip
  • 60 posts
Ok, tried the WD diagnostic cd I made a couple years ago for my laptop. It says "unable to located the License Agreement file, DLGLICE.TXT" then below that, "Cannot load the file A:\COMMAND.COM Insert correct disk and strike any key"
  • 0

#9
Macboatmaster

Macboatmaster

    7k

  • Member
  • PipPipPipPipPipPipPipPip
  • 7,237 posts
There is a chance, albeit slight, that puppy will allow you to recover the data

Alternatively if the file system is not so corrupted that it cannot be read, although windows will not load, as the MFT is corrupted by the bad sectors, it maybe that the drive will be seen as an external drive, connected usb to another computer and the files can be recovered

Puppy is of course the easiest, unless you already have a means of connecting the HDD usb


http://www.geekstogo...over-your-data/


Duplicated post - my good colleague rshaffer61 posted while I was typing

"Cannot load the file A:\COMMAND.COM

The WD diagnostics will not progress this issue for you, that amount of failures mean the HDD is beyond recovery, even to get a load of windows.
The error A:\ cmd.com
indicates you may have made the WD floppy utility instead of the dos from CD
  • 0

#10
jencwu

jencwu

    Member

  • Topic Starter
  • Member
  • PipPip
  • 60 posts

[/u][/b]

"Cannot load the file A:\COMMAND.COM

The WD diagnostics will not progress this issue for you, that amount of failures mean the HDD is beyond recovery, even to get a load of windows.
The error A:\ cmd.com
indicates you may have made the WD floppy utility instead of the dos from CD

So should I attempt to make a new WD diagnostic cd, or just skip straight to attempting to pull off data with Puppy Linux?
  • 0

Advertisements


#11
Macboatmaster

Macboatmaster

    7k

  • Member
  • PipPipPipPipPipPipPipPip
  • 7,237 posts

The WD diagnostics will not progress this issue for you, that amount of failures mean the HDD is beyond recovery, even to get a load of windows.


The only difference between using Seatools or WD disk analysis in its generic form, ie: on a non Seagate or WD drive and using it on a Seagte or WD drive respectively, is that on a foreign HDD it will not run the full cycle of tests and only the generic error codes will be produced.

The actual result is with that number of failures the same.

If you were to run the WD tool on a WD disk, then the error code, indicates to WD the specific problem
If you were to run Seagate on a WD drive then that is not the case and the other way round also applies of course.

http://support.wdc.c.../errorcodes.asp
  • 0

#12
jencwu

jencwu

    Member

  • Topic Starter
  • Member
  • PipPip
  • 60 posts
This is probably a silly question, but when I connect the external HD under normal circumstances in Windows, it automatically backs up the data that is new since the previous backup. Will this occur in Puppy Linux also, or do I need to manually copy the files I need to the external hd, following the steps outlined above? I don't need to copy everything, as most of it is already backed up.
  • 0

#13
rshaffer61

rshaffer61

    Moderator

  • Moderator
  • 34,114 posts
You will have to manually do it because you will not be using windows at all. You will booting to the Linux cd and not the hard drive.
  • 0

#14
Macboatmaster

Macboatmaster

    7k

  • Member
  • PipPipPipPipPipPipPipPip
  • 7,237 posts
I am confused.

You said

But there is some newer data that hadn't yet been backed up that we need to try to save.


Now you say

I don't need to copy everything, as most of it is already backed up.


I thought that you did need to copy - (backup) some data and that was why we suggested Puppy

The reason the external drive backs up only the new data is due to the backup settings on that hard drive.
  • 0

#15
jencwu

jencwu

    Member

  • Topic Starter
  • Member
  • PipPip
  • 60 posts
Exactly. Most of it has been backed up as my husband would periodically back up the computer using the external hd. However, he hasn't backed it up in several weeks so there is some newer data that has not yet been backed up. We need to get that data off the computer. We don't need ALL the data, since a lot of it was previously backed up. Does that make sense?
  • 0


Similar Topics

0 user(s) are reading this topic

0 members, 0 guests, 0 anonymous users

As Featured On:

Microsoft Yahoo BBC MSN PC Magazine Washington Post HP