

 This topic is locked


The below is probably a factor but not a lot we can do about that unless you actually install some upgraded Memory Modules(RAM - random access memory). Though Microsoft claims XP will run with a mere 128 MB installed in my humble opinion a bare minimum of 1 GB is far better and or as much as any one machines actual motherboard can support. For example in the past with older Dell rigs I once owned running XP(Dimension 2400 & 3100 respectively), had 2 GB of RAM installed etc.
You could check with Crucial, they have a small scanner(CrucialScan.exe) which is perfectly safe to download and run. Which will advise if your system can support any upgraded memory modules. Though were you could actually purchase some in your current locale I have absolutely no idea I'm afraid.494.42 Mb Total Physical Memory | 117.52 Mb Available Physical Memory | 23.77% Memory free
1.13 Gb Paging File | 0.72 Gb Available in Paging File | 64.09% Paging File free
I think we can actually rule out the actual Hard-Drive free space as the C drive had more than enough now:-
Though if I recall the actual drive is in need of some in-depth maintenance, so we will proceed with that.Drive C: | 19.53 Gb Total Space | 9.17 Gb Free Space | 46.93% Space Free | Partition Type: NTFS
For the time being we will leave attempting to install the Recovery Console as I do not think we will actually need to run ComboFix again. Not ideal but these things do happen. If in the event we do need to access the aforementioned Recovery Console, we could always do so via your actual XP Installation CD-ROM. For interest sake If memory serves correctly you can also actually install the Recovery Console using the XP Installation CD-ROM, however that would most likely be problematic and we would encounter the exact same problem.
My only real concern would be if we encounter a similar problem trying to install Service Pack 3, however we can cross that particular bridge so to speak when and if it arises. For now lets proceed as follows, completing the below may take some time...
Hard-Drive Maintenance/Repair:
Note: for the CHKDSK portion you may refer to this tutorial of mine here and follow the instructions for Graphical Mode if you so wish.
Click on Start >> Run and type cleanmgr in the box and press OK.
- Ensure the boxes for Temporary Files, Temporary Internet Files and Recycle Bin are checked.
- You can choose to check other boxes if you wish but they are not required.
- Click on OK then Yes.
- Click on Start again >> Run... then type in CMD and click on OK.
- At the Command Prompt C:\ > type the following:
- CD C:\ and hit the Enter/Return key.
- Now type in DEFRAG C: -F
- A Analysis report will be displayed and then Windows will start the Defragmention run automatically.
- This may take some time, when completed the Command Prompt C:\ > will appear.
- Now type in CHKDSK C: /R and hit the Enter/Return key.
- When prompted with:
CHKDSK cannot run because the volume is in use by another process
Would you like to schedule this volume to be checked next time the system
restarts (Y/N)
- Hit the Y key then at the Command Prompt C:\ >
- Type in EXIT and and hit the Enter/Return key.
- Now Reboot(Restart) your computer.
You should see a screen like this just after the Post(power on self test) screen:
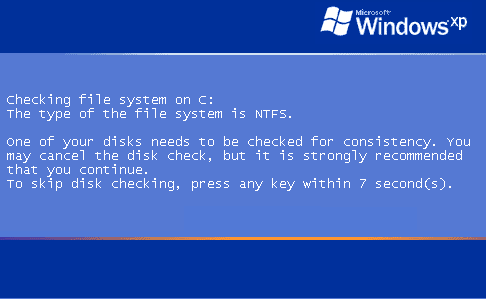
Note: Do not touch either the keyboard or Mouse, otherwise the Check-Disk will be canceled and you computer will continue to boot-up as normal.
ESET Online Scanner:
Note: You can use either Internet Explorer or Mozilla FireFox for this scan. You will however need to disable your current installed Anti-Virus, how to do so can be read here.
- Please go here to run the scan...
Note: If using Mozilla Firefox you will need to download esetsmartinstaller_enu.exe when prompted then double click on it to install.
All of the below instructions are compatible with either Internet Explorer or Mozilla FireFox. - Select the option YES, I accept the Terms of Use then click on:

- When prompted allow the Add-On/Active X to install.
- Make sure that the option Remove found threats is Not checked, and the option Scan archives is checked.
- Now click on Advanced Settings and select the following:
- Scan for potentially unwanted applications
- Scan for potentially unsafe applications
- Enable Anti-Stealth Technology
- Now click on:

- The virus signature database... will begin to download. Be patient this make take some time depending on the speed of your Internet Connection.
- When completed the Online Scan will begin automatically.
- Do not touch either the Mouse or keyboard during the scan otherwise it may stall.
- When completed select Uninstall application on close if you so wish, make sure you copy the logfile first!
- Now click on:

- Use notepad to open the logfile located at C:\Program Files\ESET\EsetOnlineScanner\log.txt.
- Copy and paste that log as a reply to this topic.
When completed the above, please post back the following in the order asked for:
- How is your computer performing now, any further symptoms and or problems encountered?
- Eset Log.


 Sign In
 Create Account
