Jump to content

Welcome to Geeks to Go - Register now for FREE

Need help with your computer or device? Want to learn new tech skills? You're in the right place!
Geeks to Go is a friendly community of tech experts who can solve any problem you have. Just create a free account and post your question. Our volunteers will reply quickly and guide you through the steps. Don't let tech troubles stop you. Join Geeks to Go now and get the support you need!

How it Works Create Account
Photo

Invalid Partition Table after running TDSS Killer


  • Please log in to reply

#1
Skiminims

Skiminims

    Member

  • Member
  • PipPip
  • 63 posts
((Not sure where exactly to post this so if this is the wrong section, please delete))

Ok, so I screwed up ><

I've been having a lot of Avast shield pop ups for multiple trojans and rootkits.

Decided to try and run TDSS Killer to see if I had a rootkit. Using TDSS Killer, it identifies the Rootkit as "rootkit.boot.pihar.b" (but when that tries to cure, it says "Can't cure MBR. Write standard bootcode?" I selected yes.

I go to reboot normally and this is all I get:

Invalid Partition Table.

Yikes!!!!
  • 0

Advertisements


#2
Amlak

Amlak

    Member 1K

  • Member
  • PipPipPipPip
  • 1,470 posts
Hi, Skiminims. Welcome to GTG. Let's help you out with your malware issue(s).

1. Preferably from a clean computer, please download the following: gparted-live-0.13.0-1.iso (124 MB)

When you have the .ISO file downloaded, you need to create a bootable disk or flash drive with it, using a clean PC to do that. The .ISO file is a disk image. It should NOT be burned as a regular file. You need a program like BurnAware Free or ImgBurn that can burn an .ISO image. I think a CD is best as there is no way anything can write on it after it is made, but the USB may be more convenient and easier.


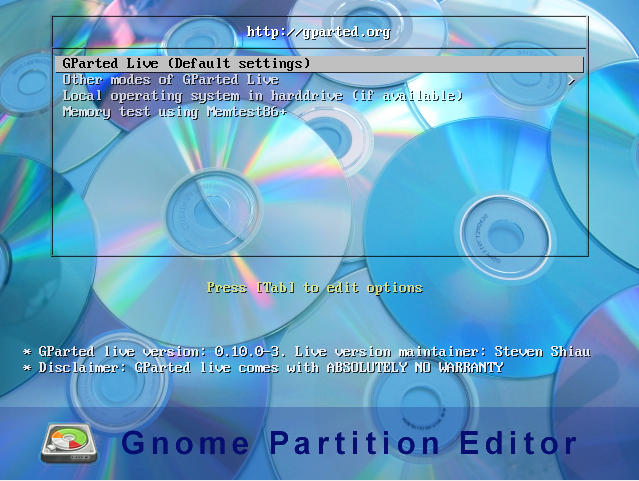
2. Now, please boot off of the newly created GParted CD. See How to Set BIOS to Boot from CDROM for information on how to boot from the CD.

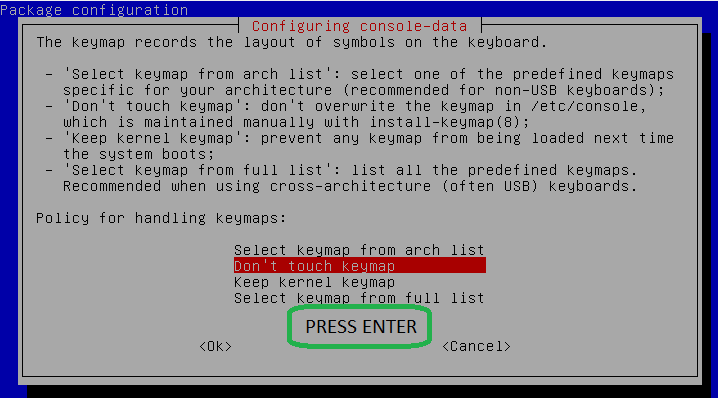
You should arrive to the following screen:
Posted Image
Press the ENTER key

Posted Image
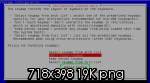
By default, "do not touch keymap" is highlighted. Leave this setting alone and press the ENTER key.

Posted Image
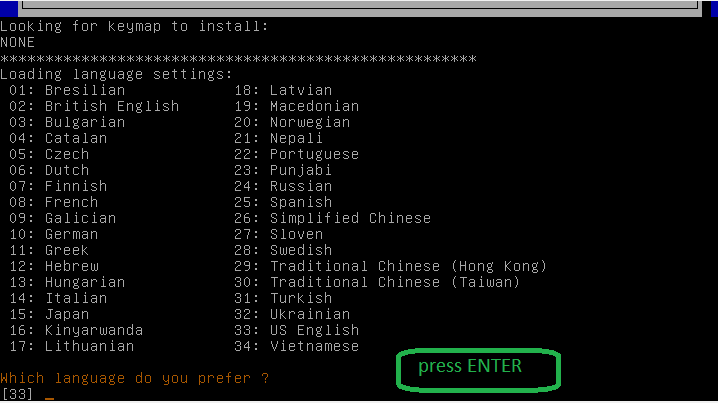
Next, choose your language and press the ENTER key. English is the default setting [33]

Posted Image
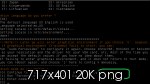
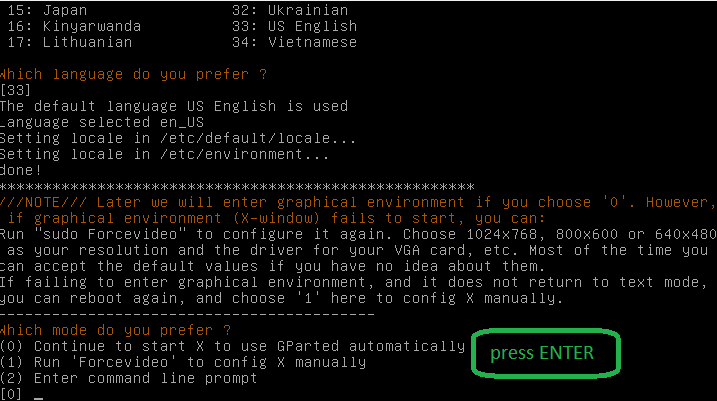
Once again, at this prompt, press the ENTER key.

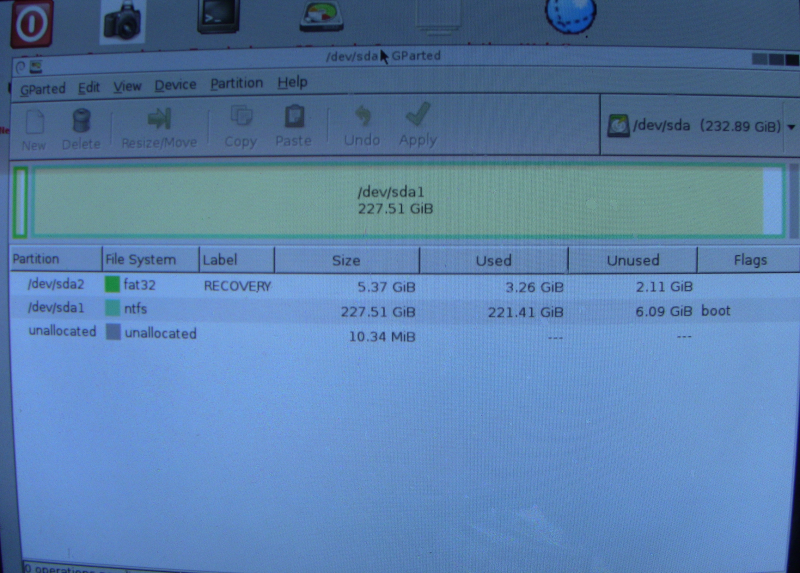
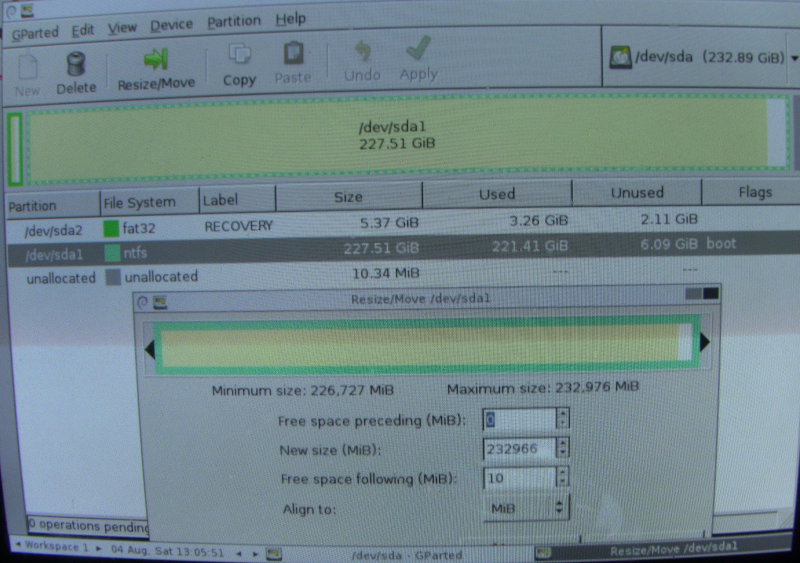
You will now be taken to the main GUI screen below
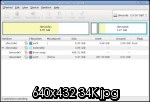
Posted Image

Please take a picture of this screen (camera or phone pictures will work just fine), and post it here for me to see. It is very important that you complete this step.
  • 0

#3
Skiminims

Skiminims

    Member

  • Topic Starter
  • Member
  • PipPip
  • 63 posts
Quick silly question:

I have a ton of DVD-Rs but no CD-R's. Will ImgBurn burn the image on a DVD-R and can it boot from one or does it absolutely have to be on a CD-R?
  • 0

#4
Amlak

Amlak

    Member 1K

  • Member
  • PipPipPipPip
  • 1,470 posts
I don't see why it shouldn't work. Give it a try and let me know if it doesn't work.
  • 0

#5
Skiminims

Skiminims

    Member

  • Topic Starter
  • Member
  • PipPip
  • 63 posts
Will do, thanks
  • 0

#6
Skiminims

Skiminims

    Member

  • Topic Starter
  • Member
  • PipPip
  • 63 posts
worked fine as a DVD-R

Here is the screencap:

GParted2.png
  • 0

#7
Amlak

Amlak

    Member 1K

  • Member
  • PipPipPipPip
  • 1,470 posts
Go back to that screen. Highlight the /dev/sda1 partition and click Resize/Move at the top. Then, in the dialog/interactive box that appears, resize the partition by dragging its right edge to fully cover the unallocated space so that there's 0 free space after it. Click the Resize button then click Apply when prompted.

Let it do its thing, and when done, restart your computer and let me know if it now boots into Windows.
  • 0

#8
Skiminims

Skiminims

    Member

  • Topic Starter
  • Member
  • PipPip
  • 63 posts
Ok, just to make sure I did this correctly, there was 0 MiB of Free Space Proceeding. I moved the partition and now there is 10 MiB Free Space Proceeding and 0 MiB of Free Space following.

Is that correct?
  • 0

#9
Amlak

Amlak

    Member 1K

  • Member
  • PipPipPipPip
  • 1,470 posts
You mean there's now 10 MB free space before the concerned partition?

You should only drag the right side and not touch the left side. Did you already click the Apply option by any chance?
  • 0

#10
Amlak

Amlak

    Member 1K

  • Member
  • PipPipPipPip
  • 1,470 posts
Hi, Skiminims. I'm heading off to sleep now. If you're still struggling to do it as instructed, then just click Cancel and shut down the computer for now. The important thing is that you don't click Apply without doing it all properly. I'll give you my next set of instructions soon.
  • 0

Advertisements


#11
Skiminims

Skiminims

    Member

  • Topic Starter
  • Member
  • PipPip
  • 63 posts
I have not yet applied any changes. I will cancel and show you what it says before I move the partition.

GPartedResize.png

Edited by Skiminims, 04 August 2012 - 12:11 PM.

  • 0

#12
Amlak

Amlak

    Member 1K

  • Member
  • PipPipPipPip
  • 1,470 posts
Ok, no problem. We'll worry about that one later (if necessary). I'm thinking of something else now. What Windows version do you have?

If it's Vista/7, are you able to access the Recovery Environment?

Normally, it's done by repeatedly tapping F8 right before the Windows loading screen. And when you do, there's normally an option called Repair your computer right above the Safe Mode options. Do you have such an option?
  • 0

#13
Skiminims

Skiminims

    Member

  • Topic Starter
  • Member
  • PipPip
  • 63 posts
No, I have Windows XP I think with either SP2 or SP3. I think 3.
  • 0

#14
Amlak

Amlak

    Member 1K

  • Member
  • PipPipPipPip
  • 1,470 posts

    • Download OTLPEStd.exe from the following link and save it to your Desktop: mirror1.
    • Finally, if you do not have a file archiver like 7-zip or Winrar installed, please download 7-zip from the following link and install it: the mirror
  • Once you have 7-zip install, decompress OTLPEStd.exe by rightclicking on the folder and choosing the options shown in the picture below. Please use a dedicated folder, for example OTLPE, on your Desktop

    Posted Image
  • Open the folder OTLPEStd which will be created in the same location as OTLPEStd.exe and right-click OTLPE_New_Std.iso. Select 7-Zip and from the submenu select Extract files... and extract the content onto your Desktop in a OTLPE folder:

    Posted Image
  • Click on Start, accept the disclaimers and wait for the program to finish.
  • Download Farbar Recovery Scan Tool and save it to a flash drive.
    Your bootable CD/DVD should now be ready!
  • Connect the flash drive containing FRST.exe to the computer with the boot issue.
  • Set the infected computer to boot from CD/DVD then let it boot into Reatogo.
  • Locate the flash drive with FRST and double click it.
  • The tool will start to run.
    Posted Image
  • When the tool opens click Yes to disclaimer.
  • Press Scan button.
  • It will make a log (FRST.txt) on the flash drive. Please copy and paste it in your reply.

  • 0

#15
Skiminims

Skiminims

    Member

  • Topic Starter
  • Member
  • PipPip
  • 63 posts
do I take the GPart disc out first before letting it boot from the flash drive?
  • 0


Similar Topics

0 user(s) are reading this topic

0 members, 0 guests, 0 anonymous users

As Featured On:

Microsoft Yahoo BBC MSN PC Magazine Washington Post HP