Jump to content

Welcome to Geeks to Go - Register now for FREE

Need help with your computer or device? Want to learn new tech skills? You're in the right place!
Geeks to Go is a friendly community of tech experts who can solve any problem you have. Just create a free account and post your question. Our volunteers will reply quickly and guide you through the steps. Don't let tech troubles stop you. Join Geeks to Go now and get the support you need!

How it Works Create Account
Photo

Google Redirection problem; tutorial didn't work [Closed]


  • This topic is locked This topic is locked

#106
ron26

ron26

    Member

  • Topic Starter
  • Member
  • PipPipPip
  • 169 posts
! REG.EXE VERSION 3.0

HKEY_LOCAL_MACHINE\system\currentcontrolset\services\wscsvc
Type REG_DWORD 0x20
Start REG_DWORD 0x2
ErrorControl REG_DWORD 0x1
ImagePath REG_EXPAND_SZ %SystemRoot%\System32\svchost.exe -k netsvcs
DependOnService REG_MULTI_SZ RpcSs\0winmgmt\0\0
ObjectName REG_SZ LocalSystem

HKEY_LOCAL_MACHINE\system\currentcontrolset\services\wscsvc\Enum

HKEY_LOCAL_MACHINE\system\currentcontrolset\services\wscsvc\Parameters

SERVICE_NAME: RpcSs
TYPE : 10 WIN32_OWN_PROCESS
STATE : 4 RUNNING
(NOT_STOPPABLE,NOT_PAUSABLE,IGNORES_SHUTDOWN)
WIN32_EXIT_CODE : 0 (0x0)
SERVICE_EXIT_CODE : 0 (0x0)
CHECKPOINT : 0x0
WAIT_HINT : 0x0

SERVICE_NAME: winmgmt
TYPE : 20 WIN32_SHARE_PROCESS
STATE : 4 RUNNING
(STOPPABLE,PAUSABLE,ACCEPTS_SHUTDOWN)
WIN32_EXIT_CODE : 0 (0x0)
SERVICE_EXIT_CODE : 0 (0x0)
CHECKPOINT : 0x0
WAIT_HINT : 0x0
  • 0

Advertisements


#107
ron26

ron26

    Member

  • Topic Starter
  • Member
  • PipPipPip
  • 169 posts
Regarding Step 60, I honestly don't remember. Should I re-run the whole set of steps? Can we figure out where I was/stopped/got to?

Thanks.

Let's defragment the hard drive and update some programs.


Step-1.

Please go to this page for directions on defragmenting the computer.


Step-2.

Posted Image UPDATE JAVA
Your version of Java is out of date. Older versions have vulnerabilities that malicious sites can use to exploit and infect your system. Please follow these steps to remove older versions of Java components and update:

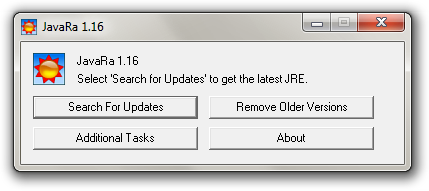
  • Please download JavaRa to your desktop.
    • Click the Download button next to Legacy Version Version 1.1.6 to download JavaRA and unzip it to its own folder.
  • Run JavaRa.exe
  • Pick the language of your choice and click Select. Then click Remove Older Versions. Accept any prompts.
    Posted Image
  • Open JavaRa.exe again and select Search For Updates.
  • Select Update Using Sun Java's Website then click Search and click on the Open Webpage button. Download and install the latest Java Runtime Environment (JRE) version for your computer. The most current version is Java SE 7u10.
    You want the Offline 32bit version, Windows x86 Offline 29.99 MB .
  • Click the link for the jre-7u10-windows-i586.exe file.

Step-3.

Update Adobe Reader

Earlier versions of Adobe Reader have known security flaws so it is recommended that you update your copy.
  • Go to Start > Control Panel > Add/Remove Programs
  • Remove ALL instances of Adobe Reader
  • Re-boot your computer as required.
  • Once ALL versions of Adobe Reader have been uninstalled, download the latest version of Adobe Reader from Here.
  • Remove the check mark next to Yes, install McAfee Security Scan Plus-optional box.
  • Click the Download Now button to download Adobe Reader and follow the directions.
Alternative Option: After uninstalling Adobe Reader, you could try installing Foxit Reader from HERE. Foxit Reader is a much smaller program. It has fewer add-ons therefore loads more quickly.
NOTE: When installing FoxitReader, be careful not to install anything to do with AskBar.


Your logs look clean. Let's remove the tools we used and then we will look at the Security Center issue

If you didn't uninstall ESET when you ran the program we will do it now.

Step-1.

Uninstall ESET

1. Please click Start > Control Panel > Add/Remove Programs
2. In the list of programs installed, locate the following program(s):

ESET

3. Click on each program to highlight it and click Change/Remove.
4. After the programs have been uninstalled, close the Installed Programs window and the Control Panel.
5. Reboot the computer.

Delete the folders associated with the uninstalled programs.(Only do this if you uninstalled the program)

1. Using Windows Explorer (to get there right-click your Start button and click "Explore"), please delete the following folders(s) (if present):

C:\Program Files\ESET

2. Close Windows Explorer.

Step-2.

Uninstall ComboFix
  • Click Start, then Run, or hold down the Windows key + R on your keyboard. This will display the Run dialogue box .
  • In the Run box, type in ComboFix /Uninstall (Notice the space between the "x" and "/") then click OK

    Posted Image
  • Follow the prompts on the screen.
  • A message should appear confirming that ComboFix was uninstalled
Step-3.

OTL Cleanup
1. Please copy all of the text in the Quote box below (Do Not copy the word Quote). To do this, highlight everything inside the Quote box (except the word Quote) , right click and click Copy.
  • :COMMANDS
    [CLEARALLRESTOREPOINTS]
    [EMPTYTEMP]

  • Please re-open Posted Image on your desktop.
  • Place the mouse pointer inside the Posted Image textbox, right click and click Paste. This will put the above script inside the textbox.
  • Click the Posted Image button.
  • Let the program run unhindered. When finished click the OK button and close the log that appears.
  • NOTE: I do not need to review the log produced.
  • OTL may ask to reboot the machine. Please do so if asked.
2. Please re-open Posted Image on your desktop.
  • Be sure all other programs are closed as this step will require a reboot.
  • Click on Posted Image
  • You will be prompted to reboot your system. Please do so.
The above process will flush all old System Restore points and create a new clean one. It will also remove most/all of the tools used and logs created during the cleanup process. After it is finished, OTL will remove itself. This is so that if you are ever infected again you will download the most current copy of the tool.

Step-4.

Delete the following Files/Folders:(If present)

MBR.txt
JavaRa-1.16-3-12-12.zip folder
JavaRa folder
jre-7u10-windows-i586.exe
scsvc.zip folder
wscsvc folder


Delete any other .bat, .log, .reg, .txt, and any other files created during this process, and left on the desktop and empty the Recycle Bin.

Step-5.

Reset Hidden Files and Folders

1. Click Start.
2. Open My Computer.
4. Select the Tools menu and click Folder Options.
5. Select the View tab.
6. Under the Hidden files and folders heading UNSELECT Show hidden files and folders.
7. Click the Hide protected operating system files (recommended) option. Click Yes to confirm. Click OK.

Step-6.

Make a Fresh Restore Point, Clear the Old Restore Points, and Re-enable System Restore

The files in System Restore are protected to prevent any programs from changing those files. This is the only way to clean these files: (You will lose all previous restore points which are likely to be infected, but that's good news).

Note: Do not clear infected/old System Restore points before creating a new System Restore point first!

Windows XP
  • Click Start > All Programs > Accessories > System tools > System Restore. The System Restore Wizard opens.
  • Note: If the System Restore Wizard does not open, the System Restore feature may be turned off. To turn System Restore on, follow these steps:
  • Click Start, click Control Panel, and then double-click System.
  • Click the System Restore tab.
  • Make sure that the Turn off System Restore check box is not selected. Or, make sure that the Turn off System Restore on all drives check box is not selected.
  • Click OK.
[*] On the dialogue box that appears select Create a Restore Point
[*] Click NEXT
[*] Enter a name e.g. Clean
[*] Click CREATE
[*] Close System Restore[/list]Turn OFF System Restore.
  • On the Desktop, right-click My Computer.
  • Click Properties.
  • Click the System Restore tab.
  • Check Turn off System Restore.
  • Click Apply, and then click OK.
    Restart your computer.
Turn ON System Restore.
  • On the Desktop, right-click My Computer.
  • Click Properties.
  • Click the System Restore tab.
  • UN-Check Turn off System Restore.
  • Click Apply, and then click OK.
    System Restore will now be active again.

Let me know how this went. :)


  • 0

#108
godawgs

godawgs

    Teacher

  • Retired Staff
  • 8,228 posts
Hi,

Well, we got to the point of updating Java and got that sorted out. But I don't think you have done any of the cleanup yet. So let's hold off on that and get the wscsvc (Security Center} service sorted out. I think that was the last thing that we needed to do before cleanup.
We will get it sorted and then get a new OTL scan and see where we are.

I want you to look at the wscsvc service and see it is started correctly.

  • Click Start, then click Run. The Run box will open.
  • In the Run box type the following and then click the OK button:

    services.msc
  • The Services window will open.
  • Look in the Names column for the following service Security Center
  • Right click on the service and click Properties. The Properties window will open.
  • On the General tab, look for the Startup type: and make sure it says Automatic If it says Manual or Disabled, click the down arrow and click Automatic.
  • Make sure the Service status: says Started. If it doesn't, click the Start button.
  • Click the Apply button and then click OK.
  • Close the Services window.

If for some reason you could not get the properties page to open, stop here and let me know what error you got.

If you did get to the properties page and you had to change any of the settings, restart the computer and then run FSS.exe to get a new scan and post the FSS.txt log.
  • 0

#109
ron26

ron26

    Member

  • Topic Starter
  • Member
  • PipPipPip
  • 169 posts
I don't see "Security Center." The closest I see is "Security Accounts Manager.

Is that it?
  • 0

#110
godawgs

godawgs

    Teacher

  • Retired Staff
  • 8,228 posts
No, that is noy the correct one. It should be listed just below Security Accounts Manager.
OK. So the service shows in the registry key but not in the services window of Computer Management. it appears that the wscsvc registry key is corrupted, So we will replace the wscsvc key.


Step-1.

Run ERUNT again to back up the registry. Directions are in this post


Step-2.

Click here to download the wscsvc.reg file. Save it to the desktop.
Close the Browser and all open windows.
Right click on the wscsvc.reg file and click Merge. OK any prompts.
If you get a message saying the file merged successfully, reboot the computer to make the changes effective. If you don't get that message, stop here and let me know what happened.


Step-3.

After the computer reboots, go back to post #108 and see if the Security Center service shows on the Servives page. If it does, follow the directions and make sure all of the settings are correct. If they are.....


Step-4

Run FSS.exe again and post the FSS.txt report.
  • 0

#111
ron26

ron26

    Member

  • Topic Starter
  • Member
  • PipPipPip
  • 169 posts
With Step 1 in post 110 am I just running ERUNT or going through all the steps listed in that linked post?
  • 0

#112
godawgs

godawgs

    Teacher

  • Retired Staff
  • 8,228 posts
Hi,

My apologies. In Step 1 you are just running ERUNT again to back up the registry. But I made a small error in the order of the steps. I want you to do it this way.


Run Step 1 to back the registry up...

Step-1.

Double click the ERUNT icon on the desktop or open the ERUNT folder in All Programs and double click the ERUNT file to run it and back up the registry.

Then run Step 2 to download and merge the registry file...

Step-2.

Click here to download the wscsvc.reg file. Save it to the desktop.
Close the Browser and all open windows.
Right click on the wscsvc.reg file and click Merge. OK any prompts.
If you get a message saying the file merged successfully, reboot the computer to make the changes effective.
If you don't get that message, stop here and let me know what happened.


If Step 2 was successful, run Step 3 to see if the wscsvc service is running.

Step-3.

Run Farbar Service Scanner

  • Doubleclick the FSS.exe file to run it.

    Posted Image
    Make sure the following options are checked:
    • Internet Services
    • Windows Firewall
    • System Restore
    • Security Center
    • Windows Update
    • Windows Defender
    • Other Services
  • Press "Scan".
  • It will create a log (FSS.txt) in the same directory the tool is run.
  • Please copy and paste the log to your reply.

We will forget about the cleanup for now, just post the new FSS.txt log if the .reg file merged successfully.
  • 0

#113
godawgs

godawgs

    Teacher

  • Retired Staff
  • 8,228 posts
Due to lack of feedback, this topic has been closed.

If you need this topic reopened, please contact a staff member. This applies only to the original topic starter. Everyone else please begin a New Topic.
  • 0


Similar Topics

0 user(s) are reading this topic

0 members, 0 guests, 0 anonymous users

As Featured On:

Microsoft Yahoo BBC MSN PC Magazine Washington Post HP