

blue screen
Started by
dustypink
, Dec 13 2012 09:37 AM
#76

 Posted 31 December 2012 - 01:19 PM
dustypink
- Topic Starter
-
- Member
-

- 432 posts
Member

#77
Posted 31 December 2012 - 01:21 PM
dustypink
- Topic Starter
-
- Member
-
- 432 posts
Member
hooooowever i cAN turn it on and press f8
#78
Posted 31 December 2012 - 01:40 PM
dustypink
- Topic Starter
-
- Member
-
- 432 posts
Member
ok its seems to be tryinghard to boot up i can click on start and accecories but its just taking forever like its bunged up
#79
Posted 31 December 2012 - 01:44 PM
dustypink
- Topic Starter
-
- Member
-
- 432 posts
Member
ok it started to work again
Edited by dustypink, 31 December 2012 - 01:54 PM.
#80
Posted 31 December 2012 - 02:01 PM
dustypink
- Topic Starter
-
- Member
-
- 432 posts
Member
right I did aLL THTagainm and its saying the same thing it gets to 34% and windowows resource could not perform the requested opeartion.sorry about the spelling this key board iis awful
#81
Posted 31 December 2012 - 02:19 PM
godawgs
-

- Retired Staff
-

- 8,228 posts
Teacher
OK. Looks like we are gonna need to look at the system outside of windows.
Do you have the Windows CD's that came with the system?
Do you have flash drive of at least 4MBs that you can download files to?
Do you have the System Recovery Options on the Advanced Boot Options? To find out, do this:
Read the instructions carefully. If you have any questions, stop and ask now. I recommend that you print them out so you will have them to follow.
Reboot into Advanced Boot Options.
Do Not enter Repair Your Computer. Just see if the option is there, then use the down arrow key to highlight Start Windows Normally and press the Enter key.
NEXT:
Run Farbar Recovery Scanner
A USB Flash Drive of 4MB or Greater is Needed
1.
Insert the flash drive into a USB port.
2.
For x64 bit systems download Farbar Recovery Scan Tool x64 and save it to a flash drive
NEXT:
IF you have the System Recovery Options on the Advanced Boot Options:
Enter System Recovery Options.
To enter System Recovery Options from the Advanced Boot Options:
IF you DO NOT have the System Recovery Options on the Advanced Boot Menu OR you can't get the System Recovery Option to work:
To enter System Recovery Options by using Windows installation disc:

Do you have the Windows CD's that came with the system?
Do you have flash drive of at least 4MBs that you can download files to?
Do you have the System Recovery Options on the Advanced Boot Options? To find out, do this:
Read the instructions carefully. If you have any questions, stop and ask now. I recommend that you print them out so you will have them to follow.
Reboot into Advanced Boot Options.
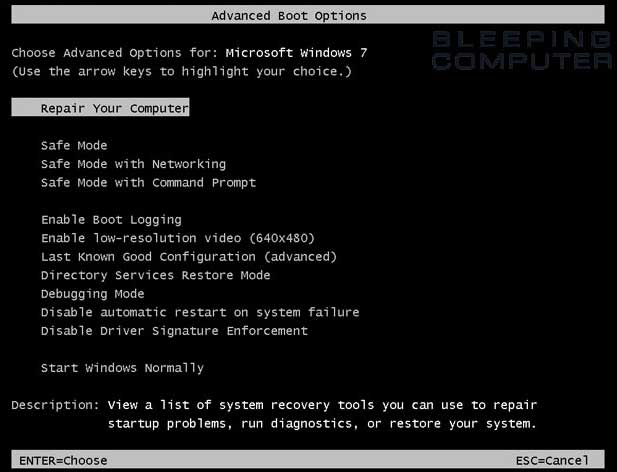
- Restart Windows in Safe Mode. To do that....
- Restart your computer and as soon as it starts booting up again continuously tap the F8 key.
- An Advanced Boot Options screen will come up. (See the image below)
NOTE: If you miss the Boot menu, continue to let the machine boot up. Then restart the machine and start tapping the F8 key.
Very Important: Never restart the computer while it is booting up. Bad things, including the computer not being able to load Windows, can occur!
- The first option will be Repair Your Computer if System Recovery is installed on the computer. (See the image below)
Do Not enter Repair Your Computer. Just see if the option is there, then use the down arrow key to highlight Start Windows Normally and press the Enter key.
NEXT:
Run Farbar Recovery Scanner
A USB Flash Drive of 4MB or Greater is Needed
1.
Insert the flash drive into a USB port.
2.
For x64 bit systems download Farbar Recovery Scan Tool x64 and save it to a flash drive
NEXT:
IF you have the System Recovery Options on the Advanced Boot Options:
Enter System Recovery Options.
To enter System Recovery Options from the Advanced Boot Options:
- Restart the computer.
- As soon as the BIOS is loaded begin tapping the F8 key until Advanced Boot Options appears.
- Use the arrow keys to select the Repair your computer menu item.
- Select English as the keyboard language settings, and then click Next.
- Select the operating system you want to repair, and then click Next.
- Select your user account and click Next (supply the password if requested).
You will see this, although yours will say Windows 7.
- Click repair my computer (See screeshot above)
- Select your operating system (yours will say Windows 7) and click Next.(See screenshot below)

The System Recovery Options window will open.
On the System Recovery Options menu you will get the following options:
You may get some or all of the following screens (dependent on whether it has been used before )

- Select Command prompt (See screenshot above)
In the command window type the following:- notepad and press Enter. The notepad opens.
- Under File menu select Open.
- Select Computer and find your flash drive letter and then close the notepad.
- In the command window type e:\frst64) and press Enter
Note: Replace letter e with the drive letter of your flash drive. - The tool will start to run.
- When the tool opens click Yes to disclaimer.
- Press Scan button.
- It will make a log (FRST.txt) on the flash drive.
- Reboot into Normal Mode and copy and paste it to your reply.
IF you DO NOT have the System Recovery Options on the Advanced Boot Menu OR you can't get the System Recovery Option to work:
To enter System Recovery Options by using Windows installation disc:
- Insert the installation disc.
- Restart your computer.
- If prompted, press any key to start Windows from the installation disc. The computer must be set to boot from the CD.
NOTE: Newer systems have a Boot Menu. When the system first starts booting up, (before the Loading Windows screen) you will see in the lower right corner or maybe upper left corner of the screen:
Setup=F?
Boot=F? ( The ? is the F number key you press, like F12 and you will get the Boot Menu. - Select Boot from CD. (Make sure the CD in the CD drive)
If you don't have the Boot Menu option you will need to set the CD as the first drive device in the BIOS. If you do not know how to set your computer to boot from CD follow the steps here - Click Repair your computer.
- Select English as the keyboard language settings, and then click Next.
- Select the operating system you want to repair, and then click Next.
- Select your user account and click Next (supply the password if requested).
- Click repair my computer (See screeshot above)
- Select your operating system (Yours will say Windows 7) and click Next.(See screenshot below)
The System Recovery Options window will open.
On the System Recovery Options menu you will get the following options:
You may get some or all of the following screens (dependent on whether it has been used before )
- Select Command prompt (See screenshot above)
In the command window type the following:- notepad and press Enter. The notepad opens.
- Under File menu select Open.
- Select Computer and find your flash drive letter and then close the notepad.
- In the command window type e:\frst64) and press Enter
Note: Replace letter e with the drive letter of your flash drive. - The tool will start to run.
- When the tool opens click Yes to disclaimer.
- Press Scan button.
- It will make a log (FRST.txt) on the flash drive.
- Reboot into Normal Mode and copy and paste it to your reply.
#82
Posted 31 December 2012 - 02:42 PM
dustypink
- Topic Starter
-
- Member
-
- 432 posts
Member
this ia getting complicated for me I dont have the cds and I dont have a fash drive usb whatever that is do you want me to carry on
#83
Posted 31 December 2012 - 03:06 PM
godawgs
-
- Retired Staff
-
- 8,228 posts
Teacher
Let's see if you have the System Recovery Option available:
Step-1.
Reboot into Advanced Boot Options.
Do Not enter Repair Your Computer. Just see if the option is there, then use the down arrow key to highlight Start Windows Normally and press the Enter key.
Step-2.
Run WVCheck
Step-3.
Things For Your Next Post:
Please post the logs in the order requested. Do Not attach the logs unless I request it.
1. Let me know if the Repair my computer option is on the Advanced Boot Menu
2. The WVCheck log
Step-1.
Reboot into Advanced Boot Options.
- Restart Windows in Safe Mode. To do that....
- Restart your computer and as soon as it starts booting up again continuously tap the F8 key.
- An Advanced Boot Options screen will come up. (See the image below)
NOTE: If you miss the Boot menu, continue to let the machine boot up. Then restart the machine and start tapping the F8 key.
Very Important: Never restart the computer while it is booting up. Bad things, including the computer not being able to load Windows, can occur!
- The first option will be Repair Your Computer if System Recovery is installed on the computer. (See the image below)
Do Not enter Repair Your Computer. Just see if the option is there, then use the down arrow key to highlight Start Windows Normally and press the Enter key.
Step-2.
Run WVCheck
- Please download WVCheck by Artellos from one of the mirrors below;
- After the download, run WVCheck.exe (You may need to right click on the WVCheck.exe file and click Run as Administrator to run the file.)
- As indicated by the prompt, This program can take a while depending on your hard drive space.
- Once the program is done, copy the contents of the notepad file and post it in your next reply.
Step-3.
Things For Your Next Post:
Please post the logs in the order requested. Do Not attach the logs unless I request it.
1. Let me know if the Repair my computer option is on the Advanced Boot Menu
2. The WVCheck log
#84
Posted 31 December 2012 - 03:17 PM
dustypink
- Topic Starter
-
- Member
-
- 432 posts
Member
The repAIR option is there I will post the notepad when its done
#85
Posted 31 December 2012 - 03:24 PM
dustypink
- Topic Starter
-
- Member
-
- 432 posts
Member
Windows Validation Check
Version: 1.9.12.5
Log Created On: 2116_31-12-2012
-----------------------
Windows Information
-----------------------
Windows Version: Windows 7 Service Pack 1
Windows Mode: Normal
Systemroot Path: C:\Windows
WVCheck's Auto Update Check
-----------------------
Auto-Update Option: Download updates and install them automatically.
-----------------------
Last Success Time for Update Detection: 2012-12-31 09:08:15
Last Success Time for Update Download: 2012-12-28 18:22:35
Last Success Time for Update Installation: 2012-12-28 18:22:43
WVCheck's Registry Check Check
-----------------------
Antiwpa: Not Found
-----------------------
Chew7Hale: Not Found
-----------------------
WVCheck's File Dump
-----------------------
C:\Windows\System32\slwga.dll
Size: 14336 bytes
Creation; 19/6/2011 10:21:56
Modification; 20/11/2010 12:21:24
MD5; 19f75d71e4256f5113d64ce2bb66b838
Matched: slwga.dll
-----------------------
C:\Windows\SysWOW64\slwga.dll
Size: 14336 bytes
Creation; 19/6/2011 10:21:56
Modification; 20/11/2010 12:21:24
MD5; 19f75d71e4256f5113d64ce2bb66b838
Matched: slwga.dll
-----------------------
C:\Windows\winsxs\amd64_microsoft-windows-security-spp-wga_31bf3856ad364e35_6.1.7600.16385_none_5b467ba9bd0679bb\slwga.dll
Size: 14848 bytes
Creation; 14/7/2009 0:52:11
Modification; 14/7/2009 2:41:54
MD5; cc03cf9f24946dcbd70acb3e1b2f05bf
Matched: slwga.dll
-----------------------
C:\Windows\winsxs\amd64_microsoft-windows-security-spp-wga_31bf3856ad364e35_6.1.7600.16723_none_5b856235bcd79403\slwga.dll
Size: 15360 bytes
Creation; 9/2/2011 23:52:55
Modification; 21/12/2010 6:15:31
MD5; b7213e92b270761b88b313b62ba0e13b
Matched: slwga.dll
-----------------------
C:\Windows\winsxs\amd64_microsoft-windows-security-spp-wga_31bf3856ad364e35_6.1.7600.20862_none_5be2bf06d6168a3a\slwga.dll
Size: 15360 bytes
Creation; 9/2/2011 23:52:55
Modification; 21/12/2010 6:9:5
MD5; 86b7d4d7a87ecb9e6bded44c52c8d5d9
Matched: slwga.dll
-----------------------
C:\Windows\winsxs\amd64_microsoft-windows-security-spp-wga_31bf3856ad364e35_6.1.7601.17514_none_5d778f71b9f4fd55\slwga.dll
Size: 15360 bytes
Creation; 19/6/2011 10:22:7
Modification; 20/11/2010 13:27:26
MD5; b6d6886149573278cba6abd44c4317f5
Matched: slwga.dll
-----------------------
C:\Windows\winsxs\x86_microsoft-windows-security-spp-wga_31bf3856ad364e35_6.1.7600.16385_none_ff27e02604a90885\slwga.dll
Size: 13824 bytes
Creation; 14/7/2009 0:36:22
Modification; 14/7/2009 2:16:15
MD5; 01fe4bdd0b47a7d8bf34d78d2bc23ddb
Matched: slwga.dll
-----------------------
C:\Windows\winsxs\x86_microsoft-windows-security-spp-wga_31bf3856ad364e35_6.1.7600.16723_none_ff66c6b2047a22cd\slwga.dll
Size: 14336 bytes
Creation; 9/2/2011 23:52:55
Modification; 21/12/2010 5:38:16
MD5; 2008845b41d561fb77b77bbe0045099e
Matched: slwga.dll
-----------------------
C:\Windows\winsxs\x86_microsoft-windows-security-spp-wga_31bf3856ad364e35_6.1.7600.20862_none_ffc423831db91904\slwga.dll
Size: 14336 bytes
Creation; 9/2/2011 23:52:55
Modification; 21/12/2010 5:29:6
MD5; 2332de32759ebcc691850e092b2564a6
Matched: slwga.dll
-----------------------
C:\Windows\winsxs\x86_microsoft-windows-security-spp-wga_31bf3856ad364e35_6.1.7601.17514_none_0158f3ee01978c1f\slwga.dll
Size: 14336 bytes
Creation; 19/6/2011 10:21:56
Modification; 20/11/2010 12:21:24
MD5; 19f75d71e4256f5113d64ce2bb66b838
Matched: slwga.dll
-----------------------
WVCheck's Dir Dump
-----------------------
WVCheck found no known bad directories.
WVCheck's Missing File Check
-----------------------
WVCheck found no missing Windows files.
WVCheck's MBAM Quarantine Check
-----------------------
There were no bad files quarantined by MBAM.
WVCheck's HOSTS File Check
-----------------------
WVCheck found no bad lines in the hosts file.
WVCheck's MD5 Check
EXPERIMENTAL!!
-----------------------
user32.dll - 5e0db2d8b2750543cd2ebb9ea8e6cdd3
-------- End of File, program close at 2123_31-12-2012 --------
#86
Posted 31 December 2012 - 04:25 PM
godawgs
-
- Retired Staff
-
- 8,228 posts
Teacher
OK. Let's try to force SFC to run.
Enter System Recovery Options.
To enter System Recovery Options from the Advanced Boot Options:

Enter System Recovery Options.
To enter System Recovery Options from the Advanced Boot Options:
- Restart the computer.
- As soon as the BIOS is loaded begin tapping the F8 key until Advanced Boot Options appears.
- Use the arrow keys to select the Repair your computer menu item.
- Select English as the keyboard language settings, and then click Next.
- Select the operating system you want to repair, and then click Next.
- Select your user account an click Next.
- Click repair my computer (See screenshot above)
- Select your operating system and click Next.(See screenshot below)

Note: Make a note of the drive-letter of your Windows 7 installation, as seen from Windows RE under the Location column. This is the drive-letter you want to reference when running Sfc.exe offline.
The System Recovery Options window will open.
On the System Recovery Options menu you will get the following options:
You may get some or all of the following screens (dependent on whether it has been used before )

- Select Command prompt (See screenshot above)
A Command Window will open. - To scan the integrity of all system files and repair them, type or copy and paste the following command at the blinking cursor:
sfc /scannow /offbootdir=c:\ /offwindir=d:\windows and press the Enter key. (See the screen shot below)
NOTE: If the drive letter of the windows installation is different from c: as shown on the location column above, change the c: in the command above to the proper drive letter.

This may take some time.
- When the scan has finished, note what it found and type exit and press the Enter key to close the Command Prompt. OR if you are back at the System Recovery Options window, click the Restart button to restart in normal mode and let me know what it found.
#87
Posted 31 December 2012 - 04:32 PM
dustypink
- Topic Starter
-
- Member
-
- 432 posts
Member
ita gone straight to system recovery option
#88
Posted 31 December 2012 - 04:34 PM
dustypink
- Topic Starter
-
- Member
-
- 432 posts
Member
so shall I carry on ?
#89
Posted 31 December 2012 - 04:36 PM
dustypink
- Topic Starter
-
- Member
-
- 432 posts
Member
ITS asking me to chose a recovery tool and missed all the other stuff you posted
#90
Posted 31 December 2012 - 04:43 PM
dustypink
- Topic Starter
-
- Member
-
- 432 posts
Member
well that didnt work either


Similar Topics
0 user(s) are reading this topic
0 members, 0 guests, 0 anonymous users
As Featured On:


 Sign In
 Create Account
