
So yesterday, I log on after a long day of school and swim team, I'm on the internet for a while, then I go to open up iTunes. When it opens, there's no music, podcasts or anything. I go to open up documents and there's nothing, only my program files. Then I go to downloads and there's still nothing, same with my pictures. I have absolutely no idea what's going on and I would really like some help! I have downloaded a program called "Recuva", and it restored half of my music and some podcasts. Do keep in mind that I use mu computer everyday for at least a few hours for things like homework, social networking, etc. Please help me!

Music, pictures and downloads all gone.
Started by
RyanSmitty
, Dec 14 2012 11:22 PM
#1

 Posted 14 December 2012 - 11:22 PM
RyanSmitty
-
- Member
-

- 3 posts
New Member
So yesterday, I log on after a long day of school and swim team, I'm on the internet for a while, then I go to open up iTunes. When it opens, there's no music, podcasts or anything. I go to open up documents and there's nothing, only my program files. Then I go to downloads and there's still nothing, same with my pictures. I have absolutely no idea what's going on and I would really like some help! I have downloaded a program called "Recuva", and it restored half of my music and some podcasts. Do keep in mind that I use mu computer everyday for at least a few hours for things like homework, social networking, etc. Please help me!

#2
Posted 15 December 2012 - 05:19 AM
phillpower2
-

- Global Moderator
-

- 24,768 posts
Mechanised Mod
 RyanSmitty
Please provide information about your computer, this includes is it a notebook or desktop, is it a custom build or brand name such as Dell or HP, if it is provide the model name or series number (not serial) providing these details will enable us to better assist you.
Recuva is an excellent program with a good success rate so if it has not recovered them all they may be lost.
Has the HDD been making unusual noises at all or have data access times been slow or difficult.
Go to Start then to Run/Search
Type in compmgmt.msc and click Enter
On left side click on Disk Management
On right side you will see your hard drive.
Now I need you to take a screenshot and attach it to your next reply.
Do the following to take a screenshot while the above is open and showing on your desktop.
To capture and post a screenshot;
Click on the ALT key + PRT SCR key..its on the top row..right hand side..now click on start...all programs...accessories...paint....left click in the white area ...press CTRL + V...click on file...click on save...save it to your desktop...name it something related to the screen your capturing... BE SURE TO SAVE IT AS A .JPG ...otherwise it may be to big to upload... then after typing in any response you have... click on browse...desktop...find the screenshot..select it and click on the upload button...then on the lower left...after it says upload successful...click on add reply like you normally would.
Screenshot instructions are provided to assist those that may read this topic but are not yet aware of the how to.
Once we have the above information we can suggest an alternative data recovery option which may be able to secure your data.
#3
Posted 15 December 2012 - 10:28 AM
RyanSmitty
- Topic Starter
-
- Member
-
- 3 posts
New Member
My computer is a custom built desktop computer, when I turn it on it says it's an M2N-MX SE PLUS which I think is the model.
The computer has not been making any weird noises and the speed has been how it normally is.
The computer has not been making any weird noises and the speed has been how it normally is.
Attached Thumbnails

#4
Posted 15 December 2012 - 11:16 AM
phillpower2
-
- Global Moderator
-
- 24,768 posts
Mechanised Mod
No issues with the HDD so see if you can retrieve your data using Puppy Linux, see below;
===================
***Required Hardware***
CD Burner (CDRW) Drive,
Blank CD,
Extra Storage Device (USB Flash Drive, External Hard Drive)
===================
1. Save these files to your Desktop/Burn Your Live CD:
2. Set your boot priority in the BIOS to CD-ROM first, Hard Drive Second
3. Recover Your Data
Remember to only click once! No double clicking! Once you drag and drop your first folder, you will notice a small menu will appear giving you the option to move or copy. Choose COPY each time you drag and drop.
YOU ARE DONE!!! Simply click Menu >> Mouse Over Shutdown >> Reboot/Turn Off Computer. Be sure to plug your USB Drive into another working windows machine to verify all data is there and transferred without corruption. Congratulations!
If you're doing this to recovery from a virus or malware infection, (or even if you're not), DO NOT copy executable files (.exe, .scr. etc...) if any of these files are infected you could be copying the corruption over to any new device/computer. just copy documents, pictures, music, or videos.
Note that there might be some other Puppy distros on the page (such as Slacko Puppy), but you need Lucid Puppy (lupu), the Ubuntu-based one. Always make sure you start downloading a file that starts with "lupu"!
USB version http://www.puppylinu...flash-puppy.htm
===================
***Required Hardware***
CD Burner (CDRW) Drive,
Blank CD,
Extra Storage Device (USB Flash Drive, External Hard Drive)
===================
1. Save these files to your Desktop/Burn Your Live CD:
- Download Latest Puppy Linux ISO (i.e.: lupu-520.iso)
Download BurnCDCC ISO Burning Software
- Open BurnCDCC with Windows Explorer
- Extract All files to a location you can remember
- Double Click
 BurnCDCC
 - Click Browse
 and navigate to the Puppy Linux ISO file you just downloaded
 - Open/Double Click that file
IMPORTANT: Adjust the speed bar to CD: 4x DVD: 1x - Click Start

- Your CD Burner Tray will open automatically
- Insert a blank CD and close the tray
- Click OK
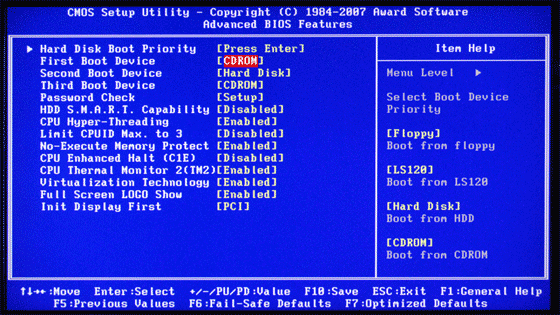
2. Set your boot priority in the BIOS to CD-ROM first, Hard Drive Second
- Start the computer/press the power button
- Immediately start tapping the appropriate key to enter the BIOS, aka "Setup"
(Usually shown during the "Dell" screen, or "Gateway" Screen) - Once in the BIOS, under Advanced BIOS Options change boot priority to:
CD-ROM 1st, Hard Drive 2nd - Open your ROM drive and insert the disk
- Press F10 to save and exit
- Agree with "Y" to continue
- Your computer will restart and boot from the Puppy Linux Live CD
3. Recover Your Data
- Once Puppy Linux has loaded, it is actually running in your computer's Memory (RAM). You will see a fully functioning Graphical User Interface similar to what you normally call "your computer". Internet access may or may not be available depending on your machine, so it is recommended you print these instructions before beginning. Also, double clicking is not needed in Puppy. To expand, or open folders/icons, just click once. Puppy is very light on resources, so you will quickly notice it is much speedier than you are used to. This is normal. Ready? Let's get started.
3a. Mount Drives[list] - Click the Mount Icon located at the top left of your desktop.

- A Window will open. By default, the "drive" tab will be forward/highlighted. Click on Mount for your hard drive.
- Assuming you only have one hard drive and/or partition, there may be only one selection to mount.
- USB Flash Drives usually automatically mount upon boot, but click the "usbdrv" tab and make sure it is mounted.
- If using an external hard drive for the data recovery, do this under the "drive" tab. Mount it now.
- At the bottom left of your desktop a list of all hard drives/partitions, USB Drives, and Optical Drives are listed with a familiar looking hard drive icon.
- Open your old hard drive i.e. sda1
- Next, open your USB Flash Drive or External Drive. i.e. sdc or sdb1
- If you open the wrong drive, simply X out at the top right corner of the window that opens. (Just like in Windows)
- From your old hard drive, drag and drop whatever files/folders you wish to transfer to your USB Drive's Window.
Remember to only click once! No double clicking! Once you drag and drop your first folder, you will notice a small menu will appear giving you the option to move or copy. Choose COPY each time you drag and drop.
YOU ARE DONE!!! Simply click Menu >> Mouse Over Shutdown >> Reboot/Turn Off Computer. Be sure to plug your USB Drive into another working windows machine to verify all data is there and transferred without corruption. Congratulations!
If you're doing this to recovery from a virus or malware infection, (or even if you're not), DO NOT copy executable files (.exe, .scr. etc...) if any of these files are infected you could be copying the corruption over to any new device/computer. just copy documents, pictures, music, or videos.
Note that there might be some other Puppy distros on the page (such as Slacko Puppy), but you need Lucid Puppy (lupu), the Ubuntu-based one. Always make sure you start downloading a file that starts with "lupu"!
USB version http://www.puppylinu...flash-puppy.htm
#5
Posted 15 December 2012 - 12:26 PM
RyanSmitty
- Topic Starter
-
- Member
-
- 3 posts
New Member
Thank you! I found more data with Recuva but I will be sure to use this at a later time!
#6
Posted 15 December 2012 - 01:23 PM
phillpower2
-
- Global Moderator
-
- 24,768 posts
Mechanised Mod
You are welcome and good luck 


Similar Topics
0 user(s) are reading this topic
0 members, 0 guests, 0 anonymous users
As Featured On:


 Sign In
 Create Account
