Jump to content

Welcome to Geeks to Go - Register now for FREE

Need help with your computer or device? Want to learn new tech skills? You're in the right place!
Geeks to Go is a friendly community of tech experts who can solve any problem you have. Just create a free account and post your question. Our volunteers will reply quickly and guide you through the steps. Don't let tech troubles stop you. Join Geeks to Go now and get the support you need!

How it Works Create Account
Photo

windows xp doesn't start


  • Please log in to reply

#16
TheBigGeorge

TheBigGeorge

    Member

  • Topic Starter
  • Member
  • PipPip
  • 20 posts
You're asking if the photo from step 32 of the link looks familiar, right? I didn't see anything close to the CMOS battery you were talking about or that is pictured in step 32.

I only slid out the main battery while cleaning out the dust and removing the RAM and I was able to do this by unscrewing small panels. In the Step 32 picture, it looks like the whole bottom case is removed.

Edited by TheBigGeorge, 03 February 2013 - 11:24 PM.

  • 0

Advertisements


#17
phillpower2

phillpower2

    Mechanised Mod

  • Global Moderator
  • 24,748 posts
Yes that was what I was referring to, I have highlighted the battery and the MB connection in the attachment below, as I said earlier though this may not be the cause of the issue so I suggest that the Ram is checked first (see below) the CMOS battery must still be replaced asap;

How to physically test your Ram.

The following checks require the computer case to be opened so take the following safety precautions 1st, disconnect the power cord from the wall socket and take anti static precautions before touching anything inside, you can do this by touching a bare metal part of the case.

Have a pencil and notepad to hand.
Remove each stick of Ram and blow out the memory slots.
Insert the first stick of Ram in memory slot one, reconnect the power and in the case of a desktop computer the video to screen cable.
Power up the computer and see how it goes.
Make a note of the results.
Repeat the procedure until the first stick of Ram has been tested in each memory slot and the results written down.
Remove the first stick of Ram and put it to one side on top of a piece of paper with the number one on it for identification purposes.
Repeat the procedure with all Ram until each stick has been tested in all slots, the results written down and the sticks identified numerically.
Please note that some MBs (motherboards) will not boot unless there is Ram in slot one so please provide us with your motherboard details, brand, model name/number and any revision number, these details may be found by the CPU, between the PCI slots and/or around the edge of the motherboard, once we have the MB details we can look for the user manual.

Let us know the results when done please.
  • 0

#18
TheBigGeorge

TheBigGeorge

    Member

  • Topic Starter
  • Member
  • PipPip
  • 20 posts
There is only one removable stick of RAM. It has 4 chips on it which can't be removed unless you were going to desolder it.
  • 0

#19
phillpower2

phillpower2

    Mechanised Mod

  • Global Moderator
  • 24,748 posts

I did remove the ram. I have 4 I believe. There are 4 chips. They all say Samsung 136 K4S561632B-TC1H


Sorry crossed wires as I read the above to mean that you have four sticks of Ram.

What happens if you remove the Ram stick and turn on the notebook, any error beeps.

Have you tried the Ram in the other slot.
  • 0

#20
TheBigGeorge

TheBigGeorge

    Member

  • Topic Starter
  • Member
  • PipPip
  • 20 posts
If I remove the RAM the computer is completely dead. It won't even begin start up when I turn it on. Switching the stick of RAM into the other port does nothing. It still cuts out and the same time and does everything I described in my first post.
  • 0

#21
phillpower2

phillpower2

    Mechanised Mod

  • Global Moderator
  • 24,748 posts
Does the notebook normally beep once when it boots up successfully.

Do you have a Windows XP or a system restore disk that may have been provided with the computer.

If not check if you have a Recovery Partition on the HDD, "how to" below;

To access the recovery partition do the following...

Power off the laptop.
Hold down the 0 (zero) key and turn the laptop on. Keep holding down the zero key until the TOSHIBA logo appears.
Start tapping the zero key repeatedly at this point.
Stop if the unit beeps or when the TOSHIBA logo disappears.
The screen should flash HDD RECOVERY MODE for a second and then it will load the Toshiba recovery program right from the hard drive.
  • 0

#22
TheBigGeorge

TheBigGeorge

    Member

  • Topic Starter
  • Member
  • PipPip
  • 20 posts
You usually beeps when I turn it on after being powered off.

I don't have a recovery disk and holding down the 0 (zero) key doesn't lead to a recovery mode
  • 0

#23
phillpower2

phillpower2

    Mechanised Mod

  • Global Moderator
  • 24,748 posts

You usually beeps when I turn it on after being powered off.
This is a signal indicating that POST has completed successfully and the fact that you do not get any error beeps when the notebook is powered on with no Ram inserted suggests that the problem is before the Ram and that your Ram may be ok, the power supply and the MB are often the cause.

I don't have a recovery disk and holding down the 0 (zero) key doesn't lead to a recovery mode
Okay no disk rules out trying a Repair Installation of XP.
Is there data on the HDD that you would like to try and secure.
No recovery partition could mean that there has never been one, the HDD has previously been fully formatted or that the HDD is bad.


Some information on POST http://www.poweronse...t.com/post2.htm
  • 0

#24
TheBigGeorge

TheBigGeorge

    Member

  • Topic Starter
  • Member
  • PipPip
  • 20 posts
Hey there Phil,

I should have been more clear.

If I remove the battery, then there is a beep and I usually get the Bad Check Sum (CMOS) message.

Otherwise there is no beep.

The computer NEVER powers on or does anything if I remove the RAM.

There is stuff saved on the computer that I would like to save/recover.

I apologize if I was hard to understand before. I do really appreciate your help with this and also for your patience so thank you.
  • 0

#25
phillpower2

phillpower2

    Mechanised Mod

  • Global Moderator
  • 24,748 posts
Hello TheBigGeorge

First of all I suggest that you try and secure the important data on the HDD, please see below;


===================
***Required Hardware***
CD Burner (CDRW) Drive,
Blank CD,
Extra Storage Device (USB Flash Drive, External Hard Drive)

===================

1. Save these files to your Desktop/Burn Your Live CD:
  • Download Latest Puppy Linux ISO (i.e.: lupu-520.iso)
    Download BurnCDCC ISO Burning Software

  • Open BurnCDCC with Windows Explorer
  • Extract All files to a location you can remember
  • Double Click Posted Image BurnCDCC
  • Click Browse Posted Image and navigate to the Puppy Linux ISO file you just downloaded
  • Open/Double Click that file
    IMPORTANT: Adjust the speed bar to CD: 4x DVD: 1x
  • Click Start Posted Image
  • Your CD Burner Tray will open automatically
  • Insert a blank CD and close the tray
  • Click OK
Puppy Linux Live CD will now be created
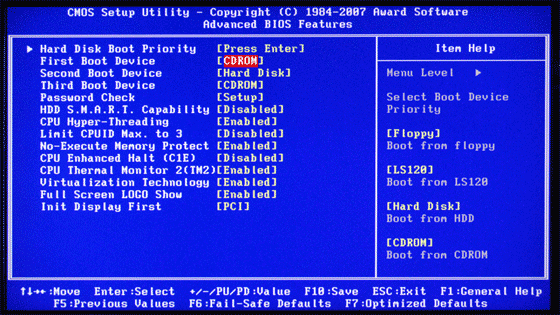
2. Set your boot priority in the BIOS to CD-ROM first, Hard Drive Second
  • Start the computer/press the power button
  • Immediately start tapping the appropriate key to enter the BIOS, aka "Setup"
    (Usually shown during the "Dell" screen, or "Gateway" Screen)
  • Once in the BIOS, under Advanced BIOS Options change boot priority to:
    CD-ROM 1st, Hard Drive 2nd
  • Open your ROM drive and insert the disk
  • Press F10 to save and exit
  • Agree with "Y" to continue
  • Your computer will restart and boot from the Puppy Linux Live CD
    Posted Image

3. Recover Your Data
  • Once Puppy Linux has loaded, it is actually running in your computer's Memory (RAM). You will see a fully functioning Graphical User Interface similar to what you normally call "your computer". Internet access may or may not be available depending on your machine, so it is recommended you print these instructions before beginning. Also, double clicking is not needed in Puppy. To expand, or open folders/icons, just click once. Puppy is very light on resources, so you will quickly notice it is much speedier than you are used to. This is normal. Ready? Let's get started.

    3a. Mount Drives
  • Click the Mount Icon located at the top left of your desktop. Posted Image
  • A Window will open. By default, the "drive" tab will be forward/highlighted. Click on Mount for your hard drive.
  • Assuming you only have one hard drive and/or partition, there may be only one selection to mount.
  • USB Flash Drives usually automatically mount upon boot, but click the "usbdrv" tab and make sure it is mounted.
  • If using an external hard drive for the data recovery, do this under the "drive" tab. Mount it now.
3b. Transfer Files.
  • At the bottom left of your desktop a list of all hard drives/partitions, USB Drives, and Optical Drives are listed with a familiar looking hard drive icon.
  • Open your old hard drive i.e. sda1
  • Next, open your USB Flash Drive or External Drive. i.e. sdc or sdb1
  • If you open the wrong drive, simply X out at the top right corner of the window that opens. (Just like in Windows)
  • From your old hard drive, drag and drop whatever files/folders you wish to transfer to your USB Drive's Window.
For The Novice: The common path to your pictures, music, video, and documents folders is: Documents and Settings >> All Users (or each idividual name of each user. CHECK All Names!) >> Documents >> You will now see My Music, My Pictures, and My Videos.

Remember to only click once! No double clicking! Once you drag and drop your first folder, you will notice a small menu will appear giving you the option to move or copy. Choose COPY each time you drag and drop.

YOU ARE DONE!!! Simply click Menu >> Mouse Over Shutdown >> Reboot/Turn Off Computer. Be sure to plug your USB Drive into another working windows machine to verify all data is there and transferred without corruption. Congratulations!


If you're doing this to recovery from a virus or malware infection, (or even if you're not), DO NOT copy executable files (.exe, .scr. etc...) if any of these files are infected you could be copying the corruption over to any new device/computer. just copy documents, pictures, music, or videos.

Note that there might be some other Puppy distros on the page (such as Slacko Puppy), but you need Lucid Puppy (lupu), the Ubuntu-based one. Always make sure you start downloading a file that starts with "lupu"!

Once this is done we can move on, good luck.
  • 0

Advertisements


#26
TheBigGeorge

TheBigGeorge

    Member

  • Topic Starter
  • Member
  • PipPip
  • 20 posts
Hey Phil,

Still here. I started downloading the stuff. I need to go buy a flashdrive which is taking a bit of time.
  • 0

#27
phillpower2

phillpower2

    Mechanised Mod

  • Global Moderator
  • 24,748 posts
No worries as we will be here when you are ready and thanks for the update :thumbsup:
  • 0

#28
TheBigGeorge

TheBigGeorge

    Member

  • Topic Starter
  • Member
  • PipPip
  • 20 posts
I am stuck on
2. Set your boot priority in the BIOS to CD-ROM first, Hard Drive Second

It gives me the menu, but when I press "C" nothing happens. I continue to press it and eventually there is a beeping sound, but nothing happens.
  • 0

#29
TheBigGeorge

TheBigGeorge

    Member

  • Topic Starter
  • Member
  • PipPip
  • 20 posts
Also for reference here is the screen that pops up when I start the computer.

"We apologize for the inconvenience, but Windows did not start successfully. A recent hardware or software change might have caused this

If your computer stopped responding, restarted unexpectedly, or was automatically shut down to protect your files and folders, choose LAst Known Good Configuration to revert to the most recent settings that worked.

If a previous startup attempt was interrupted due to a power failure or because the Power or Reset button was pressed o, or if you aren't sure what caused the problem, choose Start Windows Normally."

{Then it gives me these options to choose}

"Safe Mode
Safe Mode with Networking
Safe Mode with Command Prompt

Last Known Good Configuration (your most recent settings that worked)

Start Windows Normally"
  • 0

#30
phillpower2

phillpower2

    Mechanised Mod

  • Global Moderator
  • 24,748 posts

I am stuck on
2. Set your boot priority in the BIOS to CD-ROM first, Hard Drive Second

It gives me the menu, but when I press "C" nothing happens. I continue to press it and eventually there is a beeping sound, but nothing happens.


Have you tried the Last Known Good Configuration (your most recent settings that worked) option.

Sorry but not sure why you are pressing "C"

To set your boot priority in the BIOS to CD-ROM first, Hard Drive Second

Start the computer/press the power button
Immediately start tapping the appropriate key to enter the BIOS, aka "Setup"
(Usually shown during the "Dell" screen, or "Gateway" Screen etc)
Once in the BIOS, under Advanced BIOS Options change boot priority to:
CD-ROM 1st, Hard Drive 2nd
Open your ROM drive and insert the disk
Press F10 to save and exit
Agree with "Y" to continue


  • 0


Similar Topics

0 user(s) are reading this topic

0 members, 0 guests, 0 anonymous users

As Featured On:

Microsoft Yahoo BBC MSN PC Magazine Washington Post HP