Jump to content

Welcome to Geeks to Go - Register now for FREE

Need help with your computer or device? Want to learn new tech skills? You're in the right place!
Geeks to Go is a friendly community of tech experts who can solve any problem you have. Just create a free account and post your question. Our volunteers will reply quickly and guide you through the steps. Don't let tech troubles stop you. Join Geeks to Go now and get the support you need!

How it Works Create Account
Photo

Cant Boot Windows XP - STOP: 0x0000008E.... [Solved]


  • This topic is locked This topic is locked

#1
qwerty321

qwerty321

    Member

  • Member
  • PipPip
  • 48 posts
My Comp (Lenovo G530)is not booting. It has genuine Windows XP Sp3 in it.

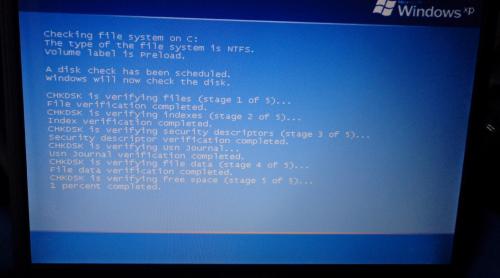
When I open it, it asks me to checkdisk. Which takes ages. After I complete the checkdisk it restarts

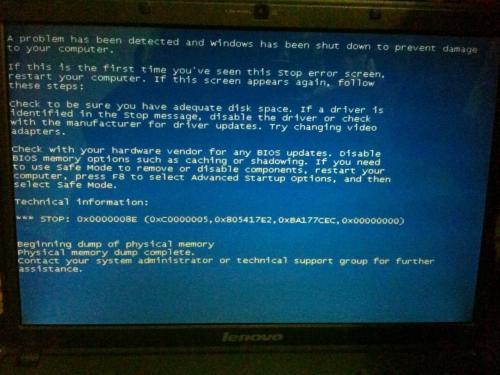
and I get the error STOP: 0x0000008E(0xC0000005,0x805417E2, 0xBA177CEC, 0x00000000)
I cant access it even through safe mode.

I tried this post http://www.geekstogo...ath-stop-codes/ However, it had no solution for STOP: 0x0000008e

Please Help!

Thanks in advance!

Attached Thumbnails

  • DSC02831.jpg
  • 1cf5d737fdc4214669c7a16e52d58f38b89b507b5e4b3cc4fc8a926052d830b6.jpg

  • 0

Advertisements


#2
Jasmyne

Jasmyne

    Trusted Helper

  • Malware Removal
  • 2,010 posts
Hi! My name is Jasmyne and Welcome to Geeks to Go!

I apologize for the delay, at times we get quite busy, thank you for your patience. I'm sorry you are having issues with your computer but I will do my best to resolve them as quickly as possible. I know having an infected computer is frustrating because I was once where you are now!

Please be patient with me as I am currently in training, and all of my responses to you have to be reviewed by my instructor before I post them. Just keep in mind that you get the advantage as you have 2 people examining your issue.

  • You may want to print out these instructions, or copy them to a text file so that will have a copy in case you loose your connection to the internet during a removal process.
  • Please make sure to carefully read any instruction that I give you and in perform them in the order they are posted. If you're not sure, or if something unexpected happens, do NOT continue! Stop and ask! Never be afraid to ask questions! :)
  • Please do not attach any log files to your replies unless I specifically ask you. Instead please copy and paste so as to include the log in your reply. You can do this in separate posts if it's easier for you.
  • Please note that there is no "Quick & Easy Fix" to most malware infections and we may need to use several different tools to get your system clean.
  • Please stick with me until I tell you that your machine is clean. If you don't see any symptoms it does not mean your system is clear of malware
  • Please don't run any other scans or other software unless I ask you to, as it will make this repair more difficult.
  • Please reply within 3 days. Topics with no reply in 4 days are closed!

With that all stated, let's get started! :)

Please print these instruction out so that you will be able to reference them later.

  • Download OTLPENet.exe to your desktop
  • Ensure that you have a blank CD in the drive
  • Double click OTLPENet.exe and this will then open imgburn to burn the file to CD
  • Reboot your system using the boot CD you just created.
    Note : If you do not know how to set your computer to boot from CD follow the steps here
  • As the CD needs to detect your hardware and load the operating system, I would recommend a nice cup of tea whilst it loads :)
  • Your system should now display a Reatogo desktop.
    Note : as you are running from CD it is not exactly speedy
  • Double-click on the OTLPE icon.
  • Select the Windows folder of the infected drive if it asks for a location
  • When asked "Do you wish to load the remote registry", select Yes
  • When asked "Do you wish to load remote user profile(s) for scanning", select Yes
  • Ensure the box "Automatically Load All Remaining Users" is checked and press OK
  • OTL should now start.
  • Drag and drop this attached scan.txt into the Custom scans and fixes box
  • Press Run Scan to start the scan.
  • When finished, the file will be saved in drive C:\OTL.txt
  • Copy this file to your USB drive if you do not have internet connection on this system.
  • Right click the file and select send to: select the USB drive.
  • Confirm that it has copied to the USB drive by selecting it.
  • You can backup any files that you wish from this OS.
  • Please post the contents of the C:\OTL.txt file in your reply.

  • 0

#3
qwerty321

qwerty321

    Member

  • Topic Starter
  • Member
  • PipPip
  • 48 posts
Hello Jasmyne,

Thanks for the reply.

I followed Step 1 and 2.

When I burn OTLPENet.exe to the CD, I get stuck at 0%. I left it at for around an hour still it was stuck at 0%. I tried multiple times but unfortunately the results was the same. It is Win7 64 bit comp. So I tried in another computer with Windows XP but the result was the same. The blank disc works if I try to burn other files into it. Where did I go wrong??

PS I tried with another blank CD but the result was the same :confused:

Edited by qwerty321, 24 June 2013 - 09:23 AM.

  • 0

#4
Jasmyne

Jasmyne

    Trusted Helper

  • Malware Removal
  • 2,010 posts
We can try another route, do you have a 1-2 GB USB drive that you can use?
  • 0

#5
qwerty321

qwerty321

    Member

  • Topic Starter
  • Member
  • PipPip
  • 48 posts
Sure do have it!!
  • 0

#6
Jasmyne

Jasmyne

    Trusted Helper

  • Malware Removal
  • 2,010 posts
Alright, Let's try making a bootable USB. :)

Download Peazip to the desktop
Run and install the programme
As it installs this page will show, deselect the AVG ticks
Press decline and it will then install cleanly

Posted Image

Download the following files to the desktop .. Right click the links and select save as...then select desktop

Rufus

OTLPE_standard

Right click OTLPE on your desktop and select ..Open as archive

Posted Image


Select OTLPE standard

Posted Image

Click Extract, ensure that desktop is selected

Posted Image

Insert the USB stick Then run Rufus
Posted Image
Select the ISO file on the desktop via the ISO icon.

Press Start Burn
Posted Image

After you've created the USB, reboot the computer using the USB drive and start with #6 of the previous instructions.
  • 0

#7
qwerty321

qwerty321

    Member

  • Topic Starter
  • Member
  • PipPip
  • 48 posts
Ignore.. Mistake :surrender:

Edited by qwerty321, 24 June 2013 - 01:16 PM.

  • 0

#8
Jasmyne

Jasmyne

    Trusted Helper

  • Malware Removal
  • 2,010 posts
The OTLPE Standard should be 93.5 MB


Try this https://dl.dropboxus...LPE_New_Net.iso instead.
  • 0

#9
qwerty321

qwerty321

    Member

  • Topic Starter
  • Member
  • PipPip
  • 48 posts
I asked my fren to dropbox it, then realized mine dl was 93.5mb itself. :happy:

Then I proceeded as you asked.

I reached Step 8. Select the Windows folder of the infected drive if it asks for a location

The comp has only a single drive C: However, when I double click or try to enter C: to select the windows folder, nothing happens. Im unable to enter into C: in the choose folder option so im not able to select C/windows as the folder. If I choose C: instead of C/Windows as the folder, I get "Target is not windows 2000 or later"

The My Computer says C: is 0 bytes!!

Edited by qwerty321, 24 June 2013 - 05:22 PM.

  • 0

#10
Jasmyne

Jasmyne

    Trusted Helper

  • Malware Removal
  • 2,010 posts
It appears you may have a SATA hard drive which can cause this error, we just need to load some drivers before booting with OTLPE to be able to access your drive.

Instructions for downloading the drivers can be found here. Once you completed Step #8 rather than installation in those instructions, you'll want to boot with OTLPE and try to run the scan again.
  • 0

Advertisements


#11
qwerty321

qwerty321

    Member

  • Topic Starter
  • Member
  • PipPip
  • 48 posts
Hey I do have a "Start Recovery Disc" can it be of any help??

" 1. Some Lenovo "Windows XP with SP3 Product Recovery disc" and all "Windows Vista Product Recovery disc" that are bundled together with these computers are integrated with Intel Matrix Storage Manager Driver (AHCI model). You can use the disc to install Windows without these steps.
  • 0

#12
qwerty321

qwerty321

    Member

  • Topic Starter
  • Member
  • PipPip
  • 48 posts
Im unable to access internet from that computer. So i downloaded Intel Matrix Storage Manager Driver in another comp.

I followed 1-6 from the link.

7. Install Windows XP and Service Pack 3. - How to do that?? By doing so will I lose the documents??

I tried to install Intel Matrix Storage Manager Driver via another USB drive after booting the comp through the bootable USB we made earlier. And I got "There is not enough space on drive C:\ to extract this package. Please free up 371.20kb and retry"
  • 0

#13
Jasmyne

Jasmyne

    Trusted Helper

  • Malware Removal
  • 2,010 posts
Let's see if I can clarify some of this for you.

Hey I do have a "Start Recovery Disc" can it be of any help??

" 1. Some Lenovo "Windows XP with SP3 Product Recovery disc" and all "Windows Vista Product Recovery disc" that are bundled together with these computers are integrated with Intel Matrix Storage Manager Driver (AHCI model). You can use the disc to install Windows without these steps.


If the startup disk is XP SP2 and is one that is bundled it might have the drivers we need, but it might not.

Im unable to access internet from that computer. So i downloaded Intel Matrix Storage Manager Driver in another comp.

I followed 1-6 from the link.

7. Install Windows XP and Service Pack 3. - How to do that?? By doing so will I lose the documents??

I tried to install Intel Matrix Storage Manager Driver via another USB drive after booting the comp through the bootable USB we made earlier. And I got "There is not enough space on drive C:\ to extract this package. Please free up 371.20kb and retry"


I should have clarified on the link. I've broken them down and modified a bit for your situation and added the OTLPE steps so you don't have to go back to the previous post. :)

On another computer:
  • Download the Intel Matrix Storage Manager Driver from the Web site and extract the driver to C:\DRIVERS\WIN\IMSM. Copy the driver (all the files in C:\DRIVERS\WIN\IMSM) to a USB or CD.

On the infected computer:
  • Make sure that SATA AHCI is enabled;
    • Press the F2 key to enter the BIOS Setup Utility when the "Lenovo" logo appears on the screen. The BIOS Setup Utility menu will be displayed.
    • Set the SATA controller to "AHCI" mode. (The Interface will be different on each model. Most of them are under the "Advanced" menu or "Configuration" menu.)
    • Press the F10 key to save the new setup, and then select Yes.
  • Boot the computer from your USB with OTLPE.
  • During startup Press F6 to install a third-party SCSI or RAID driver first.
  • When prompted, select S for Specify Additional Device.
  • When prompted, insert the USB or Disk that you created previously with the drivers, and press Enter.
    • If your system has Intel 82801HEM/HBM SATA AHCI Controller, select
      Intel® ICH8M-E/M SATA AHCI Controller, and press Enter.
    • If your system has Intel 82801GBM SATA AHCI Controller, select
      Intel® ICH7M/MDH SATA AHCI Controller, and press Enter.
    • If your system has Intel ICH9M-E/M SATA AHCI Controller, select
      Intel® ICH9M-E/M SATA AHCI Controller, and press Enter.
  • Continue to boot the computer with OTLPE.
  • Your system should now display a Reatogo desktop.
    Note : as you are running from a USB it is not exactly speedy
  • Double-click on the OTLPE icon.
  • Select the Windows folder of the infected drive if it asks for a location
  • When asked "Do you wish to load the remote registry", select Yes
  • When asked "Do you wish to load remote user profile(s) for scanning", select Yes
  • Ensure the box "Automatically Load All Remaining Users" is checked and press OK
  • OTL should now start.
  • Drag and drop this attached scan.txt into the Custom scans and fixes box
  • Press Run Scan to start the scan.
  • When finished, the file will be saved in drive C:\OTL.txt
  • Copy this file to your USB drive if you do not have internet connection on this system.
  • Right click the file and select send to: select the USB drive.
  • Confirm that it has copied to the USB drive by selecting it.
  • You can backup any files that you wish from this OS.
  • Please post the contents of the C:\OTL.txt file in your reply.

  • 0

#14
qwerty321

qwerty321

    Member

  • Topic Starter
  • Member
  • PipPip
  • 48 posts
The CD came along with the laptop. It is a Start Recovery Disk and may have the drivers.


I followed 1-4. But when I get the message "The Disk cannot be read beacuse it contains an unrecognized files system. Press any key to continue."

I had copied the folder WIN to another USB drive. I also tried by keeping the only the files which were inside IMSM.


PS After I typed S, I was got "Insert the disk labeled manufacture-supplied hardware support disk into drive A: and Press enter when ready"

My Drive A is the CD drive. So is there a chance the CD drive was accessed instead of the USB with the drivers or the bootable USB drive we made was accessed instead of the USB with the drivers??

Edited by qwerty321, 25 June 2013 - 11:47 AM.

  • 0

#15
Jasmyne

Jasmyne

    Trusted Helper

  • Malware Removal
  • 2,010 posts
These things get tricky at times, let's try a different approach...

For x32 (x86) bit systems download Farbar Recovery Scan Tool and save it to a flash drive.

Plug the flashdrive into the infected PC.

Enter System Recovery Options.

To enter System Recovery Options from the Advanced Boot Options:
  • Restart the computer.
  • As soon as the BIOS is loaded begin tapping the F8 key until Advanced Boot Options appears.
  • Use the arrow keys to select the Repair your computer menu item.
  • Select English as the keyboard language settings, and then click Next.
  • Select the operating system you want to repair, and then click Next.
  • Select your user account an click Next.

To enter System Recovery Options by using Windows installation disc:
  • Insert the installation disc.
  • Restart your computer.
  • If prompted, press any key to start Windows from the installation disc. If your computer is not configured to start from a CD or DVD, check your BIOS settings.
  • Click Repair your computer.
  • Select English as the keyboard language settings, and then click Next.
  • Select the operating system you want to repair, and then click Next.
  • Select your user account and click Next.

If you do not have recovery console installed and do not have a Windows installation disk
  • Download the recovery console iso here
  • Burn a CD using the recovery console iso and use it boot into recovery console..

On the System Recovery Options menu you will get the following options:
Startup Repair
System Restore
Windows Complete PC Restore
Windows Memory Diagnostic Tool
Command Prompt
[*]Select Command Prompt
[*]In the command window type in notepad and press Enter.
[*]The notepad opens. Under File menu select Open.
[*]Select "Computer" and find your flash drive letter and close the notepad.
[*]In the command window type e:\frst.exe (for x64 bit version type e:\frst64) and press Enter
Note: Replace letter e with the drive letter of your flash drive.
[*]The tool will start to run.
[*]When the tool opens click Yes to disclaimer.
[*]Press Scan button.
[*]It will make a log (FRST.txt) on the flash drive. Please copy and paste it to your reply.[/list]
  • 0


Similar Topics

0 user(s) are reading this topic

0 members, 0 guests, 0 anonymous users

As Featured On:

Microsoft Yahoo BBC MSN PC Magazine Washington Post HP