Jump to content

Welcome to Geeks to Go - Register now for FREE

Need help with your computer or device? Want to learn new tech skills? You're in the right place!
Geeks to Go is a friendly community of tech experts who can solve any problem you have. Just create a free account and post your question. Our volunteers will reply quickly and guide you through the steps. Don't let tech troubles stop you. Join Geeks to Go now and get the support you need!

How it Works Create Account
Photo

Display driver igfx stop Responding and has recovered


  • Please log in to reply

#16
olace88

olace88

    Member

  • Topic Starter
  • Member
  • PipPip
  • 97 posts

Gday.
I can only think of tw options now.
First, monitor the volts and temps using HWMonitor. Download and install the free ver.. Please make sure to expand the+signs so all components are showing. Let the computer idle for a couple of minutes, take a screen shot. Play a game for about 5 minutes, take a screenshot, upload both with your next reply.
> http://www.cpuid.com...or.html#gallery

The video could be on it's way out. I think nly a reapr shot can test that.

I have posted a Posted Image on the staff tech desk, see what that brings.


Will post results asap. Thanks!
  • 0

Advertisements


#17
olace88

olace88

    Member

  • Topic Starter
  • Member
  • PipPip
  • 97 posts

Also if I may can you do the following for us?

Download BlueScreenView
No installation required.
Double click on BlueScreenView.exe file to run the program.
When scanning is done, go Edit>Select All.
Go File>Save Selected Items, and save the report as BSOD.txt.
Open BSOD.txt in Notepad, copy all content, and paste it into your next reply.

Thanks to Broni for the instructions and program


Will do and post reults. Thanks guys!
  • 0

#18
olace88

olace88

    Member

  • Topic Starter
  • Member
  • PipPip
  • 97 posts

I'll jump in too.

In the Search box type: dxdiag

wait for it to find it. Right click on dxdiag.exe and Run As Admin.

Once it finishes Save All Information. Point it at your desktop and it should save it as dxdiag.txt.

Exit

Double click on dxdiag.txt and copy and paste the text into a reply.


Get Process Explorer

http://live.sysinter...com/procexp.exe
Save it to your desktop then run it (Vista or Win7 - right click and Run As Administrator).

View, Select Column, check Verified Signer, OK
Options, Verify Image Signatures


Click twice on the CPU column header to sort things by CPU usage with the big hitters at the top.

Wait a full minute then:

File, Save As, Save. Open the file Procexp.txt on your desktop and copy and paste the text to a reply.


Get the free version of Speccy:

http://www.filehippo...download_speccy (Look in the upper right for the Download
Latest Version button) Download, Save and Install it. Run Speccy. When it finishes (the little icon in the bottom left will stop moving), File, Save as Text File, (to your desktop) note the name it gives. OK. Open the file in notepad and delete the line that gives the serial number of your Operating System. (It will be near the top about 10 lines down.) Attach the file to your next post.


Start, All Programs, Accessories then right click on Command Prompt and Run as Administrator. Then type (with an Enter after each line).

sfc  /scannow

(This will check your critical system files. Does this finish without complaint? IF it says it couldn't fix everything then:

Copy the next two lines:

findstr /c:"[SR]" \windows\logs\cbs\cbs.log > \windows\logs\cbs\junk.txt
notepad \windows\logs\cbs\junk.txt

Start, All Programs, Accessories, right click on Command Prompt and Run as Administrator, Continue. Right click and Paste or Edit then Paste and the copied line should appear.
Hit Enter. Copy and paste the text from notepad or if it is too big, just attach the file.)


1. Please download the Event Viewer Tool by Vino Rosso
http://images.malwar...om/vino/VEW.exe
and save it to your Desktop:
2. Right-click VEW.exe and Run AS Administrator
3. Under 'Select log to query', select:

* System
4. Under 'Select type to list', select:
* Error
* Warning


Then use the 'Number of events' as follows:


1. Click the radio button for 'Number of events'
Type 20 in the 1 to 20 box
Then click the Run button.
Notepad will open with the output log.


Please post the Output log in your next reply then repeat but select Application.

Ron


Will do...Appreciate this very much guys.
  • 0

#19
iammykyl

iammykyl

    Tech Staff

  • Technician
  • 7,659 posts
Thank you all for coming in with your suggestions.
I will await results before chirping in again.


olace88

Please remember to post a HWMoniter screenshot, Post #11.
Thanks
  • 0

#20
olace88

olace88

    Member

  • Topic Starter
  • Member
  • PipPip
  • 97 posts

Gday.
I can only think of tw options now.
First, monitor the volts and temps using HWMonitor. Download and install the free ver.. Please make sure to expand the+signs so all components are showing. Let the computer idle for a couple of minutes, take a screen shot. Play a game for about 5 minutes, take a screenshot, upload both with your next reply.
> http://www.cpuid.com...or.html#gallery

The video could be on it's way out. I think nly a reapr shot can test that.

I have posted a Posted Image on the staff tech desk, see what that brings.


Hi,

Here's the results:
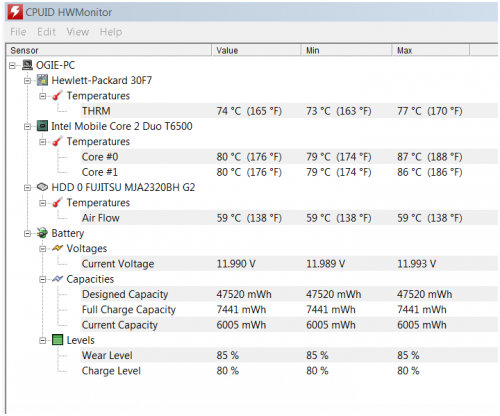
HWMonitor-Result after installation of HWMonitor. Laptop already running for 2 hours.
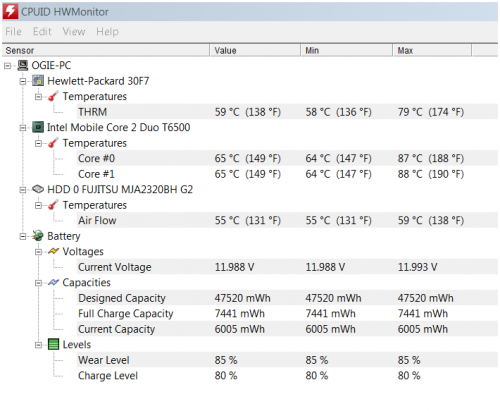
HWMonitor_10Minutes- result after 10 minutes of installation
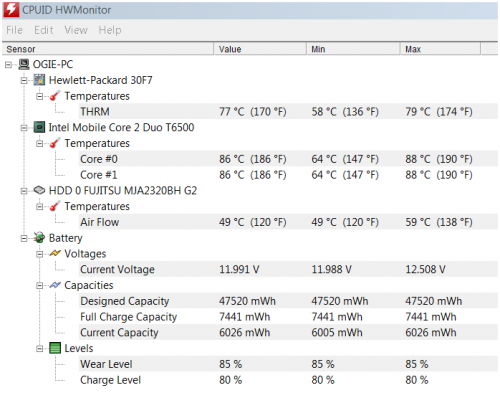
HWMonitor_12minutes- results after playing online FPS(crossfire)

The error have not appeared since the installation.

I will post the other results of the other inputs...asap.


Thanks,

olace88

Attached Thumbnails

  • HWMonitor_.PNG
  • HWMonitor_10minutes.PNG
  • HWMonitor_12minutes after playing Crossfire.PNG

  • 0

#21
olace88

olace88

    Member

  • Topic Starter
  • Member
  • PipPip
  • 97 posts

I'll jump in too.

In the Search box type: dxdiag

wait for it to find it. Right click on dxdiag.exe and Run As Admin.

Once it finishes Save All Information. Point it at your desktop and it should save it as dxdiag.txt.

Exit

Double click on dxdiag.txt and copy and paste the text into a reply.


Get Process Explorer

http://live.sysinter...com/procexp.exe
Save it to your desktop then run it (Vista or Win7 - right click and Run As Administrator).

View, Select Column, check Verified Signer, OK
Options, Verify Image Signatures


Click twice on the CPU column header to sort things by CPU usage with the big hitters at the top.

Wait a full minute then:

File, Save As, Save. Open the file Procexp.txt on your desktop and copy and paste the text to a reply.


Get the free version of Speccy:

http://www.filehippo...download_speccy (Look in the upper right for the Download
Latest Version button) Download, Save and Install it. Run Speccy. When it finishes (the little icon in the bottom left will stop moving), File, Save as Text File, (to your desktop) note the name it gives. OK. Open the file in notepad and delete the line that gives the serial number of your Operating System. (It will be near the top about 10 lines down.) Attach the file to your next post.


Start, All Programs, Accessories then right click on Command Prompt and Run as Administrator. Then type (with an Enter after each line).

sfc  /scannow

(This will check your critical system files. Does this finish without complaint? IF it says it couldn't fix everything then:

Copy the next two lines:

findstr /c:"[SR]" \windows\logs\cbs\cbs.log > \windows\logs\cbs\junk.txt
notepad \windows\logs\cbs\junk.txt

Start, All Programs, Accessories, right click on Command Prompt and Run as Administrator, Continue. Right click and Paste or Edit then Paste and the copied line should appear.
Hit Enter. Copy and paste the text from notepad or if it is too big, just attach the file.)


1. Please download the Event Viewer Tool by Vino Rosso
http://images.malwar...om/vino/VEW.exe
and save it to your Desktop:
2. Right-click VEW.exe and Run AS Administrator
3. Under 'Select log to query', select:

* System
4. Under 'Select type to list', select:
* Error
* Warning


Then use the 'Number of events' as follows:


1. Click the radio button for 'Number of events'
Type 20 in the 1 to 20 box
Then click the Run button.
Notepad will open with the output log.


Please post the Output log in your next reply then repeat but select Application.

Ron


Will do...Appreciate this very much guys.


Hello Ron,

Here are the results. I attached it all files to save space.

Attached Files


  • 0

#22
olace88

olace88

    Member

  • Topic Starter
  • Member
  • PipPip
  • 97 posts
Hi Ron,

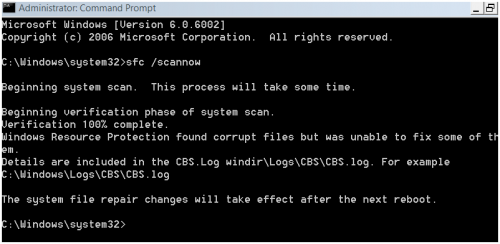
I forgot to post the SFC / Scannow snapshot...here it is. The junk.txt file is attached in my earlier response.

sorry for this delay.

Attached Thumbnails

  • SFCScannow_Snapshot.PNG

  • 0

#23
RKinner

RKinner

    Malware Expert

  • Expert
  • 24,625 posts
  • MVP
Looks like your PC is about to melt down. Suspect that's the source of your problem. Both HWMonitor and Speccy agree that it is running way too hot. I would turn it off and let it cool. When you turn it on again listen carefully you should hear the fan run? Do you?

Make sure it is operating on a hard surface. A soft surface will block the vents. Vents must be clear of any dust or hair. It helps to prop up the back with a book (don't block the vents). Sometimes if you run speedfan
http://www.almico.com/sfdownload.php

Download, save and Install it (Win 7 or Vista right click and Run As Admin.) then run it.

then check Automatic Fan Speed it will run cooler.
I would get a cooler tray to sit it on. That may be enough to keep it cool. I just fixed an HP with a similar overheating issue by cleaning the heatsink and replacing the thermal pads with Arctic Silver. Lot of work to disassemble the thing but I can't believe how cool it runs now.

Your event logs show a lot of these errors:

Log: 'System' Date/Time: 31/08/2013 9:37:21 PM
Type: Error Category: 0
Event: 12 Source: PlugPlayManager
The device 'JMB38X xD Host Controller' (PCI\VEN_197B&DEV_2384&SUBSYS_30F7103C&REV_00\4&37ba8cc&0&04E4) disappeared from the system without first being prepared for removal.


I think that's the Jmicron Card Reader. Not sure what its problem is. Unlikely that you are manually unplugging it so many times. Could be a bad driver or a bad device.

SFC is just finding the usual settings.ini plus the motif stuff that a recent update broke. Nothing to worry about there.

Process Explorer is showing a svchost process in the second position. Not all that high but usually the second position is procexp.exe so I wonder about it.
Ron
  • 0

#24
iammykyl

iammykyl

    Tech Staff

  • Technician
  • 7,659 posts

Both HWMonitor and Speccy agree that it is running way too hot.


Agree RKinner, probable clogged up with gunk, A good clean is in order, if olace88 is prepared to do it.
  • 0

#25
olace88

olace88

    Member

  • Topic Starter
  • Member
  • PipPip
  • 97 posts
Hi Guys,

Thanks for the feedback. Would you have a procedure to give it a good hardware cleaning? I just realized when I saw the HWMonitor results that it is running way too hot! I can't believe it myself at first. The reading is almost close to boiling point. Yes, I usually hear the fan during power up and sometimes when I open an application I would also hear something like the fan is running or it may e the hard disk. not sure which one though. I would guess an airconditioned environment would help but it's something i don't have.

Meanwhile, I'll use the speedfan software. But i would really need to see if i can give this a good hardware clean, Maybe a lot of dust have already accumulated because i'm not operating on an airconditioned environment.

olace88
  • 0

Advertisements


#26
olace88

olace88

    Member

  • Topic Starter
  • Member
  • PipPip
  • 97 posts
Also, I want to understand that why my system kind of stabilisizes during long periods of use when it is hotter. I often get the display error during the first hour of use. Any thoughts?

Thanks!

olace88
  • 0

#27
RKinner

RKinner

    Malware Expert

  • Expert
  • 24,625 posts
  • MVP
No idea why it stabilizes. Suppose something gets better with heat as other things get worse.

Here's a video and some step by step instructions.


http://www.insidemyl...ion-dv4-laptop/

Hardest thing is not the disassembly but the reassembly. The idiots use a bunch of different sized screws and getting all of them back in the right holes is hard. I wound up with 3 left over and two missing but decided since it didn't rattle not to try it again. I would suggest you take pictures every 3-4 screws (with the just removed screw laying next to the hole it came out of. Once you get to the fan/heat sink assembly take it off and remove the dust. (Mine was caked with black dust.)

Suggest since you are going to all of that trouble that you remove the heatsink, clean it and put Arctic Silver thermal paste in place of the old pads. It will make it cool a lot better. This is the kit I used from Amazon:

http://www.amazon.co.../dp/B001FVI91U/

You can just use alcohol to clean it with instead of the special stuff but the only time I did it I used the above. (I scraped the old pad off with my fingernail but a wooden stick would be better.) You don't use much of the compound. Just enough to coat the surface and certainly not as thick as the old pad. Too much and it just gets messy. Put a little dab on then spread it out with a toothpick. Results were unbelievable. Went from 80 C down to 20 C. (Most new laptops will run 40 C straight out of the box).

Ron
  • 0

#28
olace88

olace88

    Member

  • Topic Starter
  • Member
  • PipPip
  • 97 posts

No idea why it stabilizes. Suppose something gets better with heat as other things get worse.

Here's a video and some step by step instructions.


http://www.insidemyl...ion-dv4-laptop/

Hardest thing is not the disassembly but the reassembly. The idiots use a bunch of different sized screws and getting all of them back in the right holes is hard. I wound up with 3 left over and two missing but decided since it didn't rattle not to try it again. I would suggest you take pictures every 3-4 screws (with the just removed screw laying next to the hole it came out of. Once you get to the fan/heat sink assembly take it off and remove the dust. (Mine was caked with black dust.)

Suggest since you are going to all of that trouble that you remove the heatsink, clean it and put Arctic Silver thermal paste in place of the old pads. It will make it cool a lot better. This is the kit I used from Amazon:

http://www.amazon.co.../dp/B001FVI91U/

You can just use alcohol to clean it with instead of the special stuff but the only time I did it I used the above. (I scraped the old pad off with my fingernail but a wooden stick would be better.) You don't use much of the compound. Just enough to coat the surface and certainly not as thick as the old pad. Too much and it just gets messy. Put a little dab on then spread it out with a toothpick. Results were unbelievable. Went from 80 C down to 20 C. (Most new laptops will run 40 C straight out of the box).

Ron


Hi ROn,

thanks for your quick reply. Let me review the steps first and see if i could do this. It'll be my first time so..hehe. I wanna do it right.

Thanks for all your support!

More power to you guys and this forum. Been to different forums but you guys are unbelievable.

best regards,

olace88
  • 0

#29
iammykyl

iammykyl

    Tech Staff

  • Technician
  • 7,659 posts
Agree with the Kit. The following from an article, referring to laptop heat-sink. (in comments)
"For something like that, I would use the smooth spread method. Getting perfect coverage on a non-square shaped die is going to be difficult unless you do the spreading yourself. If you are unsure if the coverage is good or not, it's usually a good idea to apply the thermal paste, install the heatsink, then remove the heatsink and see how well it spread. Check that the entire die is covered and that not too much was pressed out the sides. You will want to clean off the die and heatsink and reapply the thermal paste, but at least you will know for sure if you are using the right amount."
Source > http://www.pugetsyst...Techniques-170/


You will need the above kit. two magnetic tipped Phillips head screwdriver, a #1 and a #2. Some cotton buds. a can of compressed air. Patience.
Please remember to remove the battery and take anti static measures by briefly touching a bare part of the computer chassis. When blowing air on a fan, place a finger or cotton bud on a vane to prevent it spinning.

another couple of guides.
> http://www.insidemyl...ion-dv4-laptop/
> http://azuliadesigns...pair-hp-laptop/
  • 0

#30
olace88

olace88

    Member

  • Topic Starter
  • Member
  • PipPip
  • 97 posts
Hi guys,

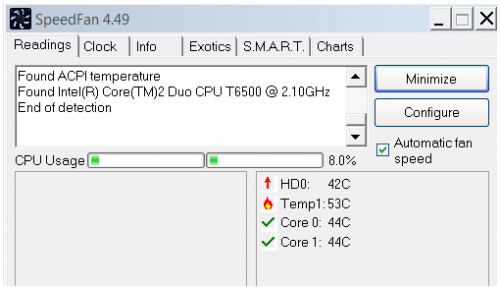
I noticed, the longer it runs, the better the temp gets better. This explains why it performs better in the long run. here's a snapshot. I put some spacer at the bottom of the laptop to lift it above the surface so it gets more air and vents it out more effectively.

Attached Thumbnails

  • SpeedFan_snapshot.PNG

  • 0


Similar Topics

0 user(s) are reading this topic

0 members, 0 guests, 0 anonymous users

As Featured On:

Microsoft Yahoo BBC MSN PC Magazine Washington Post HP