Jump to content

Welcome to Geeks to Go - Register now for FREE

Need help with your computer or device? Want to learn new tech skills? You're in the right place!
Geeks to Go is a friendly community of tech experts who can solve any problem you have. Just create a free account and post your question. Our volunteers will reply quickly and guide you through the steps. Don't let tech troubles stop you. Join Geeks to Go now and get the support you need!

How it Works Create Account
Photo

Bad Video Card on Old PC, What Can I Use Now? - Merged Topic.


  • Please log in to reply

#61
iammykyl

iammykyl

    Tech Staff

  • Technician
  • 7,659 posts
Gday.
nic777 takes credit for the NXZT case suggestion.

the i5-2500k CPU. Seems like a lot of people will install an aftermarket heatsink/fan instead. Is the stock item inferior in some way? Should I consider another CPU cooler?


The stock cooling solution is more than capable of doing it's job, and very well too, will even cope with a hefty over-clock of the CPU. It's downfall that is when the CPU is under full load, the fan can, for some people, be noisy. Also remember that by using an after market cooler, and you damage the CPU, your warranty will be voided.
I recommend you install the stock cooler first and see how it performs for you.
If you do decide to go the after market route, you must take into consideration the hight of the RAM installed as this can effect your choice of coolers if it is too high.
  • 0

Advertisements


#62
Webslinger64

Webslinger64

    Member

  • Topic Starter
  • Member
  • PipPipPip
  • 567 posts

Gday.
nic777 takes credit for the NXZT case suggestion.

the i5-2500k CPU. Seems like a lot of people will install an aftermarket heatsink/fan instead. Is the stock item inferior in some way? Should I consider another CPU cooler?


The stock cooling solution is more than capable of doing it's job, and very well too, will even cope with a hefty over-clock of the CPU. It's downfall that is when the CPU is under full load, the fan can, for some people, be noisy. Also remember that by using an after market cooler, and you damage the CPU, your warranty will be voided.
I recommend you install the stock cooler first and see how it performs for you.
If you do decide to go the after market route, you must take into consideration the hight of the RAM installed as this can effect your choice of coolers if it is too high.


Hats off to nic777 then :thumbsup:

All good points iammykyl. Thank you. I will stick with the stock cooling solution then.
  • 0

#63
nic777

nic777

    Member

  • Member
  • PipPipPip
  • 149 posts
Glad you liked it! It's one of my favorite.

As iammykyl already said, the stock cooler should be fine. I wanted to add a note; the Intel coolers are about 20 to 30 mm larger than the AMD coolers in each direction. Intel coolers work less because most Intel architecture runs on less watts compared to the AMD counterpart. So Intel generates less heat (due to efficient clock cycles and less TDP power draw) and also has a larger fan/heatsink which makes it run quieter than the stock AMD coolers. Bigger fan does not mean more noise, especially in the computer world. You will notice the larger case fans are much more quiet compared to the old style 80mm side fans. Most AMD builds I do, I will get an aftermarket cooler if overclocking. On Intel builds I just use a stock cooler for most builds.
  • 0

#64
Webslinger64

Webslinger64

    Member

  • Topic Starter
  • Member
  • PipPipPip
  • 567 posts

Glad you liked it! It's one of my favorite.

As iammykyl already said, the stock cooler should be fine. I wanted to add a note; the Intel coolers are about 20 to 30 mm larger than the AMD coolers in each direction. Intel coolers work less because most Intel architecture runs on less watts compared to the AMD counterpart. So Intel generates less heat (due to efficient clock cycles and less TDP power draw) and also has a larger fan/heatsink which makes it run quieter than the stock AMD coolers. Bigger fan does not mean more noise, especially in the computer world. You will notice the larger case fans are much more quiet compared to the old style 80mm side fans. Most AMD builds I do, I will get an aftermarket cooler if overclocking. On Intel builds I just use a stock cooler for most builds.


Great information. Thank you!
So, as I was about to install a 120mm fan on the front of the computer case, I realized I wasn't sure which direction the fan should be installed. I'm thinking case fans can be installed to blow hot air out of the case and/or to draw cool air into the case. My computer case is the http://www.newegg.co...N82E16811146078. It has a 120mm rear fan and a 140mm top fan already installed. Are these fans blowing air out of the case or drawing air into the case? If installing a 120mm fan on the front of the case, do I want to blow air out or draw air in?
  • 0

#65
iammykyl

iammykyl

    Tech Staff

  • Technician
  • 7,659 posts
Gday.

It has a 120mm rear fan and a 140mm top fan already installed. Are these fans blowing air out of the case or drawing air into the case? If installing a 120mm fan on the front of the case, do I want to blow air out or draw air in?


The rear and top fans are exhaust, sucking hot air out of the case. Install the front fan as intake, drawing cool air into the case.

This is not strictly nec if your temps are OK. When you are up and running, you can play about with the speed of the fans to optimize the flow of air through the case. Ideally you should have a steady smooth flow from front to back/top. This article will start you in the right direction, > http://www.tomshardw...tsink,3058.html NB. Balance is achieved by the volume of air in/out, not by the speed or number of fans. but get everything else done first, including all udates, backup strategy, OS image, Recovery disk.


  • 0

#66
Webslinger64

Webslinger64

    Member

  • Topic Starter
  • Member
  • PipPipPip
  • 567 posts

Gday.

It has a 120mm rear fan and a 140mm top fan already installed. Are these fans blowing air out of the case or drawing air into the case? If installing a 120mm fan on the front of the case, do I want to blow air out or draw air in?


The rear and top fans are exhaust, sucking hot air out of the case. Install the front fan as intake, drawing cool air into the case.

This is not strictly nec if your temps are OK. When you are up and running, you can play about with the speed of the fans to optimize the flow of air through the case. Ideally you should have a steady smooth flow from front to back/top. This article will start you in the right direction, > http://www.tomshardw...tsink,3058.html NB. Balance is achieved by the volume of air in/out, not by the speed or number of fans. but get everything else done first, including all udates, backup strategy, OS image, Recovery disk.


Got it. Great article btw. :thumbsup:
  • 0

#67
iammykyl

iammykyl

    Tech Staff

  • Technician
  • 7,659 posts
Posted Image
  • 0

#68
Webslinger64

Webslinger64

    Member

  • Topic Starter
  • Member
  • PipPipPip
  • 567 posts

Posted Image


Alright, so here we go. I have all hardware for my PC build in hand including Windows 7 OS. I've got all hardware installed (PSU,Motherboard, CPU, Heatsink/Fan, RAM, HDD, DVD Drive, and three fans (2 came installed on the computer case). I'm in the process of connecting everything to the Motherboard and PSU. I am uncertain about where to connect all three fans. The two preinstalled fans have a 1x3-pin and 2x-4 molex connector each. Pic below:

Posted Image

The Motherboard has three connectors to plug a fan into. One is Front, Rear and Auxillary. The fan I installed on the front panel of the case only has a 3-pin connector so it has to be connected to the Motherboard. The other two look like they can be connected to the Motherboard via the 3-pin connectors, or can they also be connected via the PSU using the molex connectors? If both options are available, which is best...Motherboard or PSU?
I ask this question because of the way the two preinstalled fans were set up. The connectors for each fan were already zip tied and snaked through an opening on the side of the case. However, this setup did not allow for the two fan connectors to reach the connection points on the Motherboard. Thus my question above. If I plug all three fans into the Motherboard, it looks like I will have to cut the zip ties, feed the wires through a different opening and rotate the fan assemblies in order to get the wires to reach the connection points on the Motherboard. :confused:
  • 0

#69
iammykyl

iammykyl

    Tech Staff

  • Technician
  • 7,659 posts
Gday.

If both options are available, which is best...Motherboard or PSU?


Connecting to the MB is best, this means you can control the fan speed eitherthough the BIOS or software utility supplied by the MB manufacturer. If you use the Molex plug from the PSU, the fan will run at max spped with no control.
You may not need to rotate the fans, snip the zip tie, see if the 3 pin wire is wound around the fan first, reroute if nec, zip tie the Molex cable out of the way.
Ref to MB Manual, Page #13.
Top of board, (N) connect the CPU fan.
Right side of board, (AA) Connect the front intake fan.
Bottom of board, (OO) Connect the top exhaust fan.
Left side of board, back, (I) Connect the rear exhaust fan.
This page is interactive > http://www.intel.com...demo-video.html
29, CPU fan.
38, Front fan. intake.
10, Top fan, Exhaust.
18, Rear fan, Exhaust.
  • 0

#70
Webslinger64

Webslinger64

    Member

  • Topic Starter
  • Member
  • PipPipPip
  • 567 posts

Connecting to the MB is best, this means you can control the fan speed eitherthough the BIOS or software utility supplied by the MB manufacturer. If you use the Molex plug from the PSU, the fan will run at max spped with no control.
You may not need to rotate the fans, snip the zip tie, see if the 3 pin wire is wound around the fan first, reroute if nec, zip tie the Molex cable out of the way.
Ref to MB Manual, Page #13.
Top of board, (N) connect the CPU fan.
Right side of board, (AA) Connect the front intake fan.
Bottom of board, (OO) Connect the top exhaust fan.
Left side of board, back, (I) Connect the rear exhaust fan.
This page is interactive > http://www.intel.com...demo-video.html
29, CPU fan.
38, Front fan. intake.
10, Top fan, Exhaust.
18, Rear fan, Exhaust.


Thanks for the reply. Awesome referral to http://www.intel.com...demo-video.html Excellent resource! :thumbsup:
I have been using the MB Manuel as I've been connecting hardware. Your info was almost right on the MB locations for the fan connectors...
Top of board (N) connect CPU fan.
Right side of board, (Z) Connect the front intake fan.
Bottom of board, (NN), Connect the top exhaust fan.
Left side of board, back, (I) Connect the rear exhaust fan.
I will look at both 3-pin wires to see if they are wrapped around the fan assemblies and go from there. I will plug all fans into the MB as advised and zip tie appropriately.
I have ALSO installed an ASUS DRW-24B3ST http://www.newegg.co...N82E16827135240 and I am unsure if the SATA cable should plug into the 6.0Gb/s SATA port (Marvell controller (DD)), the 6.0Gb/s SATA port (EE), or 3.0Gb/s SATA port (FF) - Ref to MB Manual, Page #13. The directions for the DRW-24B3ST only say to plug the drive into the SATA connector on the MB. Does it matter which one I connect the drive too?
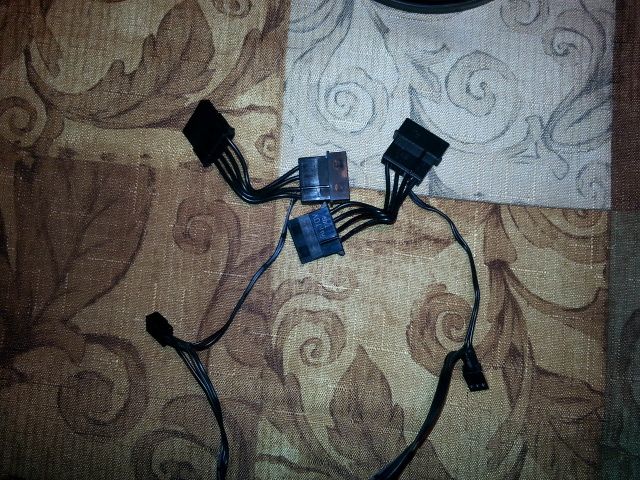
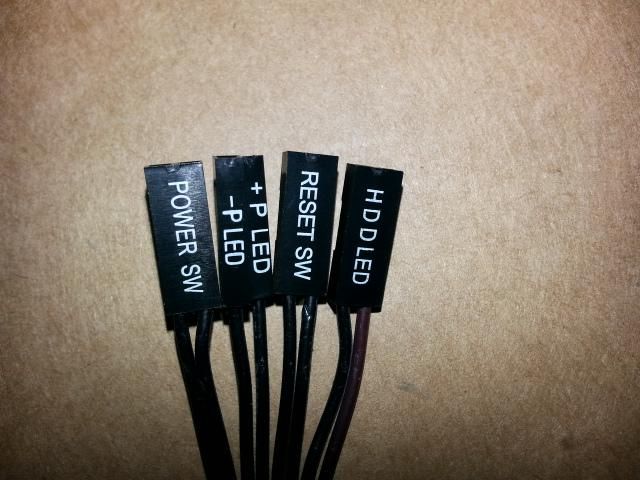
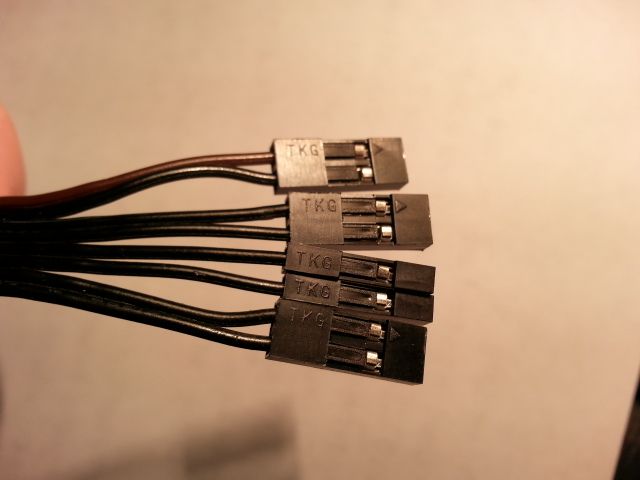
Lastly, connecting the Front Panel Header is a little confusing. According to the Note under Front Panel Header in MB Manual Pg# 52, it says, "When connecting individual wires from your chassis front panel to the front panel header, be sure to observe the connection polarity. Positive wires are usually solid color and negative wires are usually white or striped."I do not see any white or striped wires at all. What I see are 8 wires in pairs of 2, 7 of the 8 wires are solid black and 1 wire is solid brown. Illustration (Figure 24) of the Front Panel Header connection is found on Pg#49 for reference. I'm worried about reversing the polarity on these connections.

Edited by Webslinger64, 15 October 2013 - 10:13 PM.

  • 0

Advertisements


#71
iammykyl

iammykyl

    Tech Staff

  • Technician
  • 7,659 posts
Gday.
Often the MB quide in the box is older than the one on the web, looks like we may be using different versions so, before we go further here is the support page, > http://www.intel.com...oards/db-dz68bc
Here is the page to download the User installation Guide, > http://www.intel.com...b/CS-032686.htm
This page is a guide but appears to have more info at the end. > http://www.intel.com...b/CS-032686.htm

I am unsure if the SATA cable should plug into the 6.0Gb/s SATA port (Marvell controller (DD)), the 6.0Gb/s SATA port (EE), or 3.0Gb/s SATA port (FF)


Plug the OS HDD into an lintel 6.0Gb/s socket, (not critical, but if you can see the ports number, use (0). Plug the optical drive into one of the 3.0Gb/s ports, (anyone will do.
let us know when you have the manuals and we can then sort the front panel connectors, not a big deal.
  • 0

#72
Webslinger64

Webslinger64

    Member

  • Topic Starter
  • Member
  • PipPipPip
  • 567 posts

Gday.
Often the MB quide in the box is older than the one on the web, looks like we may be using different versions so, before we go further here is the support page, > http://www.intel.com...oards/db-dz68bc
Here is the page to download the User installation Guide, > http://www.intel.com...b/CS-032686.htm
This page is a guide but appears to have more info at the end. > http://www.intel.com...b/CS-032686.htm
Plug the OS HDD into an lintel 6.0Gb/s socket, (not critical, but if you can see the ports number, use (0). Plug the optical drive into one of the 3.0Gb/s ports, (anyone will do.
let us know when you have the manuals and we can then sort the front panel connectors, not a big deal.


You are correct, we were using different versions of the MB guide, but we were looking at the same fan headers. HDD is now plugged into a 6.0Gb/s socket port 0 and the optical drive plugged into 3.0Gb/s port. I have the user manuals you referred to now and am ready for some instruction on the front panel headers. Thanks!
  • 0

#73
iammykyl

iammykyl

    Tech Staff

  • Technician
  • 7,659 posts
Thanks for the update.
I have been unable to find any manual on line for the NZXT 210 Elite so working from images.
The ribbon type cable with the 4 little 2 pin plugs. The HDD LED and Power LED plugs should have a + (positive) on them. On the interactive MB page, hover over #36.
HDD LED goes on pins 1&3. Power LED goes on pins 2&4.
Polarity for the next two connections is not applicable. Reset SW goes on pins 5&7. Power SW goes on pins 6&8.

For front sound there are 2 plugs on the same cable, use The HD Audio, Socket, #12, bottom left on board. Hide away the AC-97 plug as it is not used on this board.

Any other connection you are not quite sure of?
  • 0

#74
Webslinger64

Webslinger64

    Member

  • Topic Starter
  • Member
  • PipPipPip
  • 567 posts

Thanks for the update.
I have been unable to find any manual on line for the NZXT 210 Elite so working from images.


I asked NZXT via Live Chat if there was an online manual. They referred me to http://www.nzxt.com/...e_220_multi.pdf
Though it is the manual for the Source 220, they said it was virtually the same as the Source 210. However, unlike the Source 210 manual, which I have, the Source 220 manual appears to show how the front panel header is connected. I am unable to open the pdf file from the link provided above because of it's size (remember, I have a very old PC). I can normally open pdf files w/out a problem, but for some reason this one will not completely download, so I am unable to see the complete instructions for the front panel header. Maybe you can see it better. Please let me know.
Also, here are some pics of the front panel header. The HDD LED, the Reset SW, and the Power SW connections do not have a + (positive) on them. There is a +P LED and a -P LED, but these are single/1 pin plugs.
Posted Image
Posted Image

Edited by Webslinger64, 16 October 2013 - 12:03 PM.

  • 0

#75
iammykyl

iammykyl

    Tech Staff

  • Technician
  • 7,659 posts
Thanks for the excellent pics, wish hardware reviewers did as good.
Start with the HDD LED, look on the back of the plug, you will see a very small arrow, = +, positive, goes on pin 1, the other, negative, goes on pin 3.
The two separate power LED plugs, + positive, goes on pin 2. - negative, goes on pin 4.
Reset sw, any way around, goes on pins 5&7.
Power sw, any way around, goes on pins 6&8.
When you have the system up and running, check that the HDD LED is blinking, if it remains solid, shut down, reverse the HDD LED plug, test.

The case manual was a single sheet, have enlarged the relevant graphic.
I was really surprised at how feature rich the MB is.
  • 0


Similar Topics

0 user(s) are reading this topic

0 members, 0 guests, 0 anonymous users

As Featured On:

Microsoft Yahoo BBC MSN PC Magazine Washington Post HP