

Complete lost of Windows 7-No clues
Started by
Tidas
, Dec 30 2013 09:46 PM
#1

 Posted 30 December 2013 - 09:46 PM
Tidas
-
- Member
-

- 4 posts
New Member

#2
 Posted 31 December 2013 - 10:31 AM
phillpower2
-

- Global Moderator
-

- 24,772 posts
Mechanised Mod
 Tidas
TidasCan I ask if there is any data on the present HDD that you would like to try and back up, only if there is no important data on the HDD check for a recovery partition on the HDD by doing the following;
1. Power on the computer
2. At the white ACER BIOS screen, hold the Alt key and press the F10 key simultaneously to start Acer eRecovery.
3. Once eRecovery has loaded, click Restore to Factory Default Settings
4. Click OK to continue
5. From here, the eRecovery process will update all the data on the C: drive and restore a fully functional factory image (approximately 10 minutes).
6. Once eRecovery has run, press OK to reboot unit
Note that all data will be lost during this process and your computer will be brought back to it's original factory state and settings.
Post an update for us when you are ready.
#3
Posted 02 January 2014 - 10:23 PM
Tidas
- Topic Starter
-
- Member
-
- 4 posts
New Member
I'am very thankful for your time and undoubted expertise in helping me and my seemingly computer demise, but I did as you outlined to do for the newer HHD, that has never even been used whatsoever, and the recovery station will not let me get past a popup statement saying to ensure all files have been removed before starting and that this function will not work if there are any files on the hard disk. I have but one choice to simply press OK only to go back to select restore type page and the loop replays. So discouraging, although, I have not abandon the ship in hopes you may relay the answer to this endless battle to regain my laptop I so honestly enjoy exploring the endless avenues of mystery and answers. Now, as for the original HHD, I very much would like to retrieve many of the files and such if at all possible, although at this point, recovery will be cherished and my back up DVDs will be only used for my laptop. As you read, I let a friend carelessly allow my set to ride along with a computer that wasn't even mine, worse, not even seen. Ultimately, the carelessness is all mine, nobody else. Slap, slap in my face. Well, once again I say Thanks to you and in no way expect more from you, although, any further assistance would be as to pay it forward.
#4
Posted 03 January 2014 - 03:13 AM
phillpower2
-
- Global Moderator
-
- 24,772 posts
Mechanised Mod
Hello Tidas
I am rather confused by your reply I`m afraid
The steps that I provided were for the original HDD and this was the reason that I clearly stated the following;
===================
***Required Hardware***
CD Burner (CDRW) Drive,
Blank CD,
Extra Storage Device (USB Flash Drive, External Hard Drive)
===================
1. Save these files to your Desktop/Burn Your Live CD:
2. Set your boot priority in the BIOS to CD-ROM first, Hard Drive Second
3. Recover Your Data
Remember to only click once! No double clicking! Once you drag and drop your first folder, you will notice a small menu will appear giving you the option to move or copy. Choose COPY each time you drag and drop.
YOU ARE DONE!!! Simply click Menu >> Mouse Over Shutdown >> Reboot/Turn Off Computer. Be sure to plug your USB Drive into another working windows machine to verify all data is there and transferred without corruption. Congratulations!
Let us know how you get on.
I am rather confused by your reply I`m afraid
You say that the HDD has never been used whatsoever which suggests that you have a replacement HDD in the computer.I did as you outlined to do for the newer HHD, that has never even been used whatsoever, and the recovery station will not let me get past a popup statement saying to ensure all files have been removed before starting and that this function will not work if there are any files on the hard disk. I have but one choice to simply press OK only to go back to select restore type page and the loop replays.
The steps that I provided were for the original HDD and this was the reason that I clearly stated the following;
Please put the original HDD back in the computer and then try backing your data up using Puppy Linux, full guidance below;only if there is no important data on the HDD
===================
***Required Hardware***
CD Burner (CDRW) Drive,
Blank CD,
Extra Storage Device (USB Flash Drive, External Hard Drive)
===================
1. Save these files to your Desktop/Burn Your Live CD:
- Download Latest Puppy Linux ISO (i.e.: lupu-528.iso)
Download BurnCDCC ISO Burning Software
There are instructions on how to boot from flash drive with puppy here; http://www.pendrivel...e-from-windows/
- Open BurnCDCC with Windows Explorer
- Extract All files to a location you can remember
- Double Click
 BurnCDCC
 - Click Browse
 and navigate to the Puppy Linux ISO file you just downloaded
 - Open/Double Click that file
IMPORTANT: Adjust the speed bar to CD: 4x DVD: 1x - Click Start

- Your CD Burner Tray will open automatically
- Insert a blank CD and close the tray
- Click OK
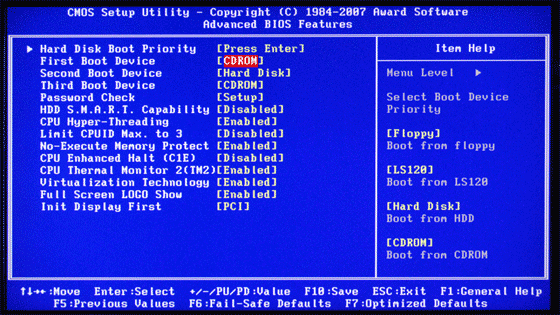
2. Set your boot priority in the BIOS to CD-ROM first, Hard Drive Second
- Start the computer/press the power button
- Immediately start tapping the appropriate key to enter the BIOS, aka "Setup"
(Usually shown during the "Dell" screen, or "Gateway" Screen) - Once in the BIOS, under Advanced BIOS Options change boot priority to:
CD-ROM 1st, Hard Drive 2nd - Open your ROM drive and insert the disk
- Press F10 to save and exit
- Agree with "Y" to continue
- Your computer will restart and boot from the Puppy Linux Live CD
3. Recover Your Data
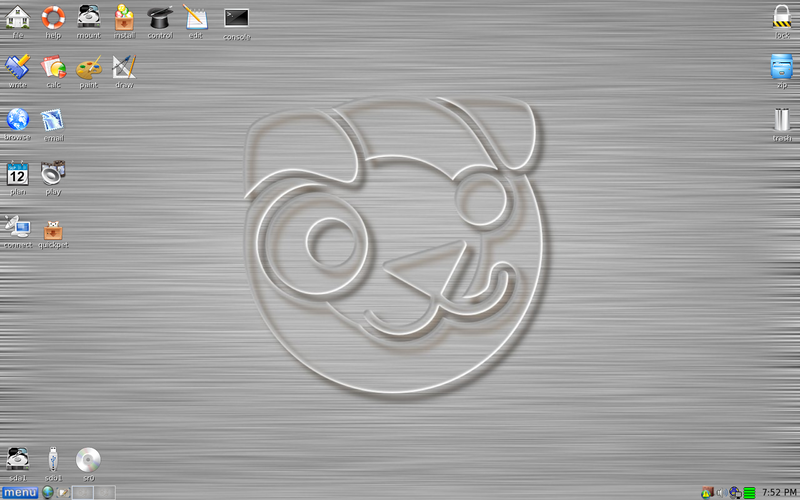
- Once Puppy Linux has loaded, it is actually running in your computer's Memory (RAM). You will see a fully functioning Graphical User Interface similar to what you normally call "your computer". Internet access may or may not be available depending on your machine, so it is recommended you print these instructions before beginning. Also, double clicking is not needed in Puppy. To expand, or open folders/icons, just click once. Puppy is very light on resources, so you will quickly notice it is much speedier than you are used to. This is normal. Ready? Let's get started.
3a. Mount Drives - Click the Mount Icon located at the top left of your desktop.

- A Window will open. By default, the "drive" tab will be forward/highlighted. Click on Mount for your hard drive.
- Assuming you only have one hard drive and/or partition, there may be only one selection to mount.
- USB Flash Drives usually automatically mount upon boot, but click the "usbdrv" tab and make sure it is mounted.
- If using an external hard drive for the data recovery, do this under the "drive" tab. Mount it now.
- At the bottom left of your desktop a list of all hard drives/partitions, USB Drives, and Optical Drives are listed with a familiar looking hard drive icon.
- Open your old hard drive i.e. sda1
- Next, open your USB Flash Drive or External Drive. i.e. sdc or sdb1
- If you open the wrong drive, simply X out at the top right corner of the window that opens. (Just like in Windows)
- From your old hard drive, drag and drop whatever files/folders you wish to transfer to your USB Drive's Window.
Remember to only click once! No double clicking! Once you drag and drop your first folder, you will notice a small menu will appear giving you the option to move or copy. Choose COPY each time you drag and drop.
YOU ARE DONE!!! Simply click Menu >> Mouse Over Shutdown >> Reboot/Turn Off Computer. Be sure to plug your USB Drive into another working windows machine to verify all data is there and transferred without corruption. Congratulations!
Let us know how you get on.
#5
Posted 03 January 2014 - 03:34 AM
Tidas
- Topic Starter
-
- Member
-
- 4 posts
New Member
Yes, you are correct about the new hhd , which will not load. I don't understand why not. It is a 500 GB scorpion blue WD seta and on it says windows 7 is ready. I get to the Acer recovery and select factory reset only to have say about file removal press OK then it repeats the same. I would very much like to know more on that problem also, but for now I will replace and follow your ins. I do wonder though, I can't get the screens in your outline to come up, though I will follow and instead of lead for sure. And second, will this produce my windows back onto a functioning laptop or am I simply recoup my files, Thank you by the way, from a sunk ship, if you will?
I will begin now, can't sleep over it anyway, crazy, huh?
I will report all back. Thanks again
I will begin now, can't sleep over it anyway, crazy, huh?
I will report all back. Thanks again
#6
Posted 04 January 2014 - 02:47 AM
phillpower2
-
- Global Moderator
-
- 24,772 posts
Mechanised Mod
Please deal with one thing at a time and initially trying to recover your data on the original HDD, we will wait for an update on this.


Similar Topics
0 user(s) are reading this topic
0 members, 0 guests, 0 anonymous users
As Featured On:


 Sign In
 Create Account
