Jump to content

Welcome to Geeks to Go - Register now for FREE

Need help with your computer or device? Want to learn new tech skills? You're in the right place!
Geeks to Go is a friendly community of tech experts who can solve any problem you have. Just create a free account and post your question. Our volunteers will reply quickly and guide you through the steps. Don't let tech troubles stop you. Join Geeks to Go now and get the support you need!

How it Works Create Account
Photo

Is my XP3Pro on the brink of complete breakdown?


  • Please log in to reply

#61
phillpower2

phillpower2

    Mechanised Mod

  • Global Moderator
  • 24,747 posts
See if you are able to run CHKDSK from your XP disk, steps here


NB:

Goin in circles now and am getting dizzy. :wacko:

This is but one topic I have to look after ;)
  • 0

Advertisements


#62
flat-erica

flat-erica

    Member

  • Topic Starter
  • Member
  • PipPip
  • 86 posts
Dear phillpower2! My apologies. I was not having a go at you my friend - no way! I do realise you have other commitments. I was just a wee bit frustrated, which will happen from time to time. Honestly, I am actually a very patient person! :cool:

Following instructions:
- XP Cd in and running. (note: I deselected num lock so I could use the arrows on right key pad.)

- Entered '1'. No admin password prompt.

- Typed in chkdsk /r and scan is running (56% completed so far)

UPDATE
- Complete. 'Windows found and fixed one or more errors on the volume'. There was more 'text' just before this message but it was too quick to photograph.
I believe I can exit now.
'See' you tomorrow I hope.
x

Edited by flat-erica, 26 February 2014 - 07:27 PM.

  • 0

#63
flat-erica

flat-erica

    Member

  • Topic Starter
  • Member
  • PipPip
  • 86 posts
UPDATE
Sorry - did now know how to edit previous post to add photos. Here they are:

one shows scan completed report (not much of a report imho). Please ignore the 'invalid entries' which were my mistake (oops). Don't seem to have done any harm tho.
Other shows result after restart (xp cd was removed beforehand) = that dreaded blue stop/error message!
Here we go again!

ps: I have been looking into other rescue cd options.. there are many to choose from.. :whistling:

Attached Thumbnails

  • IMG_4252_crop.jpg
  • IMG_4233a_crop.jpg

Edited by flat-erica, 26 February 2014 - 07:59 PM.

  • 0

#64
phillpower2

phillpower2

    Mechanised Mod

  • Global Moderator
  • 24,747 posts
I still have a couple of other suggestions yet but before I go into detail can you try and run SFC (system file checker) from your XP disk, details here, please note the reference to the tip that is suggested at the link as it is important, if you are able to run SFC and it does find errors it is sometimes necessary to run SFC 4/5 times to complete all of the repairs.

The two other suggestions that I have both involve burning a disk, one we use to try and recover data of a bad HDD and the other stress tests the HDD itself, the latter I have put off suggesting because the testing also includes a stress test and this can cause a flaky HDD to fail, hence the importance of trying to repair XP first.
  • 0

#65
flat-erica

flat-erica

    Member

  • Topic Starter
  • Member
  • PipPip
  • 86 posts
Below is from link: http://pcsupport.abo...sfc-scannow.htm

"Depending on how your computer is setup, the Command Prompt, when used from outside of Windows, doesn't always assign drive letters in the same way that you see them from inside Windows. In other words, Windows might be at C:\Windows when you're using it, but D:\Windows from the Command Prompt in System Recovery Options.

In most installations of Windows 8 and Windows 7, C: usually becomes D: and in Windows Vista, C: is usually still C:. To check for sure, look for the drive with the Users folder on it - that will be the drive Windows is installed on, unless you have multiple installations of Windows on multiple drives."


Doh. You losin me now... :blink:
  • 0

#66
phillpower2

phillpower2

    Mechanised Mod

  • Global Moderator
  • 24,747 posts
You have one partition on the HDD and so XP is on C: as in run replace d: with c:
  • 0

#67
flat-erica

flat-erica

    Member

  • Topic Starter
  • Member
  • PipPip
  • 86 posts
I think I've done rather well up to this point, but have to confess that I don't understand this bit. It may be obvious to those with savvy, but I am really unsure where to start. (Had a lot on my mind today so forgive me if I am missing the obvious!)

I think I know what a command prompt is but how do I get to the point where I type it? Do I use xp cd?
If so, where do I go from there: advanced? recovery? I'm lost! :confused:
Would you please show me by using one of my 'screenshot' photos as a guide? I will understand then.
Thanks in advance.
x
  • 0

#68
phillpower2

phillpower2

    Mechanised Mod

  • Global Moderator
  • 24,747 posts
Slap my wrist if you like but I would rather that you just excused my double post :lol:

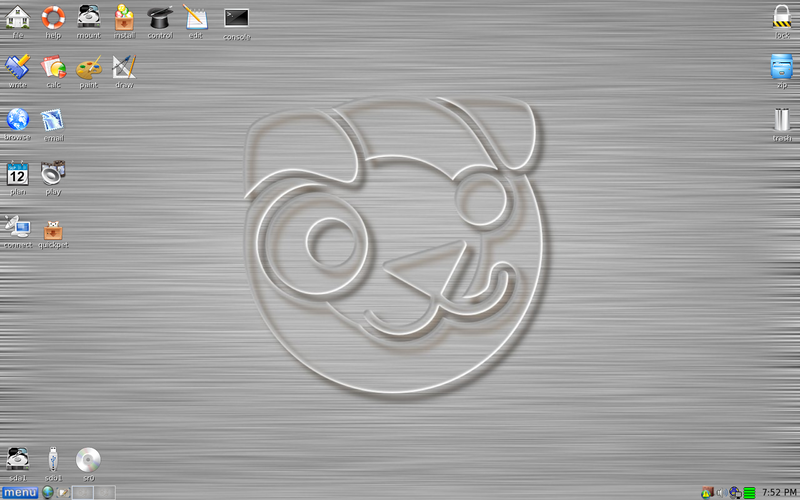
I cannot be around until much later on today due to other commitments so in order to hopefully move things along for you + give you something to sink your teeth into whilst also learning something new I have provided the Puppy Linux details in reply #69, Puppy Linux does not boot from the HDD on your computer, it boots from your Ram and it will then hopefully allow you to mount the HDD and then access the drive so that you can find out exactly what data is on the drive, keep this in mind if you ever need to try data recovery in the future.

Take a look at the following information but by all means then move straight onto the Puppy Linux option in the following post.

Please refer to the guide here How to install the Recovery Console - How to use the Recovery Console, you will need your XP disk in the drive if you proceed with the above, familiarise yourself with it first and post back if necessary (also reading the Command actions information is helpful btw Chkdsk, Fixboot and Fixmbr in particular).
  • 0

#69
phillpower2

phillpower2

    Mechanised Mod

  • Global Moderator
  • 24,747 posts
Please note that I have post this information separately so as not to overburden you, I hope that you don`t mind.

===================
***Required Hardware***
CD Burner (CDRW) Drive,
Blank CD,
Extra Storage Device (USB Flash Drive, External Hard Drive)

===================

1. Save these files to your Desktop/Burn Your Live CD:
  • Download Latest Puppy Linux ISO (i.e.: lupu-528.iso)
    Download BurnCDCC ISO Burning Software

    There are instructions on how to boot from flash drive with puppy here; http://www.pendrivel...e-from-windows/

  • Open BurnCDCC with Windows Explorer
  • Extract All files to a location you can remember
  • Double Click Posted Image BurnCDCC
  • Click Browse Posted Image and navigate to the Puppy Linux ISO file you just downloaded
  • Open/Double Click that file
    IMPORTANT: Adjust the speed bar to CD: 4x DVD: 1x
  • Click Start Posted Image
  • Your CD Burner Tray will open automatically
  • Insert a blank CD and close the tray
  • Click OK
Puppy Linux Live CD will now be created
2. Set your boot priority in the BIOS to CD-ROM first, Hard Drive Second
  • Start the computer/press the power button
  • Immediately start tapping the appropriate key to enter the BIOS, aka "Setup"
    (Usually shown during the "Dell" screen, or "Gateway" Screen)
  • Once in the BIOS, under Advanced BIOS Options change boot priority to:
    CD-ROM 1st, Hard Drive 2nd
  • Open your ROM drive and insert the disk
  • Press F10 to save and exit
  • Agree with "Y" to continue
  • Your computer will restart and boot from the Puppy Linux Live CD

    Posted Image

3. Recover Your Data
  • Once Puppy Linux has loaded, it is actually running in your computer's Memory (RAM). You will see a fully functioning Graphical User Interface similar to what you normally call "your computer". Internet access may or may not be available depending on your machine, so it is recommended you print these instructions before beginning. Also, double clicking is not needed in Puppy. To expand, or open folders/icons, just click once. Puppy is very light on resources, so you will quickly notice it is much speedier than you are used to. This is normal. Ready? Let's get started.

    3a. Mount Drives
  • Click the Mount Icon located at the top left of your desktop. Posted Image
  • A Window will open. By default, the "drive" tab will be forward/highlighted. Click on Mount for your hard drive.
  • Assuming you only have one hard drive and/or partition, there may be only one selection to mount.
  • USB Flash Drives usually automatically mount upon boot, but click the "usbdrv" tab and make sure it is mounted.
  • If using an external hard drive for the data recovery, do this under the "drive" tab. Mount it now.
3b. Transfer Files.
  • At the bottom left of your desktop a list of all hard drives/partitions, USB Drives, and Optical Drives are listed with a familiar looking hard drive icon.
  • Open your old hard drive i.e. sda1
  • Next, open your USB Flash Drive or External Drive. i.e. sdc or sdb1
  • If you open the wrong drive, simply X out at the top right corner of the window that opens. (Just like in Windows)
  • From your old hard drive, drag and drop whatever files/folders you wish to transfer to your USB Drive's Window.
For The Novice: The common path to your pictures, music, video, and documents folders is: Documents and Settings >> All Users (or each idividual name of each user. CHECK All Names!) >> Documents >> You will now see My Music, My Pictures, and My Videos.

Remember to only click once! No double clicking! Once you drag and drop your first folder, you will notice a small menu will appear giving you the option to move or copy. Choose COPY each time you drag and drop.

YOU ARE DONE!!! Simply click Menu >> Mouse Over Shutdown >> Reboot/Turn Off Computer. Be sure to plug your USB Drive into another working windows machine to verify all data is there and transferred without corruption. Congratulations!


Posted Image

  • 0

#70
flat-erica

flat-erica

    Member

  • Topic Starter
  • Member
  • PipPip
  • 86 posts
I can't believe you chose Puppy Linux for me to learn!
Came across PL while looking at alternative rescue cd options - it just stood out from the rest.
Did some reading and thought, hey - I think I could get the hang of Puppy Linux!
Thank you!!
x
ps: Me too - won't be free to do pc stuff til later.
  • 0

Advertisements


#71
phillpower2

phillpower2

    Mechanised Mod

  • Global Moderator
  • 24,747 posts
:) :thumbsup:
  • 0

#72
flat-erica

flat-erica

    Member

  • Topic Starter
  • Member
  • PipPip
  • 86 posts
Progress report on SFC... (see photos)
As you can see, not havin much luck so far.
The list in the photo includes some typos (coz it seems you can't go back n delete mistakes.) Thankfully typing 'exit' works!
I hit enter each time (tho I don't see any instructions about what to do after I type 'scannow etc'). Don't laugh, but a step-by-step with pictures would be really helpful.
It's meant to be easy so I must be doin something wrong! :confused:
- don't laugh)? I have looked but had no joy. Wish I could move on..

Btw, downloaded Puppy Linux & BurnCDCC but not installed yet.
x

Attached Thumbnails

  • IMG_4255_crop.jpg
  • IMG_4256_crop.jpg
  • IMG_4259_crop.jpg

Edited by flat-erica, 01 March 2014 - 09:25 PM.

  • 0

#73
phillpower2

phillpower2

    Mechanised Mod

  • Global Moderator
  • 24,747 posts
Did you read the following at the attached link;

Note: Depending on how your computer is setup, the Command Prompt, when used from outside of Windows, doesn't always assign drive letters in the same way that you see them from inside Windows. In other words, Windows might be at C:\Windows when you're using it, but D:\Windows from the Command Prompt in System Recovery Options.


If no joy try the following 3 suggestions or run Puppy Linux, Fixboot, Fixmbr and Chkdsk
  • 0

#74
flat-erica

flat-erica

    Member

  • Topic Starter
  • Member
  • PipPip
  • 86 posts
Yes I did read that bit - several times tbh!
This is the example given: sfc /scannow /offbootdir=d:\ /offwindir=d:\windows
Then you said:

You have one partition on the HDD and so XP is on C: as in run replace d: with c:


That's what I did.. sfc /scannow /offbootdir=c:\ /offwindir=c:\windows
Then I tried.. sfc /scannow /offbootdir=c:\ /offwindir=d:\windows etc, etc.
Arrgh.. it's doin me head in again. :headhurt: Will try some of the other options!

Edited by flat-erica, 02 March 2014 - 07:01 AM.

  • 0

#75
phillpower2

phillpower2

    Mechanised Mod

  • Global Moderator
  • 24,747 posts
I only pointed you towards the notes as I was not aware of possibly needing to try changing C: to D: myself.

Good luck with the other options.
  • 0


Similar Topics

0 user(s) are reading this topic

0 members, 0 guests, 0 anonymous users

As Featured On:

Microsoft Yahoo BBC MSN PC Magazine Washington Post HP