Jump to content

Welcome to Geeks to Go - Register now for FREE

Need help with your computer or device? Want to learn new tech skills? You're in the right place!
Geeks to Go is a friendly community of tech experts who can solve any problem you have. Just create a free account and post your question. Our volunteers will reply quickly and guide you through the steps. Don't let tech troubles stop you. Join Geeks to Go now and get the support you need!

How it Works Create Account
Photo

New hard drive installed - pc not working

w7

  • Please log in to reply

#16
Plastic Nev

Plastic Nev

    Member

  • Member
  • PipPipPip
  • 485 posts

Hi, one simple thing to do is to replace that CMOS battery, look around on the mother board for a coin shaped and sized metal disk. It may have this number stamped on the surface CR2032. along with a + sign.

These batteries are cheap enough and I can pick one up in my local superstore, though you can of course buy one on line.


To remove the old one there is usually some form of clip holding it in place, be careful about how to release the battery as if that clip breaks, the new battery can't stay in place.


Take note of which way up the old battery is so you can be sure of putting the new one back the right way as doing it the wrong way might damage the circuitry.


Nev.


  • 0

Advertisements


#17
Ztruker

Ztruker

    Member 5k

  • Technician
  • 7,091 posts

As I said, you show both 100MB partitions as Active. I think that is confusing the boot loader. You only want one Active partition and it has to be the one that contains the boot files.


When you disconnected the new drive, then there is only one Active partition so all works as it should.


I think to fix this you need to connect the new drive then once you do get booted, remove the Active flag from the old drive so only the new drive has it. Then run Startup Repair up to 3 times if needed and that should get everything straightened out.


  • 0

#18
zibi

zibi

    Member

  • Topic Starter
  • Member
  • PipPip
  • 10 posts

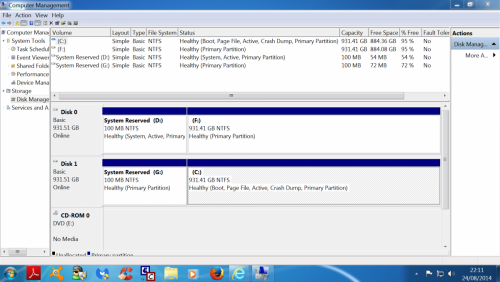
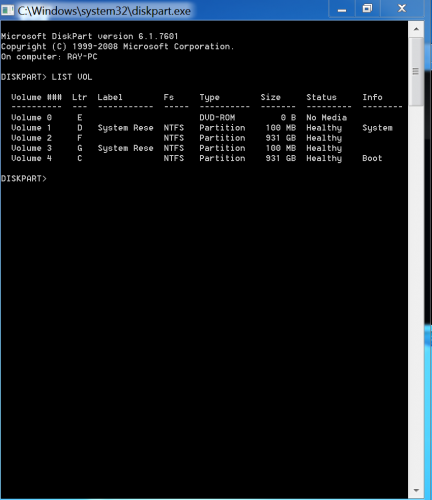
Ztruker. Thanks again. I regret things have changed. I was trying to follow "The best place to find a helping hand is at the end of your arm" which appears at the end of your posts. I was trying to sort out the 2 x 100 Mb partitions which were both active. This is where I am now.

1. The WD (new) and the Hitachi (old) disk both appear in boot menu but only the WD appears in boot priority.

2. I have changed the "active" notations (see snipping tool reports)


SNIP 3.PNG SNIP 3 DISKPART.PNG


3. When I boot with the WD disabled, Windows Boot Manager tells me to choose an OS from a choice of 2 Windows 7 systems. When I do, the system starts as normal.

4. When I boot with the Hitachi disabled, I get the following message. "Reboot and select proper boot device or Insert Boot media in selected Boot device and press a key. 

5. I was planning to carry on so only one partition is active. However, since the boot files are in the simple volume C, I was thinking that is the volume that should be active.

6. I was tired, so glad to be distracted onto CMOS battery. I have found where the CMOS battery is, but it is hidden by a fan. The RAM modules also make it difficult to access. This would have to be a last resort for me.

7. I cannot boot to the new drive, as you suggest - see 3 above.

8. Hope I did SOMETHING right!!


Edited by zibi, 24 August 2014 - 04:16 PM.

  • 0

#19
Ztruker

Ztruker

    Member 5k

  • Technician
  • 7,091 posts

I'd say start over.
 
Remove the new WD drive and make sure you can still boot from the Hitachi drive. If yes, post a screen capture of Disk Management with just the Hitachi drive installed.
 
I'd recommend running Startup repair with just the Hitachi drive installed, What I want to see is one of the 100MB partitions set as Active and C: not Active which how it was before you made C: Active I believe.
 
Once you have that, install Macrium Reflect Free then create a Macrium Rescue Disc from Macrium.
Leave ther disc in the optical drive.
Power down, connect the new WD drive on a higher SATA port number. The Hitachi drive should be on SATA port 0, WD can be on 1, 2 or 3.
Power on and use the FN key to bring up the one time boot menu and boot the Macrium Rescue disc in the optical drive.
Clone the old disk to the new one. See here for how: How to clone a disk with Macrium

Power down.

Remove the old disk, move the new one to SATA port 0 and power up.


The computer should boot with the new disk installed.


Let me know if this makes sense.


  • 0

#20
zibi

zibi

    Member

  • Topic Starter
  • Member
  • PipPip
  • 10 posts

Thanks again. I tried to follow your instructions as closely as I could.

1. I disabled the WD and could boot to Hitachi only after choosing one of 2 Windows 7 options offered by Windows Boot Manager.

2. The screen capture of disk management with only the Hitach installed is on the problem machine. (SNIP1 25.8.14.) - unfortunately I cannot show it now. It is same as before.

3. I then went through startup repair till I reached command prompt. I then used DISKPART to make volume C inactive and the 100 MB partition active.

4.The screen capture of disk management at that point is on the problem machine. Volume C is now inactive but has the boot files. The system reserved 100MB partition is set as active.

5.I then downloaded MACRIUM REFLECT to DVD.

6. I then created Rescue Media on DVD and Macrium confirmed that this was a success.

7. The machine has 4 SATA 2 3GB and 2 SATA 3 6 GB connectors. I connected the Hitachi to the SATA 2 no 1 connector and the WD to no 3 SATA 2 connector. While I was there I noticed why my Blu Ray reader/player was not working as the SATA connector had detached from the back of the drive.

8. When I switched on again I got a variation of the last previous boot. I had the Macrium disk in the drive but I did not hit a key, as I expected machine to start normally. But it didn't. Windows Boot Manager was not offering Windows 7 any more and I had a choice of Last known successful boot, safe mode, safe mode plus etc. I chose safe mode but got nowhere with that. I then booted again and hit a key to boot from the Macrium disk. Macrium kicked in. However it took me through an identical routine that booting from W7 installation disk does. But after loading files it offered the same options - safe mode, safe mode plus, last known successful boot etc. Nothing worked and System Restore did not work this time, either

9.I am typing this from the old XP machine. I have checked all the connections on problem machine and they are sound.

10. I do not know what I did wrongly. Maybe it’s best now to install W7 to the WD drive and forget about the Hitachi. If you agree, some pointers as to how to do it would be welcome. Thanks.


Edited by zibi, 25 August 2014 - 10:03 AM.

  • 0

#21
Ztruker

Ztruker

    Member 5k

  • Technician
  • 7,091 posts
Install to WD sounds like a good idea at this point.

See here:
How to Do a Clean Installation with Windows 7
How to Do a Clean Install with an Upgrade Windows 7 Version

Remove the hitachi so only the WD is installed.

Once the install is done and you've applied all Windows Updates then you can connect the hitachi and copy over your data to the WD drive.
  • 0


Similar Topics


Also tagged with one or more of these keywords: w7

0 user(s) are reading this topic

0 members, 0 guests, 0 anonymous users

As Featured On:

Microsoft Yahoo BBC MSN PC Magazine Washington Post HP