Aswrvrt.sys HELP! Boot-up hangs on Aswrvrt.sys Windows 7 [Solved]
#1
![Aswrvrt.sys HELP! Boot-up hangs on Aswrvrt.sys Windows 7 [Solved]: post #1](https://www.geekstogo.com/forum/public/style_images/shift/icon_share.png)
 Posted 22 September 2014 - 04:31 PM

#2
![Aswrvrt.sys HELP! Boot-up hangs on Aswrvrt.sys Windows 7 [Solved]: post #2](https://www.geekstogo.com/forum/public/style_images/shift/icon_share.png)
 Posted 22 September 2014 - 05:40 PM

Hi. My name is Brian, and I would be happy to take a look.
I am currently in training and my posts will need to be reviewed by an expert, so expect a slight delay between posts.
- General Instructions -
- Please read all instructions and fixes thoroughly. Read the ENTIRE post BEFORE performing any steps so you understand all that needs to be done.
- I would advise printing any instructions for easy reference as some of the fixes may require you to boot in Safe mode. Access to these instructions may not be available in Safe Mode.
- Any fixes provided by myself are for this log file only and should not be used on any other systems.
- Do not run any other removal software or perform updates other than the ones I provide, as it will complicate the cleaning process.
- You have 4 days to reply to each post or the topic will be closed. You will be able to request that the topic be re-opened by sending me a PM (Personal Message) or PM a moderator.
- Please feel free to ask any questions, especially if you are having problems with my instructions.
- Save ALL Tools to your Desktop-
All tools that I have you download should be placed on the desktop unless otherwise stated. If you are familiar with how to save files to the desktop then you can skip this step.
Since you are continuing with this step then I assume you are unfamiliar with saving files to your desktop. As a result it's easiest if you configure your browser(s) to download any tools to the desktop by default. Please use the appropriate instructions below depending on the browser you are using.
Google Chrome - Click the "Customize and control Google Chrome" button in the upper right-corner of the browser.
Choose Settings. at the bottom of the screen click the
"Show advanced settings..." link. Scroll down to find the Downloads section and click the Change... button. Select your desktop and click OK.
Mozilla Firefox - Click the "Open Menu" button in the upper right-corner of the browser.
Choose Options. In the downloads section, click the Browse button, click on the Desktop folder
and the click the "Select Folder" button. Click OK to get out of the Options menu.
![]() Internet Explorer - Click the Tools menu in the upper right-corner of the browser.
Internet Explorer - Click the Tools menu in the upper right-corner of the browser. Select View downloads. Select the Options link in the lower left of the window. Click Browse and
select the Desktop and then choose the Select Folder button. Click OK to get out of the download options screen and then click Close to get out of the View Downloads screen.
NOTE: IE8 Does not support changing download locations in this manner. You will need to download the tool(s) to the default folder, usually Downloads, then copy them to the desktop.
- Finally Before We Start-
Removing malware is a complicated multiple step process, Please stay with me until I have declared your system clean. I strongly recommend you backup your personal files and folders. Although rare, attempting to remove malware can render your machine unbootable or cause data loss. Having backups of your data is your responsibility. Your security programs may give warnings for some of the tools I will ask you to use. Be assured, any links I give are safe. I understand that you currently can't get in to your machine so hopefully you have backups of your data.
I'll put a plan together now for you but have a few questions so I can come up with an appropriate plan of attack.
1. Do you have a USB drive that you can use? A USB Drive will usually look similar to the following.
2. Also do you happen to have another machine that you can use to download things on to the USB drive?
If you do have another computer do you happen to know what Operating System is on that one (i.e. Windows 7 64 Bit, Vista, etc.)?
3. Do you happen to have your Windows 7 64-Bit Operating System CD handy?
Thank you.
#3
![Aswrvrt.sys HELP! Boot-up hangs on Aswrvrt.sys Windows 7 [Solved]: post #3](https://www.geekstogo.com/forum/public/style_images/shift/icon_share.png)
 Posted 22 September 2014 - 06:03 PM

Hi Brian,
I've got a USB yes, a Windows 7 64 bit Recovery .iso file yes, but no disc. And, yes I do have another computer.
#4
![Aswrvrt.sys HELP! Boot-up hangs on Aswrvrt.sys Windows 7 [Solved]: post #4](https://www.geekstogo.com/forum/public/style_images/shift/icon_share.png)
 Posted 22 September 2014 - 06:09 PM

Excellent. I'll put my instructions together tonight for you and post them in the morning.
#5
![Aswrvrt.sys HELP! Boot-up hangs on Aswrvrt.sys Windows 7 [Solved]: post #5](https://www.geekstogo.com/forum/public/style_images/shift/icon_share.png)
 Posted 23 September 2014 - 04:44 AM

Please follow the steps below.
Step#1 - Create a Bootable USB Drive
1. Please download the following three things to the Desktop of your Working computer.
a) Rufus
b) Windows 7 64-Bit RC ISO (I know you mentioned that you had one however I would like to use this one if you don't mind)
c) Farbar Recovery Scan Tool
2. Insert your USB drive into your working computer. Note: Please ensure that there isn't anything on the USB drive that you need as we will be formatting it.
3. Right-click on rufus-1.4.10.exe and select Run as administrator (I'm assuming your working machine is at least Windows Vista). Answer Yes to Allow if prompted.
4. If you are asked to check for application updates. Just answer No.
5. Please click on the icon as shown below and select the ISO file that you downloaded to your desktop in step#1b.
6. Click the Start button.
7. When it's Done click the Close button.
Step#2 - Copy FRST64 on to the same USB Drive
1. Click the Start Orb in the lower left corner of the screen and click on Computer.
2. Click on the drive letter that represents your USB Drive and then copy the FRST64.exe from your Desktop to this location.
Step#3 - Boot Your Sick Machine with USB Drive
1. Insert the USB Drive into your Sick computer.
2. Ensure the power is off on this computer.
3. Ensure that your system is configured to boot 1st from the USB Drive before your main hard drive. There are variations on how to do this depending on what machine you have
however a couple links that show the general steps can be found here and here.
4. Once the BIOS is set to boot from the USB Drive, when you boot your machine with the USB Drive plugged in you should get a message asking you to hit any key to boot from the USB.
Go ahead and do this.
5. The first screen that will appear should be asking for your keyboard layout. Go ahead and click Next.
6. The next screen will attempt to locate your Windows 7 Installation. If it was successful it will be highlighted and you will be able to click Next. Go ahead and do this.
7. You will have several System Recovery Options to choose from. Please click on "Command Prompt".
Step#4 - Generate Needed Logs
1. Please type the word notepad in the black command prompt window and hit Enter on the keyboard.
2. Under the File menu of notepad, please select Open.
3. Double-click on Computer and then identify which driver letter represents your USB drive. It should be the one labeled Repair disc Windows 7 64-bit.
4. Click Cancel on the Open Dialog from notepad and close notepad.
5. In the Command Prompt window, please type F:\FRST64.exe and press enter on the keyboard. Note: Replace F with the Drive Letter you identified in bullet#3.
6. The tool will start to run.
7. If a disclaimer comes up, Please answer Yes.
8. Under the Optional Scan section, please check List BCD.
9. Click the Scan button. It will create a log file named FRST.txt on the USB Drive. It will also open in Notepad when finished. You can simply close Notepad.
10. Please plug the USB Drive into your Good computer and post the contents of this log file.
Items for your next post
1. Contents of the FRST log file.
#6
![Aswrvrt.sys HELP! Boot-up hangs on Aswrvrt.sys Windows 7 [Solved]: post #6](https://www.geekstogo.com/forum/public/style_images/shift/icon_share.png)
 Posted 23 September 2014 - 07:35 AM

Hi BrianDrab,
As soon as I get home today at approximately 1pm PST I will give this a shot and get back to you.
#7
![Aswrvrt.sys HELP! Boot-up hangs on Aswrvrt.sys Windows 7 [Solved]: post #7](https://www.geekstogo.com/forum/public/style_images/shift/icon_share.png)
 Posted 23 September 2014 - 03:06 PM

Hi BrianDrab,
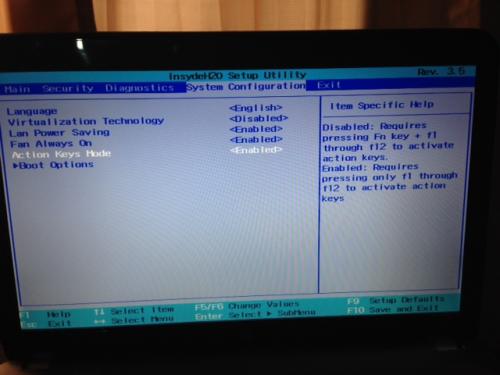
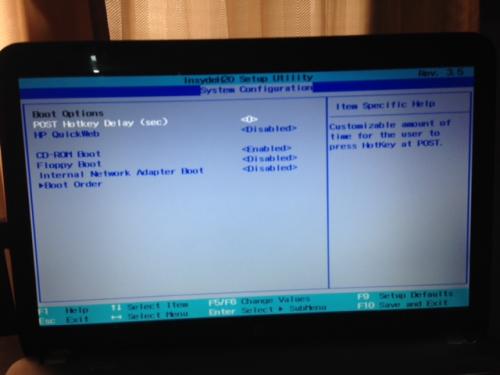
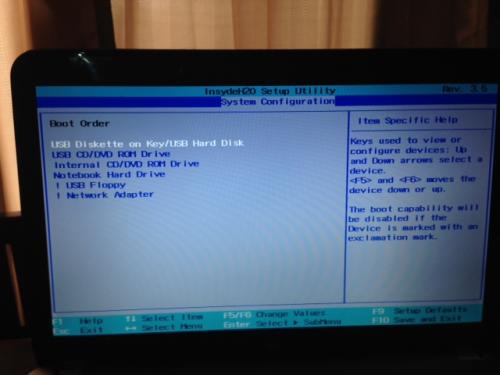
I tried but, it seems it still boot to a black screen with a cursor. I have attached photos of my BIOS to show you the boot order. In addition, I have the thumb drive formatted with Rufus and the .iso file installed as well as the Farbar file. Why isn't it booting the recovery screen?
#8
![Aswrvrt.sys HELP! Boot-up hangs on Aswrvrt.sys Windows 7 [Solved]: post #8](https://www.geekstogo.com/forum/public/style_images/shift/icon_share.png)
 Posted 23 September 2014 - 03:13 PM

So when you turn your computer on with the USB drive plugged in, you never get a message that says to hit any key to boot from the USB?
Can you try tapping the enter key on the keyboard while it attempts to boot to see if it will see the USB drive?
How many USB ports do you have on your computer? Are there USB ports on the back of the machine as well as the front? If you plugged the USB drive into one of the ports on the front then try one of them on the back instead or vice-versa.
Let me know. Thanks.
#9
![Aswrvrt.sys HELP! Boot-up hangs on Aswrvrt.sys Windows 7 [Solved]: post #9](https://www.geekstogo.com/forum/public/style_images/shift/icon_share.png)
 Posted 23 September 2014 - 03:37 PM

Hi Brian I do get the screen shot that says "press any keep to boot from UBS" problem is, I hit the 'space bar, any key really" and I end up with the black screen with a white cursor. Maybe I should try and burn the .iso to a disk? Will Rufus do that?
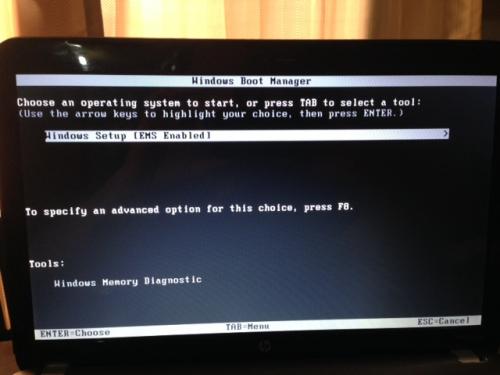
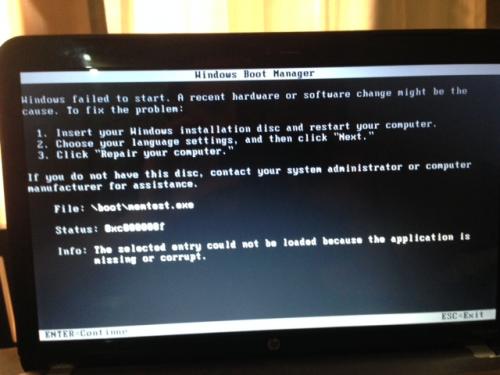
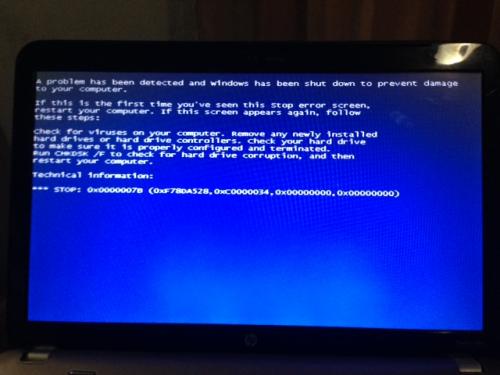
It seems like it doesn't want to boot using the thumb drive? I did end up hitting the space bar multiple times during the prompt for "press any key to boot from USB drive" and came up with (photo 1), I then ran the diagnostic and came up with (photo 2). I also tried booting the Windows Setup EMS option, but got the black screen white cursor yet again.
#10
![Aswrvrt.sys HELP! Boot-up hangs on Aswrvrt.sys Windows 7 [Solved]: post #10](https://www.geekstogo.com/forum/public/style_images/shift/icon_share.png)
 Posted 23 September 2014 - 04:13 PM

When you get Photo 1 and it says Windows Setup [EMS Enabled] just hit enter on the keyboard and see if it boots. Let me know.
#11
![Aswrvrt.sys HELP! Boot-up hangs on Aswrvrt.sys Windows 7 [Solved]: post #11](https://www.geekstogo.com/forum/public/style_images/shift/icon_share.png)
 Posted 23 September 2014 - 04:19 PM

Scratch what I just said. I see that you tried that. Let's do this to create a bootable CD. I assume you have a blank CD for this.
Step#1 - Create a Bootable Recovery Console CD
1. Put a blank recordable CD in your CD Burner of the Good machine.
2. Download ImgBurn and save to your desktop.
3. Right-click on the SetupImgBurn_2.5.8.0.exe file and select Run as Administrator.
4. Click Next.
5. Click "I accept the terms of the License Agreement" and click Next.
6. Click next a few times until you reach the following screen.
7. Make sure to select Custom installation (advanced) and uncheck "Install McAfee SiteAdvisor"
8. Click Next
9. Then ensure you select Custom installation (advanced) again and uncheck "Install Mezaa"
10. You will receive a prompt asking if you would like ImgBurn to periodically check if a newer version is available. Answer No.
11. When the install finishes, click Close.
12. You will see an icon on the desktop for ImgBurn. Please double-click this to open.
13. Select the first option "Write image file to disk".
14. In the Source, please click the little yellow icon with a magnifying glass on it to browse for the recovery ISO.
15. Make sure the destination has your burner selected.
16. Click the write button. Once complete you will have a CD that we can boot from.
17. Try to boot from this.
Let me know. Thank you.
#12
![Aswrvrt.sys HELP! Boot-up hangs on Aswrvrt.sys Windows 7 [Solved]: post #12](https://www.geekstogo.com/forum/public/style_images/shift/icon_share.png)
 Posted 23 September 2014 - 04:27 PM

Hi BrianDrab,
I used PowerISO to create a bootable disk with the .iso file. I booted from the disk, (I heard the disk doing it's work) however, I ended up with the same black screen after the black screen with the white words "Windows is loading files" finished loading.
#13
![Aswrvrt.sys HELP! Boot-up hangs on Aswrvrt.sys Windows 7 [Solved]: post #13](https://www.geekstogo.com/forum/public/style_images/shift/icon_share.png)
 Posted 23 September 2014 - 04:37 PM

P.S. this may be of little use, but through the BIOS I ran 2 tests: a Memory Test, succeeded, Then I ran a "Primary Hard Disk Self Test" and it seems to have stalled.
#14
![Aswrvrt.sys HELP! Boot-up hangs on Aswrvrt.sys Windows 7 [Solved]: post #14](https://www.geekstogo.com/forum/public/style_images/shift/icon_share.png)
 Posted 23 September 2014 - 04:43 PM

Actually I was just going to respond saying that it sounds like a hard drive issue. Can we try one last thing?
1. Download OTLPENet.exe to your desktop of the working computer.
2. Ensure that you have a blank CD in the drive
3. Double click OTLPENet.exe and this will then open imgburn to burn the file to CD
4. Reboot your sick system using the boot CD you just created.
#15
![Aswrvrt.sys HELP! Boot-up hangs on Aswrvrt.sys Windows 7 [Solved]: post #15](https://www.geekstogo.com/forum/public/style_images/shift/icon_share.png)
 Posted 23 September 2014 - 06:13 PM

Similar Topics
0 user(s) are reading this topic
0 members, 0 guests, 0 anonymous users
As Featured On:


 This topic is locked



 Sign In
 Create Account

