Jump to content

Welcome to Geeks to Go - Register now for FREE

Need help with your computer or device? Want to learn new tech skills? You're in the right place!
Geeks to Go is a friendly community of tech experts who can solve any problem you have. Just create a free account and post your question. Our volunteers will reply quickly and guide you through the steps. Don't let tech troubles stop you. Join Geeks to Go now and get the support you need!

How it Works Create Account
Photo

Lenovo G470 won't boot.


  • Please log in to reply

#16
phillpower2

phillpower2

    Mechanised Mod

  • Global Moderator
  • 24,780 posts
 can I ask if the time and date on the taskbar were correct the last time that you were able to use the notebook.


Can you also answer the above question for us.


It is a pity that you cannot borrow a USB keyboard as it may have saved you a lot of time and trouble  :(


Not sure why you think removing the HDD will help but if you wish to try it please be careful and avoid dropping it, as I explained in my reply #2 a failed HDD will not prevent you from getting into the BIOS, regardless of this without a working keyboard you can do nothing I`m afraid.


  • 0

Advertisements


#17
emeraldnzl

emeraldnzl

    GeekU Instructor

  • GeekU Moderator
  • 20,051 posts


I tryed loading OTLPE disk I made up according to instructions.. The infected pc will not load disk.


Bad luck there then.


I actually think it is time to take your machine to a repair man.


There is a way to create a bootable flash drive. The instructions a quite complicated and in the end I think unlikely to work on that machine. Nevertheless I have posted them below for what they might be worth to you.


IMPORTANT:
You will need a flash drive with a size of 512 Mb or bigger. Make sure that you do not leave anything important on the flash drive, as all data on it will be deleted during the following steps.

  •  
    • Download OTLPEStd.exe from one of the following links and save it to your Desktop: mirror1 or mirror2
    • Download eeepcfr.zip from the following link and save it to your Desktop: the mirror
    • Finally, if you do not have a file archiver like 7-zip or Winrar installed, please download 7-zip from the following link and install it: the mirror
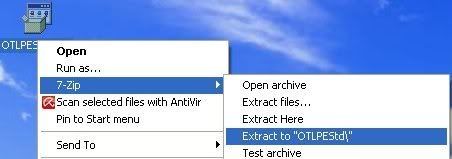
  • Once you have 7-zip install, decompress OTLPEStd.exe by rightclicking on the folder and choosing the options shown in the picture below. Please use a dedicated folder, for example OTLPE, on your Desktop

    otlpestdsmaller.jpg
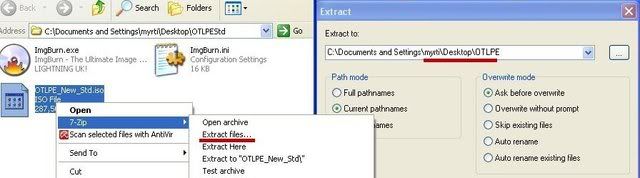
  • Open the folder OTLPEStd which will be created in the same location as OTLPEStd.exe and right-click OTLPE_New_Std.iso. Select 7-Zip and from the submenu select Extract files... and extract the content onto your Desktop in a OTLPE folder:

    otlpestdsmall2.jpg
  • Please also decompress eeepcfr to your systemroot (usually C:\).
  • Empty the flash drive you want to install OTLPE on.
  • Go to C:\eeecpfr and double-click usb_prep8.cmd to launch it.
  • Press any key when asked to in the black window that opens.
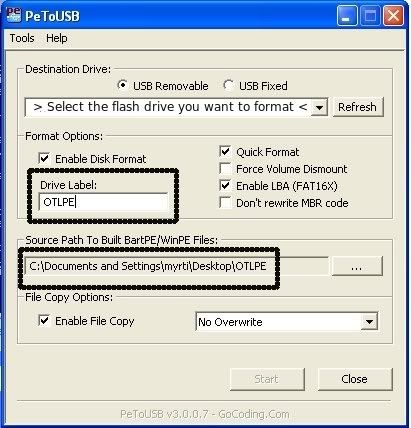
  • As indicated in the image, make sure you have selected the correct flash drive, before proceeding.
    For Drive Label: type in OTLPE.
    Under Source Path to built BartPE/WinPE Files click ... and select the folder OTLPE that you created on your Desktop.
    Finally check Enable File Copy.

    otlpe-2.jpg
  • Click on Start, accept the disclaimers and wait for the program to finish.

Your bootable flash drive should now be ready!


  • 0

#18
cipiti6

cipiti6

    New Member

  • Topic Starter
  • Member
  • Pip
  • 9 posts

Thanks for info. I will try this.


  • 0

#19
emeraldnzl

emeraldnzl

    GeekU Instructor

  • GeekU Moderator
  • 20,051 posts


Thanks for info. I will try this.


I just checked the links to ensure they were still working and found that you can no-longer download eeepcfr.zip.


Here is an alternative set of instructions created by one of my colleagues here. The links in this one are still valid. :)

It's quite a bit to do and each step needs to be done according to the instructions so it might help to print them out so that you can refer to them as you go along.

If you need help don't hesitate to come back and ask.

Download Peazip to the desktop  
Run and install the programme
As it installs this page will show, deselect the AVG ticks
Press decline and it will then install cleanly  
 
peazip.jpg
 
Download the following files to the desktop .. Right click the links and select save as...then select desktop  
 
Rufus
 
OTLPE_standard
 
Right click OTLPE on your desktop and select  ..Open as archive  
 
Unzup%20archive.png
 
 
Select OTLPE standard  
 
select%20archive.PNG
 
Click Extract, ensure that desktop is selected  
 
extract%20archive.PNG
 
Insert the USB stick Then run Rufus
 rufus.JPG
Select the ISO file on the desktop via the ISO icon.

Press Start Burn
RufusISO.JPG

Once the USB has burnt then

  • Download Farbar Recovery Scan Tool and save it to the flash drive.
  • Reboot your infected system using the boot USB you just created.
    Note : If you do not know how to set your computer to boot from USB follow the steps here
  • As the  Programme needs to detect your hardware and load the operating system, I would recommend a nice cup of tea whilst it loads  :)
  • Your system should now display a Reatogo desktop.
  • Locate the flash drive and run FSRT
  • The tool will start to run.
    FRST2.gif
  • When the tool opens click Yes to disclaimer.
  • Press Scan button.
  • It will make a log (FRST.txt) on the flash drive. Please copy and paste it to your reply.


  • 0


Similar Topics

0 user(s) are reading this topic

0 members, 0 guests, 0 anonymous users

As Featured On:

Microsoft Yahoo BBC MSN PC Magazine Washington Post HP