Jump to content

Welcome to Geeks to Go - Register now for FREE

Need help with your computer or device? Want to learn new tech skills? You're in the right place!
Geeks to Go is a friendly community of tech experts who can solve any problem you have. Just create a free account and post your question. Our volunteers will reply quickly and guide you through the steps. Don't let tech troubles stop you. Join Geeks to Go now and get the support you need!

How it Works Create Account
Photo

Laptop black screen after dell screen [Closed]


  • This topic is locked This topic is locked
#16
emeraldnzl

emeraldnzl

    GeekU Instructor

  • GeekU Moderator
  • 20,051 posts

Are you saying there is no Boot priority tab in your bios?


I am not a techie but I have heard of cases of locked bios or some sort of corruption where that can be the case.


I will ask in the tech staff section here if they know about this, but before I do and just to make sure, here are some other instructions that might be easier to follow:


To set your computer BIOS to boot from a CD

   1. Restart your computer. Watch the start-up instructions that are displayed on-screen.

      A message will be displayed instructing you to press a named key (often F2, F12, or Delete) to go into settings/setup/configuration. (The key and the message will vary according to the type of computer that you are running.)

      Press this key to enter the BIOS setup mode.

      (If your computer is particularly fast, it may remove the message before you have the chance to press the key; in this case, try pressing the key once a second, starting the moment you reboot.)

      Some examples:


  • On a Dell computer, you should hit F2 to enter the BIOS.
             
  • Other computers may require you to hit the DEL (Delete) button to enter the BIOS.
             
  • On newer computers, you may be able to hit F12 to select a temporary boot device rather than changing the permanent boot sequence in the BIOS itself. If your computer offers this option, simply select the CD or DVD drive containing the antivirus CD as your temporary boot device, and skip steps 2 and 3.

2. In the BIOS window, find the area that controls the boot sequence and rearrange the list of devices so that your CD or DVD drive is checked before your hard drive.

      For most situations, a suitable sequence is:
          1. A (Floppy)
          2. CDROM (or DVDROM)
          3. HD1 (or C).

      If your drives are listed in this order, then when you keep the  CD in your CD or DVD drive during a reboot, your computer will be told to run and check for viruses on your system. (If the hard drive is listed earlier than the CD drive, your computer will not detect the CDs presence and will simply boot into Windows.)

   3. Save the settings and exit.

   4. When your computer reboots, it will check the CD or DVD drive containing the disk before it checks the hard drive.

Thanks to Cities site University of Illinois for these instructions


---------------------------------------------------------------

If you still have no luck come back and tell me. :)


  • 0

Advertisements


#17
AsdGuy13

AsdGuy13

    Member

  • Topic Starter
  • Member
  • PipPip
  • 14 posts

It worked im on the desktop running the tool. But it takes a LONG time to scan. It hasn't finished and it has been hours. How long does it usually take?


  • 0

#18
emeraldnzl

emeraldnzl

    GeekU Instructor

  • GeekU Moderator
  • 20,051 posts

It can take a long time but that seems too long. I wonder if you have a hard drive problem.

Do the following:

Return to the Reatogo desktop:(you may have to reboot your machine to do this)

        Click on the Command Prompt icon (it should be on the Reatogo desktop)

  •     In the command window type in notepad and press Enter.
  •     The notepad opens. Under File menu select Open.
  •     Select "Computer" and find your hard drive letter and close the notepad.
  •     In the command window type C: and press Enter
  •     Note: Replace letter C with the drive letter of your hard drive if it is something different.
  •     Type in chkdsk /b and press Enter (notice the gap... it should be there.)
  •     When prompted, type in Y and press Enter.
  •     Allow chkdsk to perform all 5 stages. This may take some time, so please be patient.
  •     When complete, close the Command Prompt window, and click on the Restart button to restart your computer.

Please let me know whether there is any change with starting up your computer.

If after running chkdsk you can access your machine please follow the instructions to run FRST and post back the log it generates.


  • 0

#19
AsdGuy13

AsdGuy13

    Member

  • Topic Starter
  • Member
  • PipPip
  • 14 posts
Chkdsk gives parameter error instead of C: I put E: because that was latter after ramdisc(E:) I type it like this "chkdsk /b"
  • 0

#20
emeraldnzl

emeraldnzl

    GeekU Instructor

  • GeekU Moderator
  • 20,051 posts

If you are still having trouble try typing this:


chkdsk c: /f /r


Edit


Note - Replace c: with what ever letter your hard drive is using.


  • 0

#21
AsdGuy13

AsdGuy13

    Member

  • Topic Starter
  • Member
  • PipPip
  • 14 posts
ChKdsk cannot run because the volume is in use by another process chkdsk may run if this volume is dismounted first ALL OPENED HANDLES TO THIS VOLUME WOULD THEN BE INVALID would you like to force a dismount on this volume (Y/N)
  • 0

#22
emeraldnzl

emeraldnzl

    GeekU Instructor

  • GeekU Moderator
  • 20,051 posts

Try entering Y and then press the Enter key.


Chdsk should attempt to close handles and proceed.


  • 0

#23
AsdGuy13

AsdGuy13

    Member

  • Topic Starter
  • Member
  • PipPip
  • 14 posts
ChKdsk cannot run because the volume is in use by another process would you like to schedule this volume to be checked then next time the system restarts (Y/N)
  • 0

#24
emeraldnzl

emeraldnzl

    GeekU Instructor

  • GeekU Moderator
  • 20,051 posts

Press Y and restart. Tell me how it goes.


  • 0

#25
AsdGuy13

AsdGuy13

    Member

  • Topic Starter
  • Member
  • PipPip
  • 14 posts
Says same messages :/. Also It says something about hard drive issue while starting compiter
  • 0

Advertisements


#26
emeraldnzl

emeraldnzl

    GeekU Instructor

  • GeekU Moderator
  • 20,051 posts

I think it may be a hard drive problem.


Here are some instructions to test your hard drive if you wish to do that. I think this one will work on most hard drives. I understand that these tests are not completely reliable but it might be enough to tell you what you need to know.

Here are some instructions to test that if you wish.

Go to Sea Tools for Dos tutorial for tutorial instructions.

Click on Seatools to download the tool.

Save the download to your desktop.

In Windows 7 right click the ISO file, select Open With, then select Windows Disc Image Burning Tool then follow the prompts.
For all other versions of windows (if you do not have an ISO burner) download this free software. ImgBurn Install the program and start the application. Select the top left hand option to Write image file to disc and then on the next window click on the small yellow folder icon and browse to the ISO file on your desktop. Then click on the two grey discs with the arrow in between (bottom left) and leave it to complete the operation.

You will need a blank recordable CD or a re-recordable CD. You cannot use this software on a USB flash drive.

When the CD has been burned boot the PC into the Bios setup and set the CD/DVD drive to 1st in the boot sequence Bios Boot Order Guide. Insert the disk in the drive then reboot and the disc will load into DOS. Click on Basic Tests and select the Long Test.

A full set of instructions can be found here: Seatools instructions

When the test completes it will show a Pass or Fail.


  • 0

#27
AsdGuy13

AsdGuy13

    Member

  • Topic Starter
  • Member
  • PipPip
  • 14 posts
Please save this code if you are planning a warranty exchange sea hate product warranty status depends on how the product is sold if your hard drive is a component in an OEM system then the OEM covers the drive warrant

Unfortunately your sea gate hard druve has failed an important diagnostic test possibly caused by problem sectors which are difficult to read now is a good time to make sure you have a current backup of your important data

Seagate recommends raft you consider repairing the problem sectors sea tools for DOS may be able to save you from inconvirnce and down time of exchanging the drive for more information on this subject see our help topic bad sector found
  • 0

#28
emeraldnzl

emeraldnzl

    GeekU Instructor

  • GeekU Moderator
  • 20,051 posts

I am told that those diagnostic tools are not 100% certain but I think the symptoms your machine is displaying mean that it is most likely the problem.


Not good news I am afraid. From memory I think that machine was Dell. If it hasn't run out of warrantee you may be able to get a replacement drive.

Meantime you could try using the OTLPE disk to access your data if you want to back it up or alternatively the following method might an easier to follow way for you to access the hard drive to backup your data.

These instructions come courtesy of phillpower2 from our technical section.

===================
***Required Hardware***
CD Burner (CDRW) Drive,
Blank CD,
Extra Storage Device (USB Flash Drive, External Hard Drive)

===================
 
1. Save these files to your Desktop/Burn Your Live CD:

  • Download Latest Puppy Linux ISO (i.e.: lupu-528.iso)
    Download BurnCDCC ISO Burning Software
     
    There are instructions on how to boot from flash drive with puppy here
     
  • Open BurnCDCC with Windows Explorer
  • Extract All files to a location you can remember
  • Double Click 1%20BurnCDCC%20Icon.PNGBurnCDCC
  • Click Browse 2%20BurnCDCC%20Browse%20Button.PNG and navigate to the Puppy Linux ISO file you just downloaded
  • Open/Double Click that file
    IMPORTANT: Adjust the speed bar to CD: 4x DVD: 1x
  • Click Start 3%20BurnCDCC%20Start%20Button.PNG
  • Your CD Burner Tray will open automatically
  • Insert a blank CD and close the tray
  • Click OK

Puppy Linux Live CD will now be created
2. Set your boot priority in the BIOS to CD-ROM first, Hard Drive Second


  •  
  • Start the computer/press the power button
  • Immediately start tapping the appropriate key to enter the BIOS, aka "Setup"
    (Usually shown during the "Dell" screen, or "Gateway" Screen)
  • Once in the BIOS, under Advanced BIOS Options change boot priority to:
    CD-ROM 1st, Hard Drive 2nd
  • Open your ROM drive and insert the disk
  • Press F10 to save and exit
  • Agree with "Y" to continue
  • Your computer will restart and boot from the Puppy Linux Live CD
     
    4%20BIOSBootPriorityImage.png

 
3.  Recover Your Data

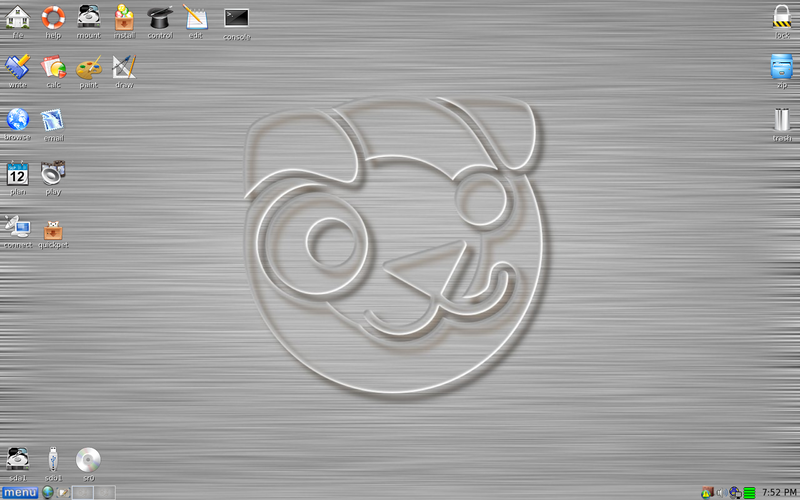
  • Once Puppy Linux has loaded, it is actually running in your computer's Memory (RAM).  You will see a fully functioning Graphical User Interface similar to what you normally call "your computer".  Internet access may or may not be available depending on your machine, so it is recommended you print these instructions before beginning.  Also, double clicking is not needed in Puppy.  To expand, or open folders/icons, just click once.  Puppy is very light on resources, so you will quickly notice it is much speedier than you are used to.  This is normal.  Ready?  Let's get started.
     
    3a. Mount Drives
  • Click the Mount Icon located at the top left of your desktop. 5%20Puppy%20Linux%20Mount%20Icon.PNG
  • A Window will open.  By default, the "drive" tab will be forward/highlighted.  Click on Mount for your hard drive.
  • Assuming you only have one hard drive and/or partition, there may be only one selection to mount.
  • USB Flash Drives usually automatically mount upon boot, but click the "usbdrv" tab and make sure it is mounted.
  • If using an external hard drive for the data recovery, do this under the "drive" tab.  Mount it now.

3b. Transfer Files.

  • At the bottom left of your desktop a list of all hard drives/partitions, USB Drives, and Optical Drives are listed with a familiar looking hard drive icon.
  • Open your old hard drive i.e. sda1
  • Next, open your USB Flash Drive or External Drive. i.e. sdc or sdb1
  • If you open the wrong drive, simply X out at the top right corner of the window that opens. (Just like in Windows)
  • From your old hard drive, drag and drop whatever files/folders you wish to transfer to your USB Drive's Window.

For The Novice:  The common path to your pictures, music, video, and documents folders is: Documents and Settings >> All Users (or each idividual name of each user. CHECK All Names!) >> Documents >> You will now see My Music, My Pictures, and My Videos.
 
Remember to only click once!  No double clicking!  Once you drag and drop your first folder, you will notice a small menu will appear giving you the option to move or copy.  Choose COPY each time you drag and drop.

If you're doing this to recover from a virus or malware infection, (or even if you're not), DO NOT copy executable files (.exe, .scr. etc...) if any of these files are infected you could be copying the corruption over to any new device/computer. just copy documents, pictures, music, or videos.
 
YOU ARE DONE!!!  Simply click Menu >> Mouse Over Shutdown >> Reboot/Turn Off Computer.  Be sure to plug your USB Drive into another working windows machine to verify all data is there and transferred without corruption. Congratulations!
 
 
PuppyLinux528screenshot.png

Free and user friendly back up software that phillpower2, the technical consultant, often suggests and that has proved positive with members is Macrium Reflect

Tell me how you get on.  :)


  • 0

#29
emeraldnzl

emeraldnzl

    GeekU Instructor

  • GeekU Moderator
  • 20,051 posts
Due to lack of feedback, this topic has been closed.

If you need this topic reopened, please contact a staff member. This applies only to the original topic starter. Everyone else please begin a New Topic.
  • 0


Similar Topics

0 user(s) are reading this topic

0 members, 0 guests, 0 anonymous users

As Featured On:

Microsoft Yahoo BBC MSN PC Magazine Washington Post HP