Jump to content

Welcome to Geeks to Go - Register now for FREE

Need help with your computer or device? Want to learn new tech skills? You're in the right place!
Geeks to Go is a friendly community of tech experts who can solve any problem you have. Just create a free account and post your question. Our volunteers will reply quickly and guide you through the steps. Don't let tech troubles stop you. Join Geeks to Go now and get the support you need!

How it Works Create Account
Photo

Rootkit scan ruined starting Windows 7 Ultimate [Solved]

Rootkit scan Win 7 sign-in screen

  • This topic is locked This topic is locked

#16
Dakeyras

Dakeyras

    Anti-Malware Mammoth

  • Expert
  • 9,772 posts
Hi. :)

I have an ASUS OEM for my other 64-bit machine, if that tells you anything.

Aye it does indeed, unfortunately the software for recovery shipped some venders which in this case includes Asus also hinders recdisc. I could attempt to work around this but a good chance it may render the recovery software inoperable so best not to chance that.

However we us a different methodology as follows...

Create a Windows 7 System Repair Disc:

Note: you will require a blank rewritable CD/DVD to create the below.
  • Download this iso file to your desktop.
  • Now double click on recdisc.iso and the below should appear:
rec1.gif
  • Select the option Verify disc after burning >> click on Burn
  • The process should now begin:
rec2.gif
  • Once created/the burning process has completed, it will be verified:
rec3.gif
  • After that the optical drive of your machine will re-open and you can remove the disc:
rec4.gif
  • Click on Close, you now have a Windows 7 System Repair Disc.
Next:

Use this to boot up the machine we are working on and once the System Recovery Options has loaded, attach your usb/flash drive >> run the custom frst script etc.
  • 0

Advertisements


#17
mtnester

mtnester

    Member

  • Topic Starter
  • Member
  • PipPip
  • 81 posts

Hello,


I was able to successfully create a repair disk using a ThinkPad laptop and following instructions regarding booting, inserting the stick with FRST64, etc. Unfortunately one of two results occurred each and every time.


X:\windows\system32>e:\FRST64.exe (my command line typing)


Result 1: cmd.exe - No Disk - There is no disk in the drive, Please insert a disk into drive \Device\Harddisk1\DR1.  (Cancel, Try Again, Continue)

Result 2: device not ready


I have used two different sticks with the files you instructed me to download and run. A third stick (a U3 USB stick) refused to allow the files to be downloaded.


The windows repair disk doesn't seem to help or hinder the operation, but my DV7 simply refuses to let me use a stick, which is unfathomable, since I was able to successfully complete the first run of FRST64 using the same first USB drive.


What could possibly have happened to make a difference?


  • 0

#18
Dakeyras

Dakeyras

    Anti-Malware Mammoth

  • Expert
  • 9,772 posts
Hi. :)

What could possibly have happened to make a difference?

Lets check a few things first, you stated problems attemting to access the drive via:-

X:\windows\system32>e:\FRST64.exe

Is E actually the drive letter designation for the usb drive ? Did you check via:-
  • In the command window type in notepad and press Enter.
  • The notepad opens. Under File menu select Open.
  • Select "Computer" and find your flash drive letter and close the notepad.
  • In the command window type e:\frst64.exe) and press Enter
Note: Replace letter e with the drive letter of your flash drive.

If so proceed to the below...

Drive Cleanup:

Reboot your machine into Safe Mode with Networking and once in that mode download and save drivecleanup.zip to the desktop.
  • Ensure no drives and or other devices are connected to any usb ports.
  • Extract this file to the desktop and there should now be a folder named drivecleanup, double click on this to open.
  • Then double click on the folder x64 to open >> right-click on DriveCleanup.exe and select Run as Administrator >> close the command window when prompted.
  • Insert the usb flash drive you plan to use for the custom frst script and windows should automatically reinstall the driver software etc.
Custom First Script:

Reboot your machine again using the Startup Repair Disk >> run the custom frist script as outlined prior.
  • 0

#19
mtnester

mtnester

    Member

  • Topic Starter
  • Member
  • PipPip
  • 81 posts

Hi,


I tried to follow your directions carefully, but have had an unexpected occurrence not mentioned by you, so apparently I did something wrong. I don't want to proceed without instructions, so let me explain what I'm looking at and how I got there.


As to the first part, I believe that E was the drive letter originally assigned to the stick; however, just in case there may have been a problem with the port, I chose to use a different USB port this time, and the drive letter was F. There was something else for E, which was not my optical drive and I did not recognize, but using letter F I typed f:\frst64.exe) and pressed Enter. The program did open, along with a popup stating "There is no disk in the drive. Please insert a disk into drive \Devic\Harddisk1\DR1. I cancelled and closed the program.


Next I booted into Safe Mode with Networking and downloaded and extracted the designated file and ran as administrator, inserted the flash drive and the drivers were installed.


Reboot your machine again using the Startup Repair Disk >> run the custom frist script as outlined prior


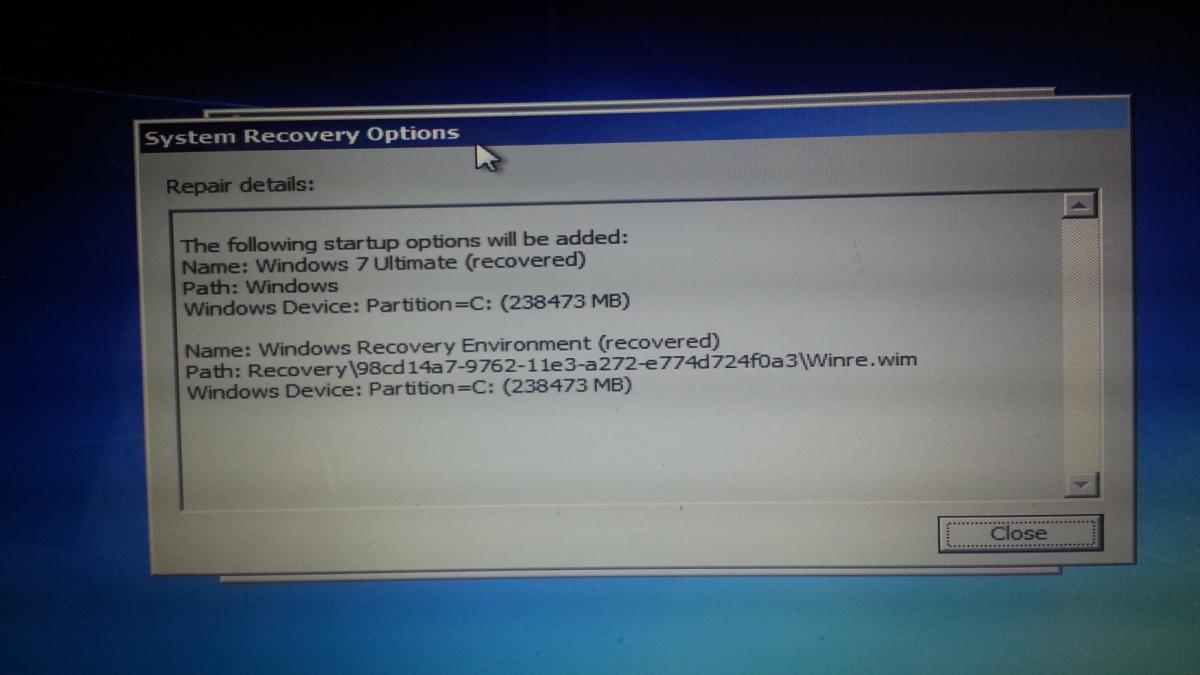
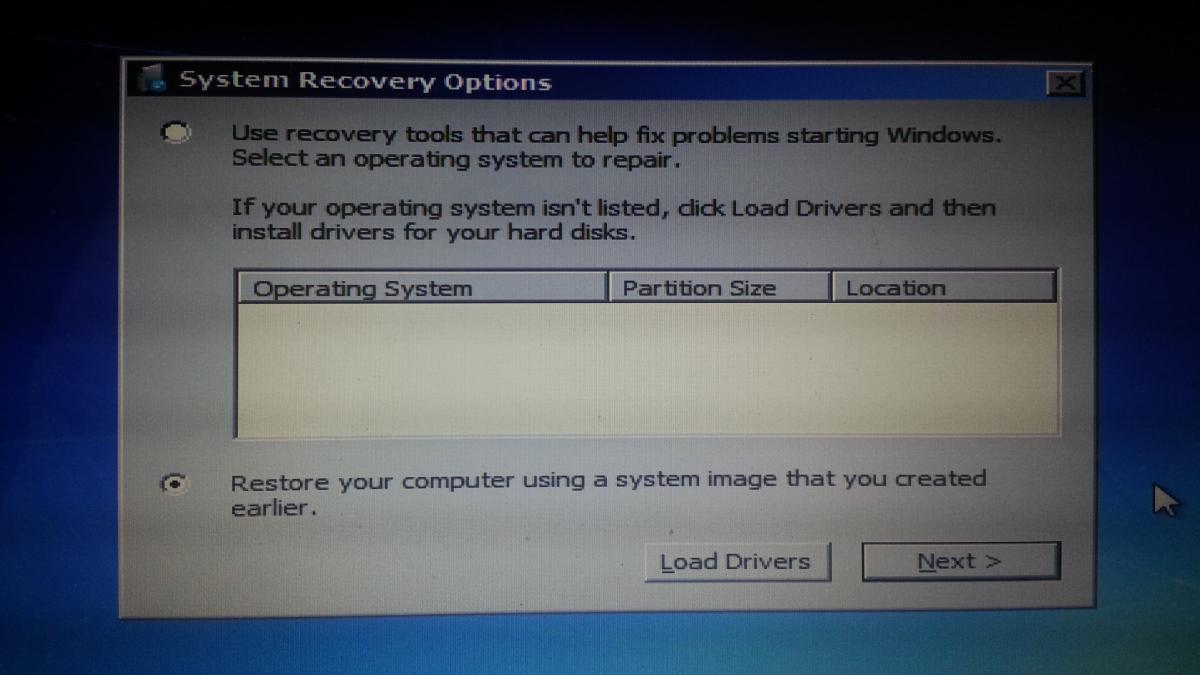
This is where I may have taken a wrong turn. To reboot the machine using the repair disk, I typed the ESC key at startup and changed the boot disk to the DVD drive so that the machine would boot from the disk. The result is not what I expected. A window popped up for "System Recovery Options," the first of which said "Use recovery tools that an help fix problems starting Windows." There are several other options listed, but they are covered by another popup box also labeled System Recovery Options and stating "Windows found problems with your computer's startup options. Do you want to apply repairs and restart your computer? View details" with buttons for Repair and Restart and No.


Was this supposed to happen? Should I apply repairs or No? The box covered by this one has buttons for Load Drivers and Next. Since I believe my original problem was caused by Avast deleting a driver that prevented Windows from opening normally, this may be applicable. If it would just cause further problems, I don't want to touch it with your direction.


I am leaving that screen "as is" for now until I hear from you. Please advise, and direct me as to where I went down the wrong path. Should I not have changed boot options? I thought I was the only way to boot from the repair disk. Of course I do not know what will happen if I decline the repairs by choosing "No" on the top box and selecting "Next" on the original box or whether I should just kill the machine and start over.


I apologize for my confusion. I feel like I'm pushing backwards two steps for each step you try to pull me forward.


  • 0

#20
Dakeyras

Dakeyras

    Anti-Malware Mammoth

  • Expert
  • 9,772 posts
Hi. :)

Hmmm possible the SUR disk auto-detected some faults but normally should not unless one of the other specific System Recovery Options is selected.

Should I apply repairs or No?

I would say select No and you should be returned to the System Recovery Options window. Then you can click on Command Prompt etc.

Now in the event this does not occur and it ends up back at this screen you mentioned, could you possibly take a picture of the screen with say a digital camera or smart-phone and in turn post it so I can see exactly what is occurring please.

If unsure how to do so, the below will be of assistance:-

How to add an attachment to a new topic or reply
  • 0

#21
mtnester

mtnester

    Member

  • Topic Starter
  • Member
  • PipPip
  • 81 posts

Dakeyras,


Another interesting (?) turn of events. Here are screenshots of what I had. Working from last message box to first. The top message was what came up when I clicked “View Details:”


Recover Option detail msg.jpg


I closed that box and this is the message box below it:


Recover Option top msg.jpg


I selected No and it closed and left me with this message box:


Recover Option bottom msg.jpg


I know this is not the Systems Recovery Option box to which you were referring, so the only choice I see at this point is to X-close the box, but that will probably take me to a blank screen, so where do you think I went wrong in the first place that got me to this point? Was it when I chose to boot from the repair disk? And wasn't that the proper procedure? Again, I'm going to leave the current screen as-is until I can get back to that laptop in a few hours,


Sorry to be such a challenge!


  • 0

#22
Dakeyras

Dakeyras

    Anti-Malware Mammoth

  • Expert
  • 9,772 posts
Hi. :)
 

Sorry to be such a challenge!

Not a problem I assure you.

I think what has happened here some how you ended up in Startup Repair mode and then when you were at the screenshot denoted by:-

I selected No and it closed and left me with this message box:

That you mentioned, you need to actually select the option Use Recovery tools etc >> Next> >> select your Windows 7 installation on the C drive and you should be back in the main System Recovery Options window.
  • 0

#23
mtnester

mtnester

    Member

  • Topic Starter
  • Member
  • PipPip
  • 81 posts

Hi,


I think I need to summarize in my own mind where I think I am. I can boot into Safe Mode using the F8 key and use networking for limited computer use. I have attempted repair recovery both with and without booting from a repair disk with the same result: I can access Repair Recovery Options. I have used two USB sticks, both of which can be read on my Asus machine and both of which have the files we want to use. I verified the drive letter that needs to be used on the HP. I have used all three ports on the HP.  All resulting in the error message "device not ready."


I went ahead and attempted a Windows repair, which it could not do. It also could not revert to an earlier System Restore point. It failed an integrity check. Does any of this mean anything to you? I'm totally lost.


I really appreciate all the help you have attempted with me, but I'm beginning to wonder what can be done with this thing other than starting from scratch? (I do wish I had brought a portable hard drive with me to move files!)


  • 0

#24
Dakeyras

Dakeyras

    Anti-Malware Mammoth

  • Expert
  • 9,772 posts
Hi. :)

I verified the drive letter that needs to be used on the HP. I have used all three ports on the HP. All resulting in the error message "device not ready."

Unfortunately not a lot that can be done about that as we have reinstalled the driver(s) required in Safe Mode with Networking. However it appears the correct drive letters are not being assigned/recognised for some reason when in the Recovery Options. So I doubt anything could be done to rectify this in any of the Safe Modes successfully but I will look into this further; but as I mentioned prior may not be able to resolve this particular issue.

I went ahead and attempted a Windows repair, which it could not do. It also could not revert to an earlier System Restore point. It failed an integrity check. Does any of this mean anything to you? I'm totally lost.

I am not surprised either failed to be honest and hence I have been advising a slightly different approach. However there was no harm yourself checking, anyway basically far as I can ascertain something obviously occurred when Avast removed what it found and this has caused the current issues. It may just be something critical was removed in the process that may have been patched by malware for example. Though mere conjecture on my behalf as I have no idea at this time what exactly was removed.
 

I really appreciate all the help you have attempted with me, but I'm beginning to wonder what can be done with this thing other than starting from scratch? (I do wish I had brought a portable hard drive with me to move files!)

You're welcome and aye you may just have to invoke the Recovery Partition I'm afraid.

The only other possible thing we can check is what exactly Avast did remove and then see if we can place it back and if the machine then boots up into Normal Mode, start a malware removal process etc. This may not be successful however...

Next:

Boot your machine into Safe Mode >> then launch Avast via Start(Windows 7 Orb) >> All Programs >> Avast.

Once the GUI(grapical user interface) has loaded >> Click on Scan >> Scan History >> locate the last scan(s) denoted in the Completed Scans.

Now click on the Detailed Report option, copy and paste(if unable merely make a note etc) all information and save this via a notepad file to a usb drive and in turn post the contents of the aforementioned for my review.
  • 0

#25
mtnester

mtnester

    Member

  • Topic Starter
  • Member
  • PipPip
  • 81 posts

Hi Dakeyras,


Once the GUI(grapical user interface) has loaded >> Click on Scan >> Scan History >> locate the last scan(s) denoted in the Completed Scans.


I am just in a world of trouble here. Avast is nonfunctional. Here are some shots I had taken before getting on here but after the “bad” scan when I was notified that Avast had stopped working in the background.(Post #1). Whatever did me in wiped out all previous Avast histories as far as I can tell from using the GUI. What I am going to do is give you a selection of photos I took from the screen to see if anything might look helpful to you.


This is what I get when I open Avast!


opening GUI.jpg


Opening scan history gives me this one:


scan history.jpg


I tried doing a scan to see what would happen:


uable to start scan.jpg


I searched for Avast logs that I thought might have info


Avast Event Log:

Attached File  Avast event log feb, mar 15.txt   12.15KB   301 downloads


Avast Browser Cleanup Log:

Attached File  Avast-Browser-Cleanup.log   45.28KB   392 downloads


Avast Browser Cleanup Silent Log:


Attached File  Avast-Browser-Cleanup-silent.log   15.79KB   564 downloads


Here are a couple of screenshots of a list of other logs if you think anything might have information of interest:


log file list 1.jpg


log file list 2.jpg


Does it look like there is anything that can get us any answers?


Thanks.


  • 0

Advertisements


#26
Dakeyras

Dakeyras

    Anti-Malware Mammoth

  • Expert
  • 9,772 posts
Hi. :)

Does it look like there is anything that can get us any answers?

Referring to the fourth screen-shot you kindly provided could you attach the Chest.log please for my review.

Also what is the drive capacity(storage size) of the USB drive you have been using please ? As we may attempt to use that as a bootable device so we can implement the custom frst script.
  • 0

#27
mtnester

mtnester

    Member

  • Topic Starter
  • Member
  • PipPip
  • 81 posts

Hi,


The USB drive I was using is 128 MB but I also have a 4 GB one from which I could move files to make the necessary room.


The requested chest.log


Attached File  Chest.log   4.32KB   371 downloads


  • 0

#28
Dakeyras

Dakeyras

    Anti-Malware Mammoth

  • Expert
  • 9,772 posts
Hi. :)

I also have a 4 GB one from which I could move files to make the necessary room.

We will make use this one then and would be best if it is empty, say format it first for example.

Create a Windows 7 System Repair USB Drive:

Download Rufus and Recdisc.iso(if you have deleted the one used last time) to the desktop of a machine.
  • Then insert the 4-GB USB drive into the machine >> right-click on rufus-2.0.exe and select Run as Administrator.
  • Select the Recdisc.iso file on the desktop via the ISO icon >> click on Start >> OK
  • Once the process is completed >> click on Close.
  • Now save a new copy of both FRST64 and Fixlist to the USB drive.
  • Remove the USB drive.
Custom FRST Script:

Ensure the machine we have been working on it not booted up in any mode and insert the System Repair USB Drive.

Bootup the machine and continually tap the F12 key, once the menu appears select USB Drive >> Enter >> follow the prompts etc.

If any problems booting up with the drive, further instructions to be had:-

How to Boot From a CD or USB Drive on Any PC
  • Once the System Recovery Options has loaded, select Command Prompt.
  • Run FRST64 again as outlined in my prior posts and then press the Fix button just once and wait.
  • The tool will make a log on the usb drive (Fixlog.txt). Please copy and paste the contents of the aforementioned notepad file in your next reply.
Next:

Check if your machine is now able to boot into Normal Mode or not please.
  • 0

#29
mtnester

mtnester

    Member

  • Topic Starter
  • Member
  • PipPip
  • 81 posts

Hi,


We will make use this one then and would be best if it is empty, say format it first for example.


I have cleaned off this USB flash drive and am ready to format it. Should I format it as FAT32 or NTFS, as I believe the rest of the files are on my 64-bit machine?


Thanks.


  • 0

#30
Dakeyras

Dakeyras

    Anti-Malware Mammoth

  • Expert
  • 9,772 posts

Should I format it as FAT32 or NTFS

NTFS would be prudent and the option Quick Format. :)
  • 0


Similar Topics


Also tagged with one or more of these keywords: Rootkit scan, Win 7, sign-in screen

0 user(s) are reading this topic

0 members, 0 guests, 0 anonymous users

As Featured On:

Microsoft Yahoo BBC MSN PC Magazine Washington Post HP