Jump to content

Welcome to Geeks to Go - Register now for FREE

Need help with your computer or device? Want to learn new tech skills? You're in the right place!
Geeks to Go is a friendly community of tech experts who can solve any problem you have. Just create a free account and post your question. Our volunteers will reply quickly and guide you through the steps. Don't let tech troubles stop you. Join Geeks to Go now and get the support you need!

How it Works Create Account
Photo

Unmountable boot volume

- - - - -

  • Please log in to reply

#1
mackemmatt

mackemmatt

    Member

  • Member
  • PipPip
  • 20 posts
Hi

I recently booted up my laptop and received a blue screen with the error message "unmountable boot volume". A quick Google search mentioned booting from a usb with the windows creation tool loaded onto it.

I'm struggling at the point of actually getting the laptop to boot from the usb instead of looping straight to the blue screen. I've read that I might need to go into bios but none of the function keys do anything on startup.

Any help would be greatly appreciated as I am at a bit of a dead end

Cheers
Matt
  • 0

Advertisements


#2
mackemmatt

mackemmatt

    Member

  • Topic Starter
  • Member
  • PipPip
  • 20 posts
Edit

I have accessed vaio rescue mode and have the option to start troubleshooting, start from media, start from bios, start from network or contact & support.

Troubleshooting loads to a black screen and nothing happens

Booting from a usb stick results in the same black screen after the vaio logo disappears

I do not want to enter bios as I haven't much idea what I'm doing and don't want to make things worse.

Does anyone have any experience with this matter and could help?

Thanks in advance
  • 0

#3
phillpower2

phillpower2

    Mechanised Mod

  • Global Moderator
  • 24,748 posts

:welcome:    mackemmatt,


A flaky HDD or corrupt OS are just two possible causes  :(


Can you post the model number of the Sony Vaio that you have, if you check here you will see that there are many variations.


How much free storage space is/was available on the HDD.


Has the HDD been making any odd noises or been slow to access.


Has the notebook been banged or dropped at all.


Tip
Do not reply to your own OP or last reply as it may lead to your request for help being overlooked, staff and members who assist on the forums will always check out a topic that has not received any replies to see if they are able to help, if you reply to your own OP it will appear to others viewing the board that you have received a reply and so are already being helped, use the Edit tab to add further information to your OP or last post while waiting for a reply from us  :thumbsup:

  • 0

#4
mackemmatt

mackemmatt

    Member

  • Topic Starter
  • Member
  • PipPip
  • 20 posts
Thanks for the reply and apologies for the double post

I hadn't noticed any slow down up until the blue screen. Hard drive was at most half full and no physical damage.

An email I sent to work shortly before the crash included an excel attachment which turned out to be corrupted. Could that be related?

The model is SVF1521D6E

Thanks
  • 0

#5
phillpower2

phillpower2

    Mechanised Mod

  • Global Moderator
  • 24,748 posts

No worries, just wouldn't want your request for help to possibly go unnoticed  :thumbsup:


Additional information acknowledged and with the exception of the corrupt excel document things look positive, can you explain the type of corruption, if malware related I will need to redirect you to the security experts.


Has the computer been upgraded to Windows 10 from an earlier OS, if yes, which OS was it.


A quick Google search mentioned booting from a usb with the windows creation tool loaded onto it. 


Can you post a link to the guide that you followed so that we can take a look please.


I'm struggling at the point of actually getting the laptop to boot from the usb


For computers that have UEFI as opposed to legacy BIOS, to be able to boot from your USB device you may need to disable secure boot and change UEFI to CSM Boot, not all computers and BIOS are the same, please refer to your user manual if you have one as the following steps are only one such example. 

 
Power up or restart the computer and continually tap or hold down the key that will allow you to access the BIOS on your computer then do the following;
 
Select Security -> Secure Boot and then Disabled.
Select Advanced -> System Configuration and then Boot Mode.
Change UEFI Boot to CSM Boot.
Save the changes and Exit the BIOS, commonly F10.
 
 
Try restarting with your recovery USB stick if that is what you have.
 
You are welcome btw  :)

  • 0

#6
mackemmatt

mackemmatt

    Member

  • Topic Starter
  • Member
  • PipPip
  • 20 posts
Hi

As far as I am aware the spreadsheet was only unreadable and didn't report any malware when it was scanned upon opening.

The laptop came with Windows 8.1 and I upgraded to Windows 10 when it became available last year. I hadn't noticed any problem with the changeover and the only manual update I have made was to a graphics card driver a couple of weeks ago.

I have just disabled the secure boot option but under boot mode the only options available are UEFI and legacy

When I run from the usb with UEFI the vaio logo appears on startup then disappears to a black screen.
When I try legacy from the usb the Windows 10 logo appears instead but then disappears to another black screen
  • 0

#7
phillpower2

phillpower2

    Mechanised Mod

  • Global Moderator
  • 24,748 posts

Hello mackemmatt,


Corrupt document info acknowledged.


Legacy is the option that you want  :thumbsup:


Can you post a link to the guide that you followed so that we can take a look please.


  • 0

#8
mackemmatt

mackemmatt

    Member

  • Topic Starter
  • Member
  • PipPip
  • 20 posts
http://www.windowswa...-in-windows-10/

I only made it as far as creating the bootable usb as the repair screen doesn't show

Tried again with the legacy option but the only change is the Windows logo showing on start up in place of the Vaio one

Cheers
  • 0

#9
phillpower2

phillpower2

    Mechanised Mod

  • Global Moderator
  • 24,748 posts

Download yourself a Windows 10 ISO, see here and How to Run Startup Repair in Windows 10 again provided by Brink here


  • 0

#10
mackemmatt

mackemmatt

    Member

  • Topic Starter
  • Member
  • PipPip
  • 20 posts
Just thought I'd check the iso currently on the usb with a second working laptop I have. Managed to make it to the startup repair screen with that one so it appears I have a working iso at least.

Is it worth downloading again in that case?
  • 0

Advertisements


#11
phillpower2

phillpower2

    Mechanised Mod

  • Global Moderator
  • 24,748 posts

Good call on checking the recovery drive, it does however paint a bleak picture for the HDD  :(


Is there any data on the HDD that you would like to try and recover.


  • 0

#12
mackemmatt

mackemmatt

    Member

  • Topic Starter
  • Member
  • PipPip
  • 20 posts
Ideally yes, that's my only real concern as it is a work laptop. I have data backed up but it is from a couple of weeks back.

Is there anything else you could suggest? I don't really understand the implications of not being able to reach the automatic repair screen even from the bootable usb.

Would it be worth taking it to a repair shop to check there are no physical connection issues?

Thanks for your continued help
  • 0

#13
phillpower2

phillpower2

    Mechanised Mod

  • Global Moderator
  • 24,748 posts

Attempting data recovery is a priority because testing a flaky HDD can cause it to fail when it undergoes a stress test, if this is a work computer would you not be better having the IT dept sort it out.


Puppy Linux info below for attempting the data recovery, boots from the RAM and not the HDD;


=================== 

***Required Hardware*** 

CD Burner (CDRW) Drive, 

Blank CD, 

Extra Storage Device (USB Flash Drive, External Hard Drive)

=================== 


1. Save these files to your Desktop/Burn Your Live CD:

  • Download Latest Puppy Linux ISO (i.e.: lupu-528.iso) 


    Download BurnCDCC ISO Burning Software 


    There are instructions on how to boot from flash drive with puppy here; / 


    For computers that have UEFI as opposed to legacy BIOS, to be able to boot from your USB device you may need to disable secure boot and change UEFI to CSM Boot, not all computers and BIOS are the same, please refer to your user manual if you have one as the following steps are only one such example.


    Restart the computer, Windows 8 and 8.1 from the Start or desktop screen move your mouse pointer over the upper or lower right corner of the screen, when the Windows Charms appear click the Settings Charm, click on Power and then the Restart option.


    Windows 10, Click on Start,Power and then Restart.


    While the computer is re-starting,you will need to continually tap or hold down the particular key that will allow you to access the BIOS on your computer, we will use the F2 key as an example here;


    After restarting the computer, when the screen goes black, press and hold down the F2 key, wait for the BIOS to load.


    Select Security -> Secure Boot and then Disabled.

    Select Advanced -> System Configuration and then Boot Mode.

    Change UEFI Boot to CSM Boot.

    Save the changes and Exit the BIOS, commonly F10.


    If your computer will not boot into Windows at all, power up or restart the computer continually tap or hold down the key that will allow you to access the BIOS on your computer and then do the following;


    Select Security -> Secure Boot and then Disabled.

    Select Advanced -> System Configuration and then Boot Mode.

    Change UEFI Boot to CSM Boot.

    Save the changes and Exit the BIOS, commonly F10.


  • Open BurnCDCC with Windows Explorer 


  • Extract All files to a location you can remember 


  • Double Click 1%20BurnCDCC%20Icon.PNGBurnCDCC 


  • Click Browse 2%20BurnCDCC%20Browse%20Button.PNG and navigate to the Puppy Linux ISO file you just downloaded 


  • Open/Double Click that file 


    IMPORTANT: Adjust the speed bar to CD: 4x DVD: 1x 


  • Click Start 3%20BurnCDCC%20Start%20Button.PNG 


  • Your CD Burner Tray will open automatically 


  • Insert a blank CD and close the tray 


  • Click OK 


Puppy Linux Live CD will now be created


2. Set your boot priority in the BIOS to CD-ROM first, Hard Drive Second 


  •  


  • Start the computer/press the power button 


  • Immediately start tapping the appropriate key to enter the BIOS, aka "Setup" 


    (Usually shown during the "Dell" screen, or "Gateway" Screen) 


  • Once in the BIOS, under Advanced BIOS Options change boot priority to: 


    CD-ROM 1st, Hard Drive 2nd 


  • Open your ROM drive and insert the disk 


  • Press F10 to save and exit 


  • Agree with "Y" to continue 


  • Your computer will restart and boot from the Puppy Linux Live CD 


    4%20BIOSBootPriorityImage.png 


3.  Recover Your Data 


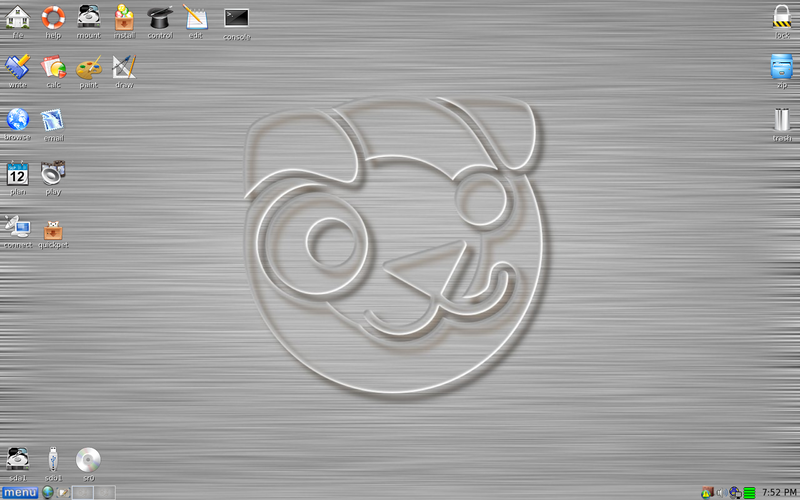
  • Once Puppy Linux has loaded, it is actually running in your computer's Memory (RAM).  You will see a fully functioning Graphical User Interface similar to what you normally call "your computer".  Internet access may or may not be available depending on your machine, so it is recommended you print these instructions before beginning.  Also, double clicking is not needed in Puppy.  To expand, or open folders/icons, just click once.  Puppy is very light on resources, so you will quickly notice it is much speedier than you are used to.  This is normal.  Ready?  Let's get started. 


    3a. Mount Drives[list] 


  • Click the Mount Icon located at the top left of your desktop. 5%20Puppy%20Linux%20Mount%20Icon.PNG 


  • A Window will open.  By default, the "drive" tab will be forward/highlighted.  Click on Mount for your hard drive. 


  • Assuming you only have one hard drive and/or partition, there may be only one selection to mount. 


  • USB Flash Drives usually automatically mount upon boot, but click the "usbdrv" tab and make sure it is mounted. 


  • If using an external hard drive for the data recovery, do this under the "drive" tab.  Mount it now. 


3b. Transfer Files.

  •  


  • At the bottom left of your desktop a list of all hard drives/partitions, USB Drives, and Optical Drives are listed with a familiar looking hard drive icon. 


  • Open your old hard drive i.e. sda1 


  • Next, open your USB Flash Drive or External Drive. i.e. sdc or sdb1 


  • If you open the wrong drive, simply X out at the top right corner of the window that opens. (Just like in Windows) 


  • From your old hard drive, drag and drop whatever files/folders you wish to transfer to your USB Drive's Window. 


For The Novice:  The common path to your pictures, music, video, and documents folders for XP is: Documents and Settings >> All Users (or each individual name of each user, for Vista and above  C:\Users\$USERNAME\[...]. CHECK All Names!) >> Documents >> You will now see My Music, My Pictures, and My Videos


Remember to only click once!  No double clicking!  Once you drag and drop your first folder, you will notice a small menu will appear giving you the option to move or copy.  Choose COPY each time you drag and drop. 


YOU ARE DONE!!!  Simply click Menu >> Mouse Over Shutdown >> Reboot/Turn Off Computer.  Be sure to plug your USB Drive into another working windows machine to verify all data is there and transferred without corruption. Congratulations! 


PuppyLinux528screenshot.png 


  • 1

#14
mackemmatt

mackemmatt

    Member

  • Topic Starter
  • Member
  • PipPip
  • 20 posts
Just ran through the above steps and it appears I've been able to recover the data I needed!

The laptop is actually a personal one I also use for work and as it is a small company we don't have a designated it department. Without your help I would have written off weeks of work I didn't have backed up so I'm immensely grateful.

One thing I'm not sure about, when I booted up Linux the hard drive seemed to be partitioned into around 6 parts. The main one being around 500gb which contained my user profile. Is this usual or have the partitions been created as a result of the attempted repairs?

Finally, now I have the data recovered, will it be possible to salvage the laptop in its current state through a full format of the hard drive or is the corruption too severe?

Thanks again for your continued support!
  • 0

#15
phillpower2

phillpower2

    Mechanised Mod

  • Global Moderator
  • 24,748 posts

Glad to hear that you have been able to recover your data  :thumbsup:


One thing I'm not sure about, when I booted up Linux the hard drive seemed to be partitioned into around 6 parts. The main one being around 500gb which contained my user profile. Is this usual or have the partitions been created as a result of the attempted repairs?


Cannot say for sure what all of the six partitions are but one will be a system reserved partition that Windows creates upon installation, one for Windows and possibly some data and one that I am hoping is a recovery partition the others not sure of tbh, depends on how the computer was set up.


As you are not having any luck with repairing Windows the recovery partition if available is most likely the best option for you.


Did this computer ship with Windows 7, 8/8.1, if yes, restart the computer and keep tapping the F10 key to see if you get access to the recovery partition, let us know what happens.


Can you also let us know if you have the Windows product key for the original OS if Windows 10 was an upgrade, look for a 25 digit code on a sticker on the base of the notebook or beneath the main power brick/battery.


You are most welcome btw  :)


  • 0


Similar Topics

0 user(s) are reading this topic

0 members, 0 guests, 0 anonymous users

As Featured On:

Microsoft Yahoo BBC MSN PC Magazine Washington Post HP