Jump to content

Welcome to Geeks to Go - Register now for FREE

Need help with your computer or device? Want to learn new tech skills? You're in the right place!
Geeks to Go is a friendly community of tech experts who can solve any problem you have. Just create a free account and post your question. Our volunteers will reply quickly and guide you through the steps. Don't let tech troubles stop you. Join Geeks to Go now and get the support you need!

How it Works Create Account
Photo

win 7 pro factory reset


  • Please log in to reply

#1
bjr1000

bjr1000

    Member

  • Member
  • PipPipPip
  • 166 posts

hi all.

i have a dell latitude laptop  with win 7 pro and i want to carry out a factory reset without the install cd.


i tried opening control panel and then on to advanced recovery but found a message '' you need installation cd ''


i contacted a dell site that instructed the      '' f 8 '' method which would show a '' dell factory reset '' option.


i hit the f 8 key but could not see any guide to reset............it showed   ''repair''  ------ ''system restore'' -------- ''command prompt ---------  ''system recovery image ''


in the past i had a compaq presario with win vista and the f/r was simple........... ''hold alt + f 10  when logo appears'' and follow on screen instructions .


be grateful for any comments.

thanks

rj  


  • 0

Advertisements


#2
DonnaB

DonnaB

    Miss Congeniality

  • GeekU Moderator
  • 8,529 posts
Hi bjr1000,

Dell's are a little different. Did Win7 Pro come factory installed on this laptop. Reason I ask is because if it did not, whatever OS was factory installed could be the OS you restore to when resetting to factory condition.

When you accessed the Advanced Boot Options menu did you arrow down and click on Repair Your Computer?

See if this helps.

If not, please provide the model number for the laptop.
  • 0

#3
bjr1000

bjr1000

    Member

  • Topic Starter
  • Member
  • PipPipPip
  • 166 posts

thanks donna


1. i do not know if win 7 pro was originally installed as it was bought as 'used' on ebay in 2015.


2. tried 'repair your computer.' but no success.


3. tried your link but no success.


4. the model is  e6320.


bj 


  • 0

#4
DonnaB

DonnaB

    Miss Congeniality

  • GeekU Moderator
  • 8,529 posts
You're welcome. Found the specs here for that particular make and model and it appears that Win7 Pro came pre-installed.

What issues did you encounter when you tried the above and were not successful. For some reason, it appears that is the only way to access the recovery partition. Did you try F12 or F10 at boot up time?

Check to see if there is a Recovery Manager type folder located in Start > All Programs. I'll check around some more to see what I can find.

In the meantime, let's see if I can tell if you have a recovery partition on that laptop:

Go to Start then to Run
Type in compmgmt.msc and click OK
On the left side click on Disk Management
On the right side you will see your hard drive.
Expand the middle pane to full view.

Now I need you to take a screenshot and attach it to your next reply. Do the following to take a screenshot while the above is open and showing on your desktop.

To do a screenshot please click on the Print Screen key on your keyboard. It is normally the key above your number pad between the F12 key and the Scroll Lock key.

Now go to Start > All Programs > Accessories and click on Paint
In the Empty White Area click and hold the CTRL key and then click the V
Go to the File option at the top and click on Save as
Save as file type JPEG and save it to your Desktop
Make sure the window is open all the way so I can see everything on the top right window.

On Vista/Win7 you could also use the snipping tool and click File > Save As... and save to your desktop.

Attach it to your next post, or if you have access to any online storage for images, please upload there and provide the link.
  • 0

#5
iammykyl

iammykyl

    Tech Staff

  • Technician
  • 7,659 posts

Hope you don't mind another oar.

Please complete DonnaB's instructions first, then Wait for a reply, so the Dell instructions can be perused... 

The Dell recovery steps are a bit more involved than normal, 

http://www.dell.com/...omputer?lang=EN


  • 0

#6
bjr1000

bjr1000

    Member

  • Topic Starter
  • Member
  • PipPipPip
  • 166 posts

thanks iammykyl


donna........when i have tried the recovery i am not getting the ''dell factory tools'' or the ''dell factory image '' options.


f10 and f12   no go.


tried the screenshot but failed..............   message '' not enough disk space''


the reason for my attempt at a factory reset is that i am getting messages saying  ''low disk space '' .


i have emptied my  music   photo  video   pictures documents  folders and also reduced a  large chunk of my bookmarks but it makes no difference


at the moment  local disk 'c' is reading 3.25 mb free of 232gb.


i am thinking a fresh start would solve this.


bj


  • 0

#7
DonnaB

DonnaB

    Miss Congeniality

  • GeekU Moderator
  • 8,529 posts
Hi bjr,
 

the reason for my attempt at a factory reset is that i am getting messages saying ''low disk space '' .

I am so glad you mentioned the above. Why the reset to factory was going to be my next question. :yes:

So, that is the only reason you want to reset to factory, huh? We can probably fix that without a factory reset if we can find what is using up all the disk space. :)

Do you create backups and where are they saved to?
 

i have emptied my music photo video pictures documents folders and also reduced a large chunk of my bookmarks but it makes no difference

Go through your Installed Programs and uninstall the ones you don't use.

What antivirus software do you have installed. Update that and run a scan. Let me know the results. If you have Malwarebytes installed, repeat the above and post the log.

Try running Disk Cleanup to see if that will remove some useless files.

How many system restore points are there?

Try those ideas above and then see if you can do the following. The program is merely 1kb in size so you should be able to download and run it:

Please download and install WinDirStat.
  • Click on the desktop icon to run the program.
  • Click on Individual Drives and then click on the C: drive.
  • When the pacmen have finished there will be a graphic display of that drive.
  • Click on the + (plus) sign to expand the folders found.
  • Place your cursor on the divider line between the text above and the color graph below and drag downwards to expand the upper portion of the resultant image produced.
  • Please create a screen shot and attach or upload the image to your next post so I can have a look

  • 0

#8
iammykyl

iammykyl

    Tech Staff

  • Technician
  • 7,659 posts

When you get to "Try running Disk Cleanup to see if that will remove some useless files."


Click Start, > in the right window, > click Run.

Copy and paste the bolted text into the box and press OK, cleanmgr.exe /LOWDISK

In the window that opens, the letter of the drive to be cleaned will be display, > click OK,

Wait for the scan to complete.

In the results window that opens, Untick Service Pack Backup Files, > Click OK, > confirm, and wait for the cleanup to finish. 

You should now have enough free space to take/upload screenshots/files. 


Complete DonnaB's  instructions. 


  • 0

#9
bjr1000

bjr1000

    Member

  • Topic Starter
  • Member
  • PipPipPip
  • 166 posts

  i followed your info and now have 2.4gb free space available.


i downloaded windirstat and took a screenshot as per your instruction.


i saved the image to my desktop but i do not know how to send it to my topic reply page.


bj


  • 0

#10
DonnaB

DonnaB

    Miss Congeniality

  • GeekU Moderator
  • 8,529 posts
Hi bj,

See if the following instructions help:

How to attach a file:
  • Below the Reply to this topic box, click on More Reply Options button.
  • Scroll down and click on Browse button.
  • Navigate through your computer to where the file is that you want to attach
  • Click on the file then click the Open button.
  • Click the Attach This File button.
  • Click Add Reply button once you have completed your post and are ready to submit.
  • At the bottom of the Quick Reply window, click on Go Advanced
  • On the next screen, under Additional Options, click on Manage Attachments
  • In the File Upload Manager window that pops up, click on Add Files then Browse.
  • In the next window that pops up, navigate to where the logs are saved and click on the log file, then click the Open button.
  • Once back to the File Upload Manager window, click on the Upload button.
  • You should then see that the log files is located under Attachments found under the [b]Additional Options area.

  • 0

Advertisements


#11
bjr1000

bjr1000

    Member

  • Topic Starter
  • Member
  • PipPipPip
  • 166 posts

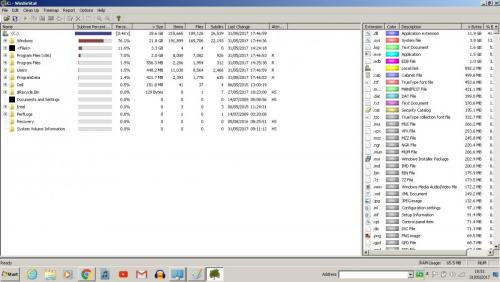
roger.jpg


donna


i could not check attachment to see if it is ok


  • 0

#12
bjr1000

bjr1000

    Member

  • Topic Starter
  • Member
  • PipPipPip
  • 166 posts

image does not look  clear.....will try again.


btw......after i recovered some disk space the amount was 4.8 gb.


when i replied to your post the following day the free space dropped to 2.4gb. for no apparent reason.


bj


  • 0

#13
bjr1000

bjr1000

    Member

  • Topic Starter
  • Member
  • PipPipPip
  • 166 posts

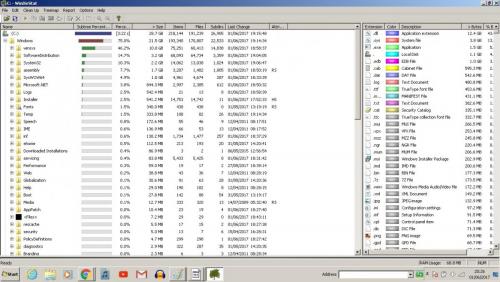
bjr two.jpg


2nd try


  • 0

#14
bjr1000

bjr1000

    Member

  • Topic Starter
  • Member
  • PipPipPip
  • 166 posts

tried the zoom options in windirstat but there was no response wit either button


  • 0

#15
SleepyDude

SleepyDude

    Trusted Helper

  • Malware Removal
  • 4,975 posts

Hi,


The images are fine :thumbsup:


Please execute the following steps, this will provide more information about your computer and make possible to us provide you better help.

  • download Speccy Portable save the file to some place
  • extract the Zip file spsetupxxx.zip to an empty folder
  • run Speccy/Speccy64 according to the Operating System you have

.
To publish a Speccy profile to the Web:

  • In Speccy, click File, and then click Publish Snapshot.
  • In the Publish Snapshot dialog box, click Yes to enable Speccy to proceed.
  • Speccy publishes the profile and displays a second Publish Snapshot. You can open the URL in your default browser, copy it to the clipboard, or close the dialog box

Please post the resulting URL.


Another thing, is Windows saying that there are new updates to install?


  • 0


Similar Topics

0 user(s) are reading this topic

0 members, 0 guests, 0 anonymous users

As Featured On:

Microsoft Yahoo BBC MSN PC Magazine Washington Post HP