Jump to content

Welcome to Geeks to Go - Register now for FREE

Need help with your computer or device? Want to learn new tech skills? You're in the right place!
Geeks to Go is a friendly community of tech experts who can solve any problem you have. Just create a free account and post your question. Our volunteers will reply quickly and guide you through the steps. Don't let tech troubles stop you. Join Geeks to Go now and get the support you need!

How it Works Create Account
Photo

Would like to make older drive a slave however...


  • Please log in to reply

#1
jsun75

jsun75

    Member

  • Member
  • PipPip
  • 13 posts
Like the title topic says, I am going to attmept to make an older drive a slave. The drive in question is a old 20.4gb Quantum Fireball lct 20 (Model Number is QML20000LD - A).

This drive is being replaced by a Wester Digital Caviar SE 160gb

Here is/are the question(s).

1. The Quantum is currently a Master with a jumper in the slot furthest to the left. I am assuming that needs to be moved to make it a Slave, but to where? There are 4 places. (The Quantum website is a bit beyond my navigating skills.) According to Western Digital I do NOT need to place a jumper to designate the Caviar as the Master, it will default as this. Is that correct?

2. Since the Quantum is/was the primary boot drive what will happen when I have it plugged in as a Slave? The OS is XP Home ed. Assuming there is a negative reaction or lack thereof what do you suggest I do to aleviate this problem?

What, if anyother, information do you guys needs to help me with this?

Thank you very much in advance

-J-
  • 0

Advertisements


#2
troppo

troppo

    Member

  • Member
  • PipPipPip
  • 582 posts
hi and welcome to geeks to go forums,

firstly just to clear up you want to do
1) just want to replace the drive that is in your pc at the moment witha larger one?
2) make the original drive a secondary slave drive but still want to boot from the slave?
im a little confused on what you want to do.

but having said that just to set the drive as slave,
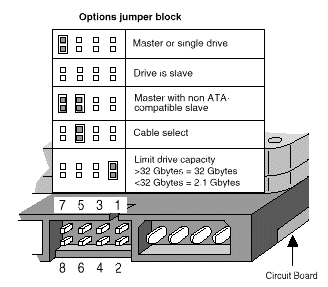
usually there are 4 sets of pins on the back of the hard drive they should look something like this,
[::::]
from what i can gather yours looks like this,
[{}:::] {}= the jumper that is covering the pins on the back of the hard drive

usually there is some sort of marking on the drive it self
but going of the top of my head usually the jumper should be of when placing a drive as a slave
this pic is from seagate
useries6family.gif

if none of these settings work just try the drive ands see what happens if it is not detected try a different jumper on the drive or remove the jumper all together,
also nothing should happen when u plug the drive in if it has an operating system on it exept when the computer boots it may ask you to select which drive to boot from select the one which has the right operating system on it,
once you have got this working you should then format the drive (old one) to remove the operating system that is on it
remember to save any information that you want from the drive formattinf will delete everyhting

i hope this helps,
troppo

Edited by troppo, 21 March 2006 - 05:18 AM.

  • 0

#3
The_Shadow_630

The_Shadow_630

    Member

  • Member
  • PipPipPip
  • 161 posts
OK, that is completely different than what mine was. According to the labeling on my hard drive, the jumper is set to the second position from the left to make it the slave. The other option of course would be to set it to Cable select and, if you wire it in right, it will automatically become slave. If you do that you have to wire it as follows.

On the standard IDE cable there are 3 plugs. One is for plug it into the MB, that is the one farthest from the middle plug. The middle plug is for a slave drive, unless jumpers say otherwise on the dirve, and the one on the other end, closest to the middle one, is for the master unless the jumpers say otherwise.

What you would do is plug the one on the end into the new HD (that is the one closest to the middle plug). Plug the middle one into the old HD and plug the last one to the MB. If the HD jumpers are set to cable select, then it will automatically make the new one the master and the old one the slave.

That is, of course, if you are using and IDE cable. If it it SATA then I am not sure, I have no experience with those.

Edited by The_Shadow_630, 21 March 2006 - 11:17 AM.

  • 0

#4
dsenette

dsenette

    Je suis Napoléon!

  • Community Leader
  • 26,047 posts
  • MVP
it's best to force the selection by jumpering sooo

on the new drive jumper it as master and connect it to the end of the IDE cable
jumper the old drive as slave and connect it to the middle connector on the ide cable

(both drives SHOULD have letters etched into the drive or on a sticker near the jumpers that list the jumper positioning)

now...you will want to boot to the new drive and install windows to it..
once you get into windows you will be able to browse the data on the second drive at which point you will want to copy all data over to the new drive and take ownership of the files and folders (see instructions below) THEN you will want to format the old drive to clean it out...at which point you can move any of the old data back to it if you like... you CANNOT transfer programs..just data files..

How to take ownership of a folder

Note You must be logged on to the computer with an account that has administrative credentials. If you are running Microsoft Windows XP Home Edition, you must start the computer in safe mode, and then log on with an account that has Administrative rights to have access to the Security tab.
If you are using Windows XP Professional, you must disable Simple File Sharing. By default, Windows XP Professional uses Simple File sharing when it is not joined to a domain.
For additional information about how to do this, click the following article number to view the article in the Microsoft Knowledge Base:
307874 How to disable simplified sharing and set permissions on a shared folder in Windows XP


To take ownership of a folder, follow these steps:
  • Right-click the folder that you want to take ownership of, and then click Properties.
  • Click the Security tab, and then click OK on the Security message (if one appears).
  • Click Advanced, and then click the Owner tab.
  • In the Name list, click your user name, or click Administrator if you are logged in as Administrator, or click the Administrators group. If you want to take ownership of the contents of that folder, select the Replace owner on subcontainers and objects check box.
  • Click OK, and then click Yes when you receive the following message:

    You do not have permission to read the contents of directory <folder name>. Do you want to replace the directory permissions with permissions granting you Full Control?
    
    All permissions will be replaced if you press Yes.
    Note <folder name> is the name of the folder that you want to take ownership of.

  • Click OK, and then reapply the permissions and security settings that you want for the folder and its contents.
How to take ownership of a file

Note You must be logged on to the computer with an account that has administrative credentials.

To take ownership of a file, follow these steps:
  • Right-click the file that you want to take ownership of, and then click Properties.
  • Click the Security tab, and then click OK on the Security message (if one appears).
  • Click Advanced, and then click the Owner tab.
  • In the Name list, click Administrator, or click the Administrators group, and then click OK.

    The administrator or the Administrators group now owns the file. To change the permissions on the files and folders under this folder, go to step 5.

  • Click Add.
  • In the Enter the object names to select (examples) list, type the user or group account that you want to give access to the file. For example, type Administrator.
  • Click OK.
  • In the Group or user names list, click the account that you want, and then select the check boxes of the permissions that you want to assign that user.
  • When you are finished assigning permissions, click OK.

  • 0

#5
jsun75

jsun75

    Member

  • Topic Starter
  • Member
  • PipPip
  • 13 posts
OK,

I would first like to say thank you for the prompt replies and the ensuing discussion that seems to be taking place. Beleive you, me I am paying attention.

To answer Troppos questions:

"firstly just to clear up you want to do
1) just want to replace the drive that is in your pc at the moment witha larger one?"


I would like to replace the drive with a larger one and still use the smaller, older drive as extra storage.


2) make the original drive a secondary slave drive but still want to boot from the slave?
im a little confused on what you want to do.


Yes, make the older drive a slave. No I do not want to use it as the boot. My concern is that it currently is the boot. What will happen when I go to set up the new drive as the master and the older drive as a slave? As its currently stands the new drive has no OS (Yet) and is still unformatted and the older drive is still a boot drive (is that the right terminology for describing it as a Master or whatever?).


Also... and this was very boneheaded of me... I have discovered the new drive is S-ATA. This has prompted more questions.

My mother board is a MSI K8T-Neo. I beleive that is a S-ATA ready or capable. However I need to get some SATA cables for the New drive.

Can I run a SATA drive as a Master and a EIDE drive as Slave?

Thanks for the advice...

-J-
  • 0

#6
dsenette

dsenette

    Je suis Napoléon!

  • Community Leader
  • 26,047 posts
  • MVP

Yes, make the older drive a slave. No I do not want to use it as the boot. My concern is that it currently is the boot. What will happen when I go to set up the new drive as the master and the older drive as a slave? As its currently stands the new drive has no OS (Yet) and is still unformatted and the older drive is still a boot drive (is that the right terminology for describing it as a Master or whatever?).


if it's jumpered as slave...then bios won't even look to it at boot unless you've changed your boot order to point to it...or if there's a boot loader on the first drive that is pointing to the slave..

according to msi your board does support sata

to my knowledge you can have the sata as your master and still have the ide drive as your slave

you would want to boot up with your os cd in the cdrom and at somepont it will ask you to install the sata drivers which should have come with the drive...once you do that it will continue on through the setup and let you format and install on that drive...
  • 0

#7
jsun75

jsun75

    Member

  • Topic Starter
  • Member
  • PipPip
  • 13 posts
Thanks DSENETTE,

One more questions and I think I will be well on my way... to where... I am not sure, but I am headed there...

Where do I plae the the jumpers for the EIDE older drive as slave? It is currently set at the far left of the four slots...

Thanks,
-J-
  • 0

#8
dsenette

dsenette

    Je suis Napoléon!

  • Community Leader
  • 26,047 posts
  • MVP
depends on the drive...i'm not sure on the placement for your specific drive...as i said...there should be a diagram etched on the drive...or a sticker...or something as simple as letters next to the jumpers like cs ma sl
  • 0

#9
The_Shadow_630

The_Shadow_630

    Member

  • Member
  • PipPipPip
  • 161 posts
I have actually run into some that do not have diagrams or etching or anything to ID the jumpers. If that is the case it my just end up that you have to do it trial and error or look up the model of the hard drive through the company and see if they can tell you. Worse comes to worse, you may have to e-mail them and ask them for a diagram or explanation telling you which one is which.
  • 0

#10
jsun75

jsun75

    Member

  • Topic Starter
  • Member
  • PipPip
  • 13 posts
Do not know how accurate this information is but I was told by a COMPUSA tech service advisor type that it is RECOMMENDED that I use the EIDE-type hard drive as my Master if I intend to use both a SATA drive and a EIDE drive. Is there any validity to this?

Thanks,
-J-
  • 0

Advertisements


#11
The_Shadow_630

The_Shadow_630

    Member

  • Member
  • PipPipPip
  • 161 posts
I would think that you should use the newer drive as the master and boot drive. It just makes sense to use the new drive for your OS and main programs. I would set it up with the SATA as Master and EIDE as slave.
  • 0

#12
dsenette

dsenette

    Je suis Napoléon!

  • Community Leader
  • 26,047 posts
  • MVP
i could see some validity to that if it is an older system...some of the older first generation boards that first brought sata to the home weren't very fond of booting to sata drives as they were technically still designed to be IDE systems since the SATA drives were so expensive...but i would imagiine newer boards would hav eno issues...now of course...if you want to be safe you can always keep the old drive as the master...i don't really see anything wrong with that....as you want the speed to be where your files are...when you load the system up...windows will be up and active...so the transfer speed isn't as relevant (it's still relevant)...in the case of that setup....i would jumper the sata as slave...make sure the other is master...transfer all your data from the ide to the sata then wipe the ide to start clean...but once again..this is all up to you....if it were me...i'd back kup all my important stuff....and throw caution to the wind and try the sata as master and see how it goes...if it doesn't work...you can always put it back the way it was
  • 0

#13
jsun75

jsun75

    Member

  • Topic Starter
  • Member
  • PipPip
  • 13 posts
Dsenette,

I love that y'all are so willing to help. My understanding trows with each post... How is that for good 'ole @$$ kissing?!?!

All jokes aside, I just realized that my copy of XP home is an upgrade. Once Upon a time this system started out as a Gateway w/ ME as the OS... Since then the only original part left over from that system is the hard drive that is being replaced. I am not sure how much a full version of Xp is and to be honest I am little lazy to go look and even more hesitant to spend anymore cash at this present time...

Let me preface this with, I have currently given up on trying to continue to use the Older, smaller drive and will just use the larger, newer SATA drive until I can further figure that whole mess.

Here is the next question. I have the original Backup/Restoration discs (2) for the gateway. it has the full version of ME on it. Can I load that then use the OEM upgrade of XP over that?
  • 0

#14
dsenette

dsenette

    Je suis Napoléon!

  • Community Leader
  • 26,047 posts
  • MVP
eeeh...i'd say no...but if you have the xp upgrade cd..you can get a copy of windows 98 se on ebay for like 50 bucks...then you just install with the xp disk..and when it asks for it...put in the 98 disk as proof of upgrade
  • 0

#15
jsun75

jsun75

    Member

  • Topic Starter
  • Member
  • PipPip
  • 13 posts
[bleep]!

I was hoping to avoid having to make any more purchases for the moment. I will look into snagging a 98SE version...

Thanks again,
-J-
  • 0


Similar Topics

0 user(s) are reading this topic

0 members, 0 guests, 0 anonymous users

As Featured On:

Microsoft Yahoo BBC MSN PC Magazine Washington Post HP