Jump to content

Welcome to Geeks to Go - Register now for FREE

Need help with your computer or device? Want to learn new tech skills? You're in the right place!
Geeks to Go is a friendly community of tech experts who can solve any problem you have. Just create a free account and post your question. Our volunteers will reply quickly and guide you through the steps. Don't let tech troubles stop you. Join Geeks to Go now and get the support you need!

How it Works Create Account
Photo

Blue screen of death windows 7


  • Please log in to reply

#16
Kais3r

Kais3r

    Member

  • Topic Starter
  • Member
  • PipPip
  • 88 posts

How old is your Graphics Card?

1 year old, it is an nvidia g-force 8800 512mb

Manufacturer:
MY OWN CREATION
Processor:
Intel® Core™2 Duo CPU E8400 @ 3.00GHz (2 CPUs), ~3.0GHz
Memory:
4094MB RAM
Hard Drive:
320 GB
Video Card:
NVIDIA GeForce 8800 GT
Monitor:
Generic PnP Monitor
Sound Card:
Speakers (Realtek High Definition Audio)
Speakers/Headphones:
Keyboard:
USB Root Hub
Mouse:
USB Root Hub
Mouse Surface:
Operating System:
Windows 7 ultimate 32 bit
Motherboard:
GIGABYTE GA-EP35-DS3L LGA 775 Intel P35 ATX Intel Motherboard
Computer Case:
Antec sonata 3 with 500watt power supply
  • 0

Advertisements


#17
rshaffer61

rshaffer61

    Moderator

  • Moderator
  • 34,114 posts
I would like to take a look at some sensors.
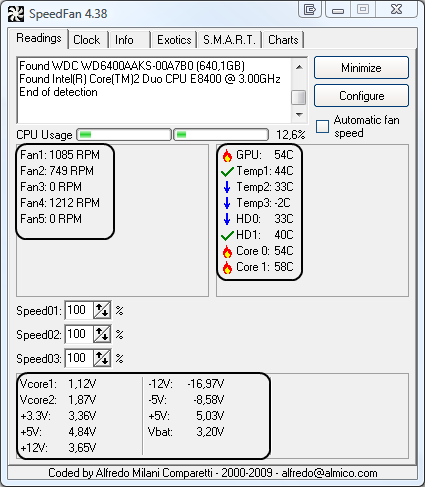
Download Speedfan (The download link is to the right), and install it. Once it's installed, run the program and post here the information it shows.
The information I want you to post is the stuff that is circled in the example picture I have attached.
To make sure we are getting all the correct information it would help us if you were to attach a screenshot like the one below of your Speedfan results.

To do a screenshot please have click on your Print Screen on your keyboard.
  • It is normally the key above your number pad between the F12 key and the Scroll Lock key
  • Now go to Start and then to All Programs
  • Scroll to Accessories and then click on Paint
  • In the Empty White Area click and hold the CTRL key and then click the V
  • Go to the File option at the top and click on Save as
  • Save as file type JPEG and save it to your Desktop
  • Attach it to your next reply

Posted Image
  • 0

#18
Kais3r

Kais3r

    Member

  • Topic Starter
  • Member
  • PipPip
  • 88 posts
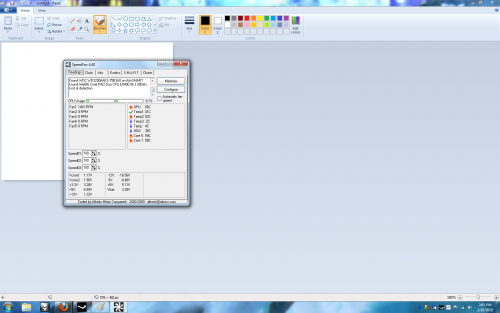
Here it is.
Thanks for all your help.

Attached Thumbnails

  • speedfan.png

  • 0

#19
rshaffer61

rshaffer61

    Moderator

  • Moderator
  • 34,114 posts
OK a couple of things I noticed.
You have a temp that looks a little high with your GPU (Video Card) for just idle mode.
Also in the voltages your +12V rail is hardly registering and to me indicates a faulty power supply.
  • 0

#20
Kais3r

Kais3r

    Member

  • Topic Starter
  • Member
  • PipPip
  • 88 posts

OK a couple of things I noticed.
You have a temp that looks a little high with your GPU (Video Card) for just idle mode.
Also in the voltages your +12V rail is hardly registering and to me indicates a faulty power supply.

how can i get the power supply tested?
  • 0

#21
rshaffer61

rshaffer61

    Moderator

  • Moderator
  • 34,114 posts
Unfortunately, there is no sure fire way for most users to test a PSU properly. Here is Digerati's canned text on testing PSUs.

To properly and conclusively test a power supply unit (PSU), it must be tested under various realistic "loads" then analyzed for excessive ripple and other anomalies.
This is done by a qualified technician using an oscilloscope or power analyzer - sophisticated (and expensive) electronic test equipment requiring special training to operate, and a basic knowledge of electronics theory to understand the results.
Therefore, conclusively testing a power supply is done in properly equipped electronics repair facilities.

Fortunately, there are other options. I keep a FrozenCPU Ultimate PSU Tester in my tool bag when I am "in the field" and don't have a good spare power supply to swap in. While not a certain test, they are better than nothing.
The advantage of this model is that it has an LCD readout of the voltage. With an actual voltage readout, you have a better chance of detecting a "failing" PSU, or one barely within specified ATX Form Factor Standard tolerances.
Lesser models use LEDs to indicate the voltage is just within some "range". These are less informative, considerably cheaper, but still useful for detecting PSUs that have already "failed". Newegg has several testers to choose from.
All these testers contain a "dummy load" to fool the PSU into thinking it is connected to a motherboard, and therefore allows the PSU to power on, if able, without being attached to a motherboard - great for testing fans,
but again, it is not a true load or suitable for conclusive testing.

As mentioned, swapping in a known good supply is a tried and trued method of troubleshooting used for centuries, even by pros. Remove the "suspect" part and replace with a "known good" part and see if the problem goes away.

I do not recommend using a multimeter to test power supplies. To do it properly, that is, under a realistic load, the voltages on all the pins must be measured while the PSU is attached to the motherboard and the computer powered on.
This requires poking (with some considerable force) two hard and sharp, highly conductive meter probes into the main power connector, deep in the heart of the computer. One tiny slip can destroy the motherboard, and everything plugged into it.
It is not worth the risk considering most multimeters, like plug-in testers, do not measure, or reveal any unwanted and potentially disruptive AC components to the DC voltages.

And remember, anything that plugs into the wall can kill. Do not open the power supply's case unless you are a qualified electronics technician. There are NO user serviceable parts inside a power supply


Thanks to Digerati for the above instructions
  • 0


Similar Topics

0 user(s) are reading this topic

0 members, 0 guests, 0 anonymous users

As Featured On:

Microsoft Yahoo BBC MSN PC Magazine Washington Post HP