
I need to learn about different kinds of wireless adapters for setting up a wifi connection. I have a Dell Optiplex 755 desktop and I'm looking for something to help me get onto Boingo.

I have a question about wifi and my desktop
Started by
Marchalla
, Jul 13 2015 11:14 AM

#2

 Posted 13 July 2015 - 12:35 PM
Marchalla
- Topic Starter
-
- Member
-

- 25 posts
Member
I'm just looking for the right network adapter so I can go on Boingo. There are different ones for whatever a person may need. I just know that I tried to get started by finding the right adapter and at first it was not the right one. So far I could get an adapter but I need one that has all the things so I can connect to the service I want to connect to. If the adapter has the correct type of set up it will have the proper connection tools I need. The adapter I tried before was the 802.11 driver but it did not have the connection established for me. I think that there are certain things to know about 802.11 type connections and I've read some things but only basic. I tried turning the wireless settings on in the 802.11 adapter and making sure but could get nowhere. If the wireless card is not made to work for connection services like Boingo then what would I do?
#3
Posted 14 July 2015 - 09:32 AM
Marchalla
- Topic Starter
-
- Member
-
- 25 posts
Member
I think I know what I'm looking for is the Microsoft virtual wifi miniport adapter or anything like it. I had an old Avertec I used for a short while and I tried connecting it to the service Boingo and I was getting somewhere on that. The old Averatec is no longer very functional and the system it had was Windows Vista Home Premium. But my point is that if I could get the network drivers from that older pc over to my Dell optiplex 755 it would be working. The provider is Boingo and they use an app which could do it but I can't get that final part about being connected. Basically all it says is that I need to have the wifi turned on and I don't think that my Dell has the kind of a setup to do this. I believe that laptops have one. Maybe mine is slightly different but I sure would like to know about this and any help would be greatly appreciated. Thank you!
#4
Posted 29 July 2015 - 10:05 AM
Marchalla
- Topic Starter
-
- Member
-
- 25 posts
Member
Can I go back to question and help answer IEEE 802.11 standards again please? If my desktop has LAN settings then what about for the wireless settings? Where are the wireless settings for my PC then? If it has the type of set up as a laptop wouldn't that be different? I'm sure that to get connected I'll need to have the wifi set to on position in the added adapter card 802.11 wireless. I'm using Vista Business and I know that in Vista Home Premium it includes something called the miniport virtual wifi. Then isn't this just like what would be in the laptop's which makes the whole thing simpler? Because I can't seem to get the system going by turning on this wifi card then what? Since it looks like it doesn't have any of these it seems like it may not work.
Edited by Marchalla, 29 July 2015 - 10:07 AM.
#5
Posted 30 July 2015 - 01:29 AM
Dashing star
-

- Member
-
- 722 posts
Member
You can enable the wifi options only you have the following device otherwise it is difficult like laptop you can't have default settings for wifi in desktop.
You can use PCI wifi adapter card for using wifi in your desktop
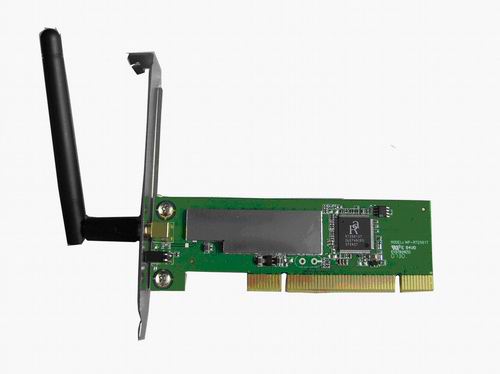
also you can use USB wifi adapter

Give this a try--> PCI vs USB wireless adapter for Desktop
Edited by Dashing star, 30 July 2015 - 01:30 AM.
#6
Posted 30 July 2015 - 09:04 AM
Marchalla
- Topic Starter
-
- Member
-
- 25 posts
Member
Thank you very much! That helps me answer my question on that.
Edited by Marchalla, 30 July 2015 - 09:06 AM.
#7
Posted 30 July 2015 - 10:22 PM
Dashing star
-
- Member
-
- 722 posts
Member
You are welcome.. 
You can ask if you have questions! 
#8
Posted 30 July 2015 - 10:51 PM
Marchalla
- Topic Starter
-
- Member
-
- 25 posts
Member
So then using a usb adapter will make it more like the laptops that have this added already? How about getting connected using hotspots and services that connect to free hotpots? I'm working on this until I get the one I have set up and going it's called Boingo.


#9
Posted 31 July 2015 - 01:21 AM
Dashing star
-
- Member
-
- 722 posts
Member
To Find a Wireless Network Using Windows 7
The first problem you encounter when trying to make the wireless network connection is finding the network. Not all wireless networks show up at first blush.
Remember that physical objects around you affect the signal: walls, bookcases, large partitions made from lead, and superheroes. Those things readily block the wireless signal. Move around. Sometimes, moving the laptop just a few feet in one direction improves signal reception. Remember that if you cannot see the wireless hub directly, odds are good that you won’t get a solid signal.
Windows 7 features a Refresh button:
In Windows 7, follow these steps to connect to a wireless network that’s not showing its name:
- Open the Control Panel.
- Choose the link View Network Status and Tasks from beneath the Networking and Internet heading.
- The Network and Sharing Center window appears.
- Choose the link Set Up a Connection or Network.
- The Set Up a Connection or Network window shows up.
- Choose Manually Connect to a Wireless Network.
- Click the Next button.
- Type the network SSID (name) into the Network Name text box.
- Choose the security type from the Security Type button menu.
- If the Encryption Type button becomes available, choose the proper type of encryption from the menu.
- Type the wireless network’s password into the Security Key text box.
- Put a check mark by the option Start This Connection Automatically. That way, you don’t have to input this same information again if you ever need to reconnect with the same wireless network.
- Click the Next button to connect with the network.
- As long as you didn’t screw anything up, and the network gods are pleased, you're connected to the nameless wireless network.
- Choose the Connect To option.
And the connection is complete.
Another cause of a dropped connection may be a timeout. For example, some for-pay wireless services give you only a limited amount of access time. After that time expires, you’re no longer connected or you may see the Pay Up home page rather than the Internet.
Finally, the connection problem may simply be that the password is incorrect. A dialog box warns you about it, but keep in mind that any wireless network passwords you stored in your PC might be changed by the various networks you access.
You can check the connection strength by pointing the mouse at the wee connection icon in the notification area.
In Windows Vista, the wireless connection strength is also displayed beneath the network’s information area in the Network and Connection Sharing window.
If you’re using Windows 7 or Windows Vista, you can install various wireless networking gadgets for the Sidebar. Most display the wireless network’s name, signal strength, and IP address.
Third-party utilities can also be used to gauge signal strength, such as the wireless networking tool shown earlier. Various war driver utilities, used to find wireless signals, can also be used to discover signal strength. The NetStumbler is a popular choice and can be downloaded from the web
To Connect to a Wireless Hotspot with Windows 7
Wireless hotspots are places where one or more wireless networks are available for the general public to use, such as a library or coffee shop. It's easy to connect to a wireless hotspot with Windows 7 because the software constantly looks for a working Internet connection.
If Windows 7 finds a hotspot, it sends the information to Internet Explorer and you're good to go. If it doesn't find the hotspot on its own or if there’s more than one network available, you'll have to guide Windows 7 through the process.
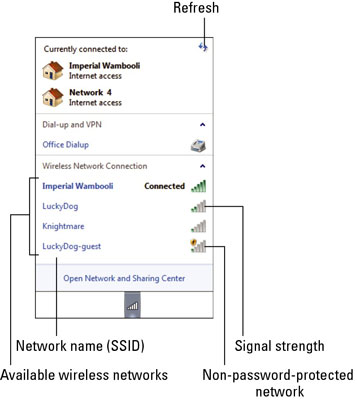
Click your taskbar’s network icon

Windows 7 lists all of the available options for connecting with the Internet — including any wireless networks within range.
1. Connect to the wireless network by clicking its name and clicking Connect.
At many places, clicking Connect may connect your laptop to the Internet immediately. But if your laptop asks for more information, move to Step 2.
2. Enter the wireless network’s name and security key/passphrase, if asked.
If you've selected an Unnamed Network, you'll need to supply the correct network name. Depending on the security of the network, you might also need a security key or passphrase.
3. Click Connect.
Windows 7 announces its success.
4. (Optional) Click the two boxes, Save This Network and Start This Connection Automatically.
Windows 7 will stash the network’s settings so that next time you're within range, your PC will automatically connect.
Edited by Dashing star, 31 July 2015 - 01:26 AM.
#10
Posted 01 August 2015 - 03:29 PM
Marchalla
- Topic Starter
-
- Member
-
- 25 posts
Member
Okay thank you for your help!


Similar Topics
0 user(s) are reading this topic
0 members, 0 guests, 0 anonymous users
As Featured On:


 Sign In
 Create Account
