Unmounted_boot_volume error? (Resolved).

Best Answer phillpower2 , 24 February 2016 - 03:40 PM
Thanks for checking For backing up your data, the method that you need to use will depend on how much data there is, if only a few GB you could use USB thumb drives but if there are man... Go to the full post »
#1

 Posted 19 February 2016 - 07:21 PM

#2

 Posted 19 February 2016 - 07:23 PM

#3

 Posted 20 February 2016 - 04:22 AM

![]() Breannamorgan16,
Breannamorgan16,
Two possible causes, 1: Windows has somehow become corrupted, 2: The HDD itself has problems.
Couple of questions if I may;
What is the model name or number of the HP notebook, this so that we can check the specifications such as whether or not it has a DVD/CD drive.
Do you have a Windows 8/8.1 DVD or HP system restore disk/s, may be needed to repair a damaged OS.
Is there data on the HDD that you would like to try and back up, we can provide steps for this once we know the computer specs.
Has the HDD been making any odd noises, been slow to access previous to this happening and how much free storage space was/is available on the HDD, this info will help us to determine if this is a Windows or a HDD issue.
#4

 Posted 20 February 2016 - 09:01 AM

I don't have any system restore disks.
Yes, I have data I would like to try and back up.
As far as I remember, it wasn't slow or making any weird noises, and I can't remember exactly how much free space is available but I know it was no where near being out of storage space.
#5

 Posted 20 February 2016 - 10:16 AM

So no DVD drive then meaning that any data recovery that may need to be done will be via a USB device, will come back to this after you have tried doing the following to see if you can get into Safe Mode, you may need to try this using a USB keyboard if you have or can borrow one, how to boot into Safe Mode guide here
If we are unable to fix this here you will need to purchase recovery media on a USB stick direct from HP, this because Microsoft are not responsible for offering support and you will not be able to download an ISO direct from them.
#6

 Posted 23 February 2016 - 08:47 AM

Not heard back from you Breannamorgan16, do you still require assistance or is the issue now resolved, an update would be appreciated.
#7

 Posted 23 February 2016 - 10:14 AM

#8

 Posted 23 February 2016 - 12:39 PM

No problem and thank you for getting back to us ![]()
#9

 Posted 24 February 2016 - 02:33 PM

#10

 Posted 24 February 2016 - 02:47 PM

#11

 Posted 24 February 2016 - 02:53 PM

When I try booting to safe mode and a system recovery on the laptop it says what either safe mode or system recovery in the bottom left hand corner.
Not sure what you mean there, can you explain a little more for us please.
Keyboard info acknowledged.
#12

 Posted 24 February 2016 - 03:01 PM

#13

 Posted 24 February 2016 - 03:13 PM

Does anything happen if you try pressing F8 again when you see the Safe Mode message in the corner, just wanting to check this before posting the info for you to try and back up your data off the HDD.
#14

 Posted 24 February 2016 - 03:30 PM

#15

 Posted 24 February 2016 - 03:40 PM

Thanks for checking ![]()
For backing up your data, the method that you need to use will depend on how much data there is, if only a few GB you could use USB thumb drives but if there are many GBs you would be better off backing up to an external USB HDD, the info below includes the steps for both burning Puppy Linux to disc and the USB thumb drive method that you will need to use;
===================
***Required Hardware***
CD Burner (CDRW) Drive,
Blank CD,
Extra Storage Device (USB Flash Drive, External Hard Drive)
===================
1. Save these files to your Desktop/Burn Your Live CD:
- Download Latest Puppy Linux ISO (i.e.: lupu-528.iso)
Download BurnCDCC ISO Burning Software
There are instructions on how to boot from flash drive with puppy here; http://www.pendrivel...e-from-windows/
- Open BurnCDCC with Windows Explorer
- Extract All files to a location you can remember
- Double Click
 BurnCDCC
- Click Browse
and navigate to the Puppy Linux ISO file you just downloaded
- Open/Double Click that file
IMPORTANT: Adjust the speed bar to CD: 4x DVD: 1x
- Click Start

- Your CD Burner Tray will open automatically
- Insert a blank CD and close the tray
- Click OK
Puppy Linux Live CD will now be created
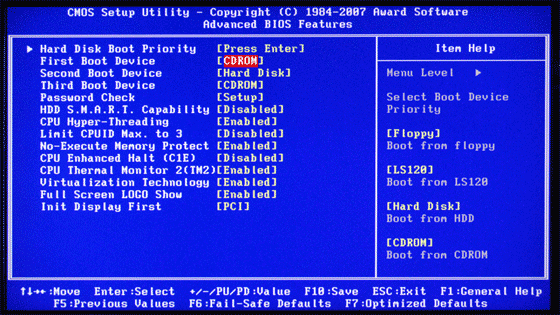
2. Set your boot priority in the BIOS to CD-ROM first, Hard Drive Second
-
- Start the computer/press the power button
- Immediately start tapping the appropriate key to enter the BIOS, aka "Setup"
(Usually shown during the "Dell" screen, or "Gateway" Screen)
- Once in the BIOS, under Advanced BIOS Options change boot priority to:
CD-ROM 1st, Hard Drive 2nd
- Open your ROM drive and insert the disk
- Press F10 to save and exit
- Agree with "Y" to continue
- Your computer will restart and boot from the Puppy Linux Live CD

3. Recover Your Data
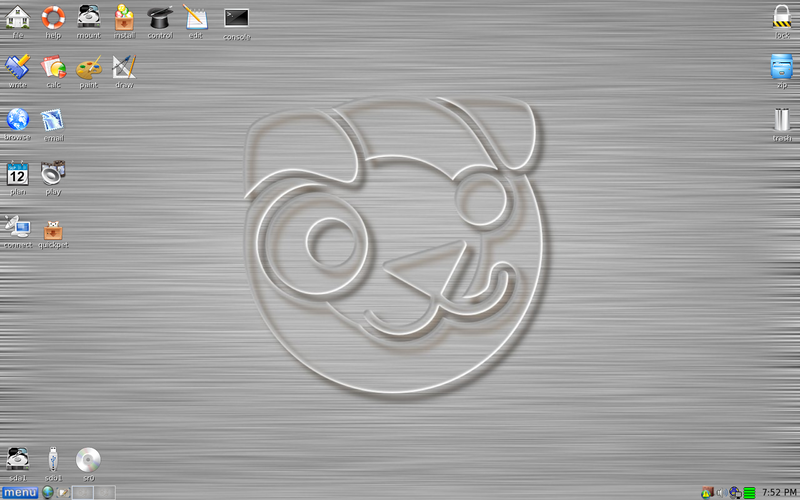
- Once Puppy Linux has loaded, it is actually running in your computer's Memory (RAM). You will see a fully functioning Graphical User Interface similar to what you normally call "your computer". Internet access may or may not be available depending on your machine, so it is recommended you print these instructions before beginning. Also, double clicking is not needed in Puppy. To expand, or open folders/icons, just click once. Puppy is very light on resources, so you will quickly notice it is much speedier than you are used to. This is normal. Ready? Let's get started.
3a. Mount Drives
- Click the Mount Icon located at the top left of your desktop.

- A Window will open. By default, the "drive" tab will be forward/highlighted. Click on Mount for your hard drive.
- Assuming you only have one hard drive and/or partition, there may be only one selection to mount.
- USB Flash Drives usually automatically mount upon boot, but click the "usbdrv" tab and make sure it is mounted.
- If using an external hard drive for the data recovery, do this under the "drive" tab. Mount it now.
3b. Transfer Files.
-
- At the bottom left of your desktop a list of all hard drives/partitions, USB Drives, and Optical Drives are listed with a familiar looking hard drive icon.
- Open your old hard drive i.e. sda1
- Next, open your USB Flash Drive or External Drive. i.e. sdc or sdb1
- If you open the wrong drive, simply X out at the top right corner of the window that opens. (Just like in Windows)
- From your old hard drive, drag and drop whatever files/folders you wish to transfer to your USB Drive's Window.
For The Novice: The common path to your pictures, music, video, and documents folders for XP is: Documents and Settings >> All Users (or each individual name of each user, for Vista and above C:\Users\$USERNAME\[...]. CHECK All Names!) >> Documents >> You will now see My Music, My Pictures, and My Videos.
Remember to only click once! No double clicking! Once you drag and drop your first folder, you will notice a small menu will appear giving you the option to move or copy. Choose COPY each time you drag and drop.
YOU ARE DONE!!! Simply click Menu >> Mouse Over Shutdown >> Reboot/Turn Off Computer. Be sure to plug your USB Drive into another working windows machine to verify all data is there and transferred without corruption. Congratulations!

Similar Topics
0 user(s) are reading this topic
0 members, 0 guests, 0 anonymous users
As Featured On:


 Sign In
 Create Account

