Jump to content

Welcome to Geeks to Go - Register now for FREE

Need help with your computer or device? Want to learn new tech skills? You're in the right place!
Geeks to Go is a friendly community of tech experts who can solve any problem you have. Just create a free account and post your question. Our volunteers will reply quickly and guide you through the steps. Don't let tech troubles stop you. Join Geeks to Go now and get the support you need!

How it Works Create Account
Photo

Making part of an image transparent


  • Please log in to reply

#1
MR0624

MR0624

    Member

  • Member
  • PipPipPip
  • 367 posts
First off, i'm a total cs2 noob, i'm pretty much learning by just messing around..Anyway, i'm designing a spray for my Insurgency Mod clan, and I need some help making a scope transparent. Here are the 2 images I have right now..


The main backround of the spray:


Posted Image

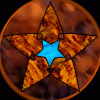
And this scope, which I would like to make the contents of the scope transparent, and make it look like they're seeing the ad through the scope. I want the outline of the scope to stay, and the lines to stay so the scope stays, the backround just changes.

Posted Image

So how do i make everything except the guide lines inside the scope (and the black lining) transparent, so the background image shows up?

Remember, I'm a total noob so I might need some detailed explanations >_>

Any other advice would be much appreciated..

Also, I guess I'm going to have to make the scope bigger to be able for it to fit over the words and screenshot, so how do i go about doing this?


btw, i'm changing the screenshot to normal colors, my friend inverted the colors, and saved it that way and sent to me, so i'm waiting for him to link me to the original screenshot so i can replace everything back to normal color >_>

Edited by MR0624, 17 July 2007 - 12:21 PM.

  • 0

Advertisements


#2
dsenette

dsenette

    Je suis Napoléon!

  • Community Leader
  • 26,047 posts
  • MVP
well...the easiest way to do what y ou want would be to select the parts you want gone (i.e. the 4 quadrants of the inside of that scope) and delete those...then you would add the other image in as a seperate layer...then move the "scope" layer on top of the "ad" layer......at which point you'd end up with this

[attachment=15043:scope3.jpg]
  • 0

#3
dsenette

dsenette

    Je suis Napoléon!

  • Community Leader
  • 26,047 posts
  • MVP
of course...if i wasn't at work...and had a little more uninterupted time...that would be cleaner around the edges
  • 0

#4
MR0624

MR0624

    Member

  • Topic Starter
  • Member
  • PipPipPip
  • 367 posts
Very nice, thanks much :whistling:
  • 0

#5
BlackHalo

BlackHalo

    Member

  • Member
  • PipPipPip
  • 266 posts
What you could also do is the following:

Open the picture of the scope in Photoshop. Go to file>place and select the image of the ad.
The ad should be placed as a new layer. Right-click on it in the layers panel and select 'rasterize layer'.
To make the selection easy, change the opacity of the ad-layer to about 70% (just so you can see what you're doing).(You can do this in the layers panel where it says opacity).
Now resize this layer so that it fits roughly in the scope (Edit>Free Transform). [b]Remember to hold shift while resizing, this will retain the proportions of your image![b].
Click on the scope-layer and use the elliptical marquee tool to select the edges inside the scope.
Press ctrl+shift+i to invert your selection.
Click on the ad-layer in the layers panel.
Press backspace.
If you selected the edges of the scope correctly, the ad should now fit perfectly inside the scope.
Select the scope-layer again and use the polygonal lasso tool (click and hold the lasso-tool button and select the polyganol lasso tool from the drop-down menu) to trace the crosshairs. (You might have to zoom severely as the lines are very thin).
Select the ad-layer again and press backspace.
After this whole process, the image should fit perfectly inside the scope.
If you want, you can leave it fairly transparent at about 70% opacity as I have done here, otherwise just change the opacity to suit your liking.

Posted Image

Edited by BlackHalo, 18 October 2007 - 02:14 AM.

  • 0


Similar Topics

0 user(s) are reading this topic

0 members, 0 guests, 0 anonymous users

As Featured On:

Microsoft Yahoo BBC MSN PC Magazine Washington Post HP