

Computer Won't Boot, BSOD
Started by
GeekForgotten
, Nov 11 2010 10:41 AM
#31

 Posted 12 November 2010 - 06:15 PM
rshaffer61
-

- Moderator
-

- 34,114 posts
Moderator

#32
Posted 12 November 2010 - 06:20 PM
GeekForgotten
- Topic Starter
-
- Member
-

- 134 posts
Member
It would be great if I could recover a few documents and files
if possible
I wanted to also put this computer to use so I took a old HDD of mine and installed windows 7 on it
and the HDD that doesn't work is also hooked up to the same computer
(In case you want me to run in window apps)
if possible
I wanted to also put this computer to use so I took a old HDD of mine and installed windows 7 on it
and the HDD that doesn't work is also hooked up to the same computer
(In case you want me to run in window apps)
Edited by GeekForgotten, 12 November 2010 - 06:23 PM.
#33
Posted 12 November 2010 - 07:15 PM
rshaffer61
-
- Moderator
-
- 34,114 posts
Moderator
Well if the other hd is seen maybe we can save some stuff.
Is it showing when you look in My Computer?
Do the following:
Go to Start then to Run
Type in compmgmt.msc and click Enter
On left side click on Disk Management
On right side you will see you hard drive.
Now I need you to take a screenshot and attach it to your next reply. Do the following to take a screenshot while the above is open and showing on your desktop.
To do a screenshot please have click on your Print Screen on your keyboard. It is normally the key above your number pad between the F12 key and the Scroll Lock key
Now go to Start and then to All Programs
Scroll to Accessories and then click on Paint
In the Empty White Area click and hold the CTRL key and then click the V
Go to the File option at the top and click on Save as
Save as file type JPEG and save it to your Desktop
Attach it to your next reply
#34
Posted 12 November 2010 - 07:45 PM
GeekForgotten
- Topic Starter
-
- Member
-
- 134 posts
Member
The only thing I see on My Computer is my current 500GB HDD and the Parititon for the 300GB Drive
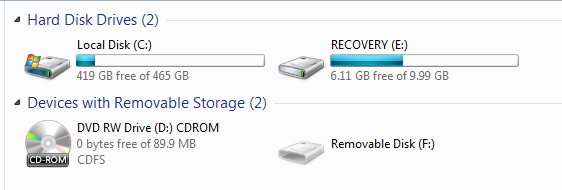
The Recovery Partition that you see (9.99GB) is part of the HDD but the other 300GB Western Digital isn't there
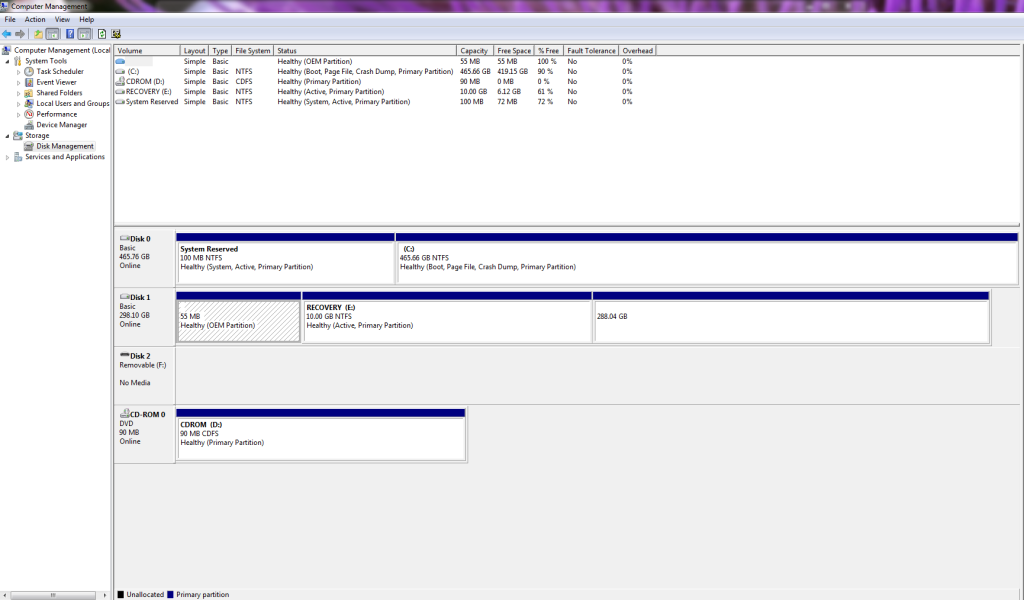
And here is the Disk Management
The Recovery Partition that you see (9.99GB) is part of the HDD but the other 300GB Western Digital isn't there
And here is the Disk Management
#35
Posted 12 November 2010 - 08:01 PM
rshaffer61
-
- Moderator
-
- 34,114 posts
Moderator
Yep I see the issue now. The partition with all the data has no drive letter assigned to it and it looks like no data either.
Try right clicking on that 288 gig partition and let me know what options it gives you.
Try right clicking on that 288 gig partition and let me know what options it gives you.
#36
Posted 12 November 2010 - 10:08 PM
GeekForgotten
- Topic Starter
-
- Member
-
- 134 posts
Member
I right click it, It gives me the option to change the drive letter, FORMAT it, or delete it
When I click assign a drive letter it gives me this error, even though i've tried restarting my computer
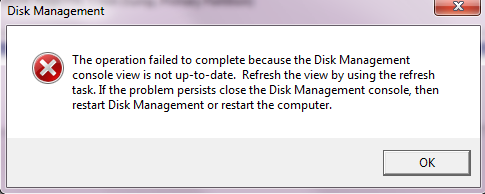
When I click assign a drive letter it gives me this error, even though i've tried restarting my computer
#37
Posted 13 November 2010 - 08:28 AM
rshaffer61
-
- Moderator
-
- 34,114 posts
Moderator
The problem is the Recovery Partition is the active partition on that drive and not the OS partition.
I believe the OEM Partition or the OS Partition has to be the Active Partition for this to work correctly.
I believe the OEM Partition or the OS Partition has to be the Active Partition for this to work correctly.
#38
Posted 13 November 2010 - 11:16 AM
GeekForgotten
- Topic Starter
-
- Member
-
- 134 posts
Member
How would I go about to make it active ?
#39
Posted 13 November 2010 - 11:47 AM
rshaffer61
-
- Moderator
-
- 34,114 posts
Moderator
Try right clicking on the partition that says OEM and let me know what options you get there.
#40
Posted 13 November 2010 - 11:48 AM
GeekForgotten
- Topic Starter
-
- Member
-
- 134 posts
Member
Only option it gives me
is help
is help
#41
Posted 13 November 2010 - 12:16 PM
rshaffer61
-
- Moderator
-
- 34,114 posts
Moderator
Well this is not looking good at all.
In post 7 you say there is a recovery partition on the HD which we have verified but you never state if you have a actual win 7 installation disk.
In post 7 you say there is a recovery partition on the HD which we have verified but you never state if you have a actual win 7 installation disk.
#42
Posted 13 November 2010 - 12:24 PM
GeekForgotten
- Topic Starter
-
- Member
-
- 134 posts
Member
That recovery partition was when I got the computer from dell (At that time it was windows vista installed)
I have win 7 now as i upgraded it
and I do have a win 7 installation disk
I have win 7 now as i upgraded it
and I do have a win 7 installation disk
#43
Posted 13 November 2010 - 02:08 PM
rshaffer61
-
- Moderator
-
- 34,114 posts
Moderator
OK so the only issue now is the data you want to keep?
Is the data replaceable or not?
Was the Vista and the new Win7 both 32 bit OS's or is one a 64 bit OS?
Is the data replaceable or not?
Was the Vista and the new Win7 both 32 bit OS's or is one a 64 bit OS?
#44
Posted 13 November 2010 - 02:40 PM
GeekForgotten
- Topic Starter
-
- Member
-
- 134 posts
Member
Well IF it possible to recover some data
because sadly it is not replaceable
But if there is no other way to recover the data, I would like to get the HDD up and running
Both OS's are 32Bit
because sadly it is not replaceable
But if there is no other way to recover the data, I would like to get the HDD up and running
Both OS's are 32Bit
Edited by GeekForgotten, 13 November 2010 - 02:40 PM.
#45
Posted 13 November 2010 - 02:42 PM
rshaffer61
-
- Moderator
-
- 34,114 posts
Moderator
OK then we can try to rebuild the bootmgr but I can't say it will work. This will require the original drive to be put back n as the master even though it won't boot.
After that then try the below and see if it will work.
If you have your Windows XP disk
If you DO NOT have your Windows XP disk
Running "ChkDsk"
Using "BootCfg /Rebuild" to fix the "Boot.ini" file
After that then try the below and see if it will work.
If you have your Windows XP disk
- Insert your Windows XP disk into your computer and reboot
- Make sure the PC is set to run from the CD as the primary boot device.
NOTE: You do this by setting your PC to boot to the CD-ROM in BIOS (enter bios by pressing f1, f2 or del key during memory count up, then search for boot order, and set the CD as the first boot device) - When the PC boots, it will boot from the CD...after the first several screens load, you will be given a choice to choose R for Recovery Console. You will be asked to log in.
NOTE: For Windows XP Home, there is not password, just hit ENTER. For Windows XP pro, ask whomever set up the machine what password they used.
If you DO NOT have your Windows XP disk
- Download RC.ISO from Here.
- Now burn this ISO image to a CD and boot your computer with it.
NOTE: Keep in mind that this is different than burning a file to a CD-ROM. If you do not know how to burn an ISO image, then download CDBurnerXP Pro to another Windows machine and install it. Then go Here for instructions for burning the ISO image - Once the CD is created, place it in the defunct computer
- Then reboot your broken PC with that CD in the CD-ROM drive.
- Make sure the PC is set to run from the CD as the primary boot device.
NOTE: You do this by setting your PC to boot to the CD-ROM in BIOS (enter bios by pressing f1, f2 or del key during memory count up, then search for boot order, and set the CD as the first boot device) - When the PC boots, it will boot from the CD...after the first several screens load, you will be given a choice to choose R for Recovery Console. You will be asked to log in.
NOTE: For Windows XP Home, there is not password, just hit ENTER. For Windows XP pro, ask whomever set up the machine what password they used.
Running "ChkDsk"
- At the Recovery console C:\WINDOWS prompt, type
chkdsk /r
- Press ENTER
- Let this scan run UNINTERUPTED until completed (30 min or so depending on the drive)
- Report any errors in your next reply
- Once the scan is complete, Type exit, and then press ENTER to quit Recovery Console.
- Your computer will now restart, boot from the CD again and continue with the next steps.
Using "BootCfg /Rebuild" to fix the "Boot.ini" file
- At the Recovery console C:\WINDOWS prompt, type
bootcfg /rebuild
- Press ENTER
Note: The bootcfg /rebuild command scans the hard disks of the computer for Windows NT 4.0, Windows 2000, or Windows XP installations, and then displays the results. You can add the detected Windows installations. - When you receive a message that is similar to the following message, press Y:
NOTE: You may see more than one entry here if you have a dual boot windows system. If this is the case follow this procedure for ALL installations to make sure that all OS's are added correctly
Total Identified Windows Installs: 1
[1] C:\Windows
Add installation to boot list? (Yes/No/All)
- You receive a message that is similar to the following message:
Enter Load Identifier
NOTE: This is the name of the operating system. This is either Microsoft Windows XP Professional or Microsoft Windows XP Home Edition. - Type the name of your operating system, and then press ENTER
- You receive a message that is similar to the following:
Enter OS Load options
- Type /fastdetect, and then press ENTER.
- Type exit, and then press ENTER to quit Recovery Console.
- Your computer will restart, and the updated boot list may appear when you receive the "Please select the operating system to start" message.
- If you see a Boot list with multiple entries choose the XP Home option to boot to windows.


Similar Topics
0 user(s) are reading this topic
0 members, 0 guests, 0 anonymous users
As Featured On:


 Sign In
 Create Account
