

Severe Lag and a Virus i cant find!
Started by
SakiKitty
, Dec 18 2010 10:57 PM
#31

 Posted 30 December 2010 - 04:46 PM
SakiKitty
- Topic Starter
-
- Member
-

- 194 posts
Member

#32
Posted 30 December 2010 - 04:53 PM
Essexboy
-

- Retired Staff
-

- 69,964 posts
GeekU Moderator
OK let me review all the logs again
#33
Posted 30 December 2010 - 05:00 PM
Essexboy
-
- Retired Staff
-
- 69,964 posts
GeekU Moderator
I can still see nothing so lets look in a different area
Download avz4.zip from here
When restarted
Attach both virusinfo_syscure.zip and virusinfo_syscheck.zip to your next post
Download avz4.zip from here
- Unzip it to your desktop to a folder named avz4
- Double click on AVZ.exe to run it.
- Run an update by clicking the Auto Update button on the Right of the Log window:

- Click Start to begin the update
- Start AVZ.
- Choose from the menu "File" => "Standard scripts " and mark the "Advanced System Analysis with Malware removal mode enabled " check box.

- Click on the Execute selected scripts.
- Automatic scanning, healing and system check will be executed.
- A logfile (avz_sysinfo.htm) will be created and saved in the LOG folder in the AVZ directory as virusinfo_syscure.zip.
- It is necessary to reboot your machine, because AVZ might disturb some program operations (like antiviruses and firewall) during the system scan.
- All applications will work properly after the system restart.
When restarted
- Start AVZ.
- Choose from the menu "File" => "Standard scripts " and mark the Advanced System Analysis " check box.

- Click on the "Execute selected scripts".
- A system check will be automatically performed, and the created logfile (avz_sysinfo.htm) will be saved in the LOG folder in the AVZ directory as virusinfo_syscheck.zip.
Attach both virusinfo_syscure.zip and virusinfo_syscheck.zip to your next post
#34
Posted 30 December 2010 - 05:53 PM
SakiKitty
- Topic Starter
-
- Member
-
- 194 posts
Member
Your link doesnt work =/
#35
Posted 31 December 2010 - 12:14 PM
Essexboy
-
- Retired Staff
-
- 69,964 posts
GeekU Moderator
Oops just found out it was pulled and replaced by AVP
Save these instructions so you can have access to them while in Safe Mode.
Please click here to download AVP Tool by Kaspersky.
Leave the rest of the settings as they appear as default.
Save these instructions so you can have access to them while in Safe Mode.
Please click here to download AVP Tool by Kaspersky.
- Save it to your desktop.
- Reboot your computer into SafeMode.
You can do this by restarting your computer and continually tapping the F8 key until a menu appears.
Use your up arrow key to highlight SafeMode then hit enter. - Double click the setup file to run it.
- Click Next to continue.
- Accept the Licence agreement and click on next
- It will by default install it to your desktop folder.Click Next.
- It will then open a box There will be a tab that says Automatic scan.
- Under Automatic scan make sure these are checked.
- Hidden Startup Objects
- System Memory
- Disk Boot Sectors.
- My Computer.
- Also any other drives (Removable that you may have)
Leave the rest of the settings as they appear as default.
- Then click on Scan at the to right hand Corner.
- It will automatically Neutralize any objects found.
- If some objects are left un-neutralized then click the button that says Neutralize all
- If it says it cannot be Neutralized then chooose The delete option when prompted.
- After that is done click on the reports button at the bottom and save it to file name it Kas.
- Save it somewhere convenient like your desktop and just post only the detected Virus\malware in the report it will be at the very top under Detected post those results in your next reply.
Note: This tool will self uninstall when you close it so please save the log before closing it.

#37
Posted 01 January 2011 - 05:38 AM
Essexboy
-
- Retired Staff
-
- 69,964 posts
GeekU Moderator
I guess that rules out a malware problem
Download Speedfan and install it. Once it's installed, run the program and post here the information it shows. The information I want you to post is the stuff that is circled in the example picture I have attached.
If you are running on a vista machine, please go to where you installed the program and run the program as administrator.
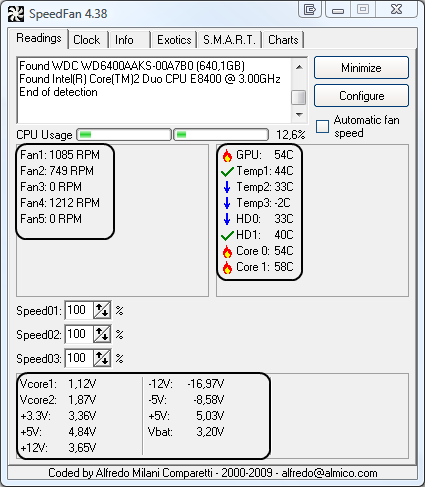
(this is a screenshot from a vista machine)
Download Speedfan and install it. Once it's installed, run the program and post here the information it shows. The information I want you to post is the stuff that is circled in the example picture I have attached.
If you are running on a vista machine, please go to where you installed the program and run the program as administrator.
(this is a screenshot from a vista machine)
#38
Posted 01 January 2011 - 01:54 PM
SakiKitty
- Topic Starter
-
- Member
-
- 194 posts
Member
Well i went to configure and checked everything i could but... this is all it will show 
Attached Thumbnails

#39
Posted 01 January 2011 - 02:06 PM
Essexboy
-
- Retired Staff
-
- 69,964 posts
GeekU Moderator
It is enough though to rule out any hardware malfunctions - i.e. overheating
At the moment I am at a loss as to why your system is behaving in this manner.
It does not appear to malware or hardware. So the next option is to rule out drivers, but this is a tad long winded. However if you want to try it
As I say this is tedious but you may get lucky the first time around
Step 1: Start the System Configuration Utility
1. Click Start, click Run, type msconfig, and then click OK.
2. The System Configuration Utility dialog box is displayed.
Step 2: Configure selective startup options
1. In the System Configuration Utility dialog box, click the General tab, and then click Selective Startup.
2. Click to clear the Process SYSTEM.INI File check box.
3. Click to clear the Process WIN.INI File check box.
4. Click to clear the Load Startup Items check box. Verify that Load System Services and Use Original BOOT.INI are checked.
5. Click the Services tab.
6. Click to select the Hide All Microsoft Services check box.
7. Click Disable All, and then click OK.
When you are prompted, click Restart to restart the computer.
Step 3: Log on to Windows
If you are prompted, log on to Windows.
When you receive the following message, click to select the Don't show this message or launch the System Configuration Utility when Windows start check box, and then click OK.
STEP 4: Troubleshoot
At the moment I am at a loss as to why your system is behaving in this manner.
It does not appear to malware or hardware. So the next option is to rule out drivers, but this is a tad long winded. However if you want to try it
As I say this is tedious but you may get lucky the first time around
Step 1: Start the System Configuration Utility
1. Click Start, click Run, type msconfig, and then click OK.
2. The System Configuration Utility dialog box is displayed.
Step 2: Configure selective startup options
1. In the System Configuration Utility dialog box, click the General tab, and then click Selective Startup.
2. Click to clear the Process SYSTEM.INI File check box.
3. Click to clear the Process WIN.INI File check box.
4. Click to clear the Load Startup Items check box. Verify that Load System Services and Use Original BOOT.INI are checked.
5. Click the Services tab.
6. Click to select the Hide All Microsoft Services check box.
7. Click Disable All, and then click OK.
When you are prompted, click Restart to restart the computer.
Step 3: Log on to Windows
If you are prompted, log on to Windows.
When you receive the following message, click to select the Don't show this message or launch the System Configuration Utility when Windows start check box, and then click OK.
You have used the System Configuration Utility to make changes to the way Windows starts.
The System Configuration Utility is currently in Diagnostic or Selective Startup mode, causing this message to be displayed and the utility to run every time Windows starts.
STEP 4: Troubleshoot
- Now restart and test the issue at hand with regard to speed
- If no problems, run msconfig and recheck half the disabled items on the Services tab. Reboot to test again. If the problem recurs, Uncheck half the items you just checked to narrow down the culprit.
- If the problem does not re-occur, check the other half, so all the Services are enabled. Reboot to test again. If the problem recurs, Uncheck half the items you just checked to narrow down the culprit.
#40
Posted 01 January 2011 - 02:19 PM
SakiKitty
- Topic Starter
-
- Member
-
- 194 posts
Member
After i check to Hide all Microsoft services, the boxes that remain aren't checked anyway.
And when i pressed ok, it said i had to be in administrator to do anything or something to that nature.
and after i restarted, even with all the things you asked me to do, the problem still occurs so im not sure what you want me to do.
And when i pressed ok, it said i had to be in administrator to do anything or something to that nature.
and after i restarted, even with all the things you asked me to do, the problem still occurs so im not sure what you want me to do.
Edited by SakiKitty, 01 January 2011 - 02:25 PM.
#41
Posted 01 January 2011 - 02:30 PM
Essexboy
-
- Retired Staff
-
- 69,964 posts
GeekU Moderator
The idea behind it is to disable all none microsoft drivers to see if they are causing the delay - but as they are allready disabled then that idea goes out of the window
When you experience the delays is there any specific programme running ?
Could you look in task manager to see which process is taking the most CPU
When you experience the delays is there any specific programme running ?
Could you look in task manager to see which process is taking the most CPU
#42
Posted 01 January 2011 - 02:56 PM
SakiKitty
- Topic Starter
-
- Member
-
- 194 posts
Member
Haha im sorry this is so bazzar. Your not the only person i sought help from and they were baffled too.
Basically the thing that take up most of my cpu when i use it, is WoW but that goes without saying. Generally though, which is what started me getting annoyed with this, i can play on WoW and use Skype or Teamspeak or Ventrillo without any issues. Ive been doing this for years. But then the person on the other end of my chat, couldnt hear me. Everytime i talk, my voice skips and they cant understand me. I can hear them perfectly well but they have no idea what im saying. Then WoW started lagging to the extreme. This is when i got fed up and wanted to know What the... the problem is and why is it happening.
The only new thing from before it was skipping to after, is i got a new hard drive. It was installed correctly without many problems during the process and i had a computer expert step me through it on the phone (hes the first person i asked help from and he couldnt figure it out).
I know this seems kind of silly but when random out of the blue issues start like this... well it bothers me. There has to be a reason for it and i intent to find the cause and deal with it which is where you come in.
I hope this detailed explanation gives you some insight.
Basically the thing that take up most of my cpu when i use it, is WoW but that goes without saying. Generally though, which is what started me getting annoyed with this, i can play on WoW and use Skype or Teamspeak or Ventrillo without any issues. Ive been doing this for years. But then the person on the other end of my chat, couldnt hear me. Everytime i talk, my voice skips and they cant understand me. I can hear them perfectly well but they have no idea what im saying. Then WoW started lagging to the extreme. This is when i got fed up and wanted to know What the... the problem is and why is it happening.
The only new thing from before it was skipping to after, is i got a new hard drive. It was installed correctly without many problems during the process and i had a computer expert step me through it on the phone (hes the first person i asked help from and he couldnt figure it out).
I know this seems kind of silly but when random out of the blue issues start like this... well it bothers me. There has to be a reason for it and i intent to find the cause and deal with it
which is where you come in.I hope this detailed explanation gives you some insight.
#43
Posted 01 January 2011 - 03:09 PM
Essexboy
-
- Retired Staff
-
- 69,964 posts
GeekU Moderator
Did you put the new hard drive in ?
There is a possibility that you may have dislodged or slightly moved one of the memory chips. OTL reports 2Gb is this the correct amount ?
OK here is my little spiel for Memtest
The Windows Memory Diagnostics Tool is an easy to create, easy to use application available from Microsoft that is a valuable tool in troubleshooting suspected RAM problems. Download the tool and save the file to your desktop. Double click on the downloaded file to open the disk creation application.
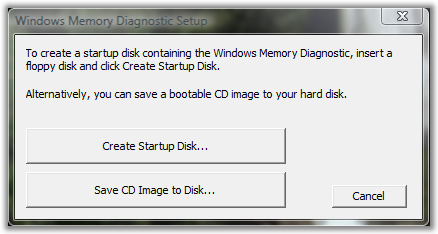
When the downloaded file is opened, the creation software will start and you will be presented with a license agreement...accept that and you will see the options to create a bootable floppy diskette or to copy the CD image to a location on your computer as shown below.
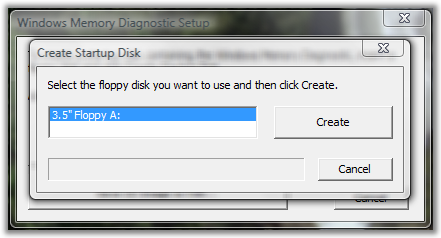
When the "Create Startup Disk..." button is clicked, you will be prompted to select the floppy drive to use to create the disk. In the majority of cases, there will be only one choice and it will be selected by default as shown in the example below. Insert a diskette into the floppy drive and click on the "Create" button.
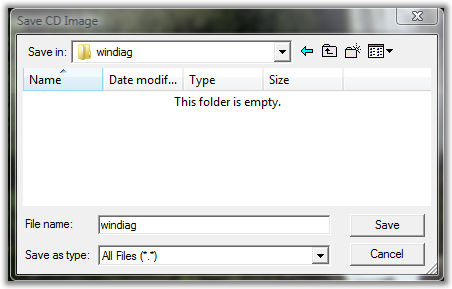
When the "Save CD Image to Disk..." button is clicked, you will be prompted to save the CD image to a location on your computer. Save it to a location you will remember such as your My Documents folder or the desktop. In the example below, I've created a folder on the desktop named windiag to save the file to.
Once the image has been saved to a location on your computer, you can use your burning software to burn the image to a cd. If your software doesn't support burning ISO Images or you do not have burning software installed, you can use a tool like ISO Recorder which will add a "Copy Image to CD" option to the right click context menu. You can simply right click on the saved image and choose that option...the burning tool will open.
Use the disk you create to boot the computer. The diagnostics will run automatically and will continue to do so until it is terminated. It should be left to run for a minimum of four complete passes. If you have the time, an hour or two is better.
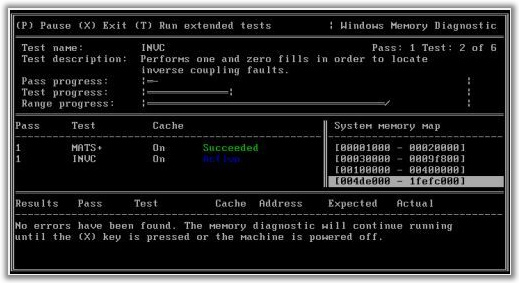
If the RAM module(s) is good, each test in each pass will display a green "Succeeded" message in the Pass field as shown in the image below.
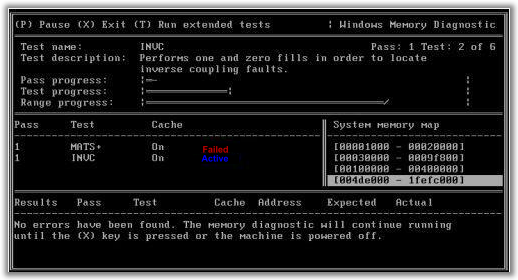
If the RAM module(s) is bad, one or more passes will display a red "Failed" message in the Pass field as shown in the image below.
Any failure in any test may indicate a bad module. If there is more than one module installed on the machine when a failure is indicated, remove all but one module and begin the test again, testing each module by itself until the failing module is found.
To terminate the diagnostics, remove the disk and press the X key or power the machine off.
Other things to try when faced with suspected memory problems:
There is a possibility that you may have dislodged or slightly moved one of the memory chips. OTL reports 2Gb is this the correct amount ?
OK here is my little spiel for Memtest
The Windows Memory Diagnostics Tool is an easy to create, easy to use application available from Microsoft that is a valuable tool in troubleshooting suspected RAM problems. Download the tool and save the file to your desktop. Double click on the downloaded file to open the disk creation application.
When the downloaded file is opened, the creation software will start and you will be presented with a license agreement...accept that and you will see the options to create a bootable floppy diskette or to copy the CD image to a location on your computer as shown below.
When the "Create Startup Disk..." button is clicked, you will be prompted to select the floppy drive to use to create the disk. In the majority of cases, there will be only one choice and it will be selected by default as shown in the example below. Insert a diskette into the floppy drive and click on the "Create" button.
When the "Save CD Image to Disk..." button is clicked, you will be prompted to save the CD image to a location on your computer. Save it to a location you will remember such as your My Documents folder or the desktop. In the example below, I've created a folder on the desktop named windiag to save the file to.
Once the image has been saved to a location on your computer, you can use your burning software to burn the image to a cd. If your software doesn't support burning ISO Images or you do not have burning software installed, you can use a tool like ISO Recorder which will add a "Copy Image to CD" option to the right click context menu. You can simply right click on the saved image and choose that option...the burning tool will open.
Use the disk you create to boot the computer. The diagnostics will run automatically and will continue to do so until it is terminated. It should be left to run for a minimum of four complete passes. If you have the time, an hour or two is better.
If the RAM module(s) is good, each test in each pass will display a green "Succeeded" message in the Pass field as shown in the image below.
If the RAM module(s) is bad, one or more passes will display a red "Failed" message in the Pass field as shown in the image below.
Any failure in any test may indicate a bad module. If there is more than one module installed on the machine when a failure is indicated, remove all but one module and begin the test again, testing each module by itself until the failing module is found.
To terminate the diagnostics, remove the disk and press the X key or power the machine off.
Other things to try when faced with suspected memory problems:
- Set the BIOS Fail Safe Defaults in Setup.
- Reset the CMOS. (Advanced)
- Adjust RAM voltage/timing. (Advanced)
#44
Posted 01 January 2011 - 03:25 PM
SakiKitty
- Topic Starter
-
- Member
-
- 194 posts
Member
Well the 2GB is correct. Yes i put the new drive in.
Well i burned the program to the CD and i tried to boot to CD but it didnt work. I tried it 3 different times and for whatever reason it wont boot to the CD
Well i burned the program to the CD and i tried to boot to CD but it didnt work. I tried it 3 different times and for whatever reason it wont boot to the CD
Edited by SakiKitty, 01 January 2011 - 04:01 PM.
#45
Posted 01 January 2011 - 04:25 PM
Essexboy
-
- Retired Staff
-
- 69,964 posts
GeekU Moderator
Silly question but did you burn it as a bootable image ?


Similar Topics
0 user(s) are reading this topic
0 members, 0 guests, 0 anonymous users
As Featured On:


 Sign In
 Create Account
