Jump to content

Welcome to Geeks to Go - Register now for FREE

Need help with your computer or device? Want to learn new tech skills? You're in the right place!
Geeks to Go is a friendly community of tech experts who can solve any problem you have. Just create a free account and post your question. Our volunteers will reply quickly and guide you through the steps. Don't let tech troubles stop you. Join Geeks to Go now and get the support you need!

How it Works Create Account
Photo

testing a motherboard and building new computer


  • Please log in to reply

#31
iammykyl

iammykyl

    Tech Staff

  • Technician
  • 7,659 posts
Gday.
Some info and instructions.
Your case manual. > http://www.coolermas...Download&id=753 NB. a system speaker is included.
Not shown on the G2G Tutorial, or on the case instruction is the I/O shield. On your old case, at the back, top left hand corner where the Mobo sockets poke out the case, that is the I/O shield.
This must be carefully removed (try not to damage, watch you do not cut your finger, some very sharp edges) and installed in your new case.
It pushes into the case from the outside. Stat at the top edge and work down.
Insert into the new case from the inside, make sure it is the correct way up. it will click into place.
More to follow.
Do you have a promised delivery date yet?
  • 0

Advertisements


#32
DonB0130

DonB0130

    Member

  • Topic Starter
  • Member
  • PipPip
  • 85 posts
....looks like they should be here tuesday sometime...no date shown, though....i'll post a firm date when i get it...

i took out a board that had a 'line in' socket that was connected to the mother board...is this what you meant by this I/O shield?
  • 0

#33
DonB0130

DonB0130

    Member

  • Topic Starter
  • Member
  • PipPip
  • 85 posts
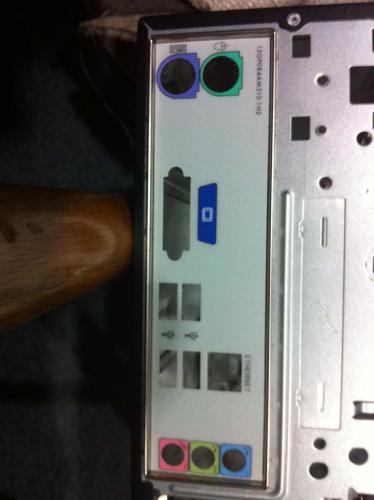
ok....maybe the attached is a picture of the i/o shield....don't see how i get this out...it looks pretty attached...
i'll see what i can doio shield.jpg
  • 0

#34
iammykyl

iammykyl

    Tech Staff

  • Technician
  • 7,659 posts
Correct. That is the I/O shield. Have not seen one quite like that.
Have a look at the inside. Are there some little clips or tabs holding it in place? if so, that one would push out of the case from the inside.
  • 0

#35
phillpower2

phillpower2

    Mechanised Mod

  • Global Moderator
  • 24,780 posts
Please excuse the interjection folks :)

DonB0130

If the MB is removed please try pushing the I/O plate inwards to release it, they are normally designed this way to prevent the MB pushing the plate out of the case when it is fitted, the plate should be countersunk BTW.
  • 0

#36
Wolfeymole

Wolfeymole

    Member

  • Member
  • PipPipPipPip
  • 1,929 posts
This may help regarding this I/O panel.

http://www.ifitjams.com/ibuild4.htm
  • 0

#37
DonB0130

DonB0130

    Member

  • Topic Starter
  • Member
  • PipPip
  • 85 posts
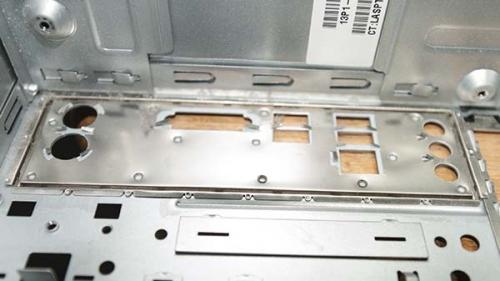
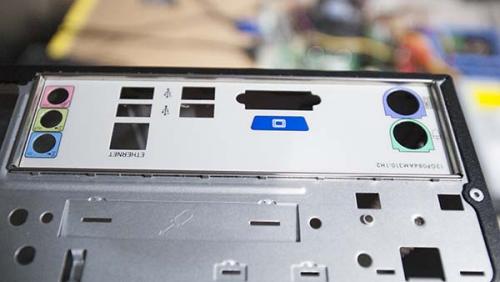
well, i got the i/o out....all the suggestion made were helpful....
there were little 'clips' on all four sides on the outside (i think on the inside as well)....
i used a screwdriver,pushed on the edges until the clips were 'inside' the opening....once i did this on
two of the sides, the i/o started to fall into the insides of the case....
shield inside of caseinside io shield.jpg
shield outside of caseio shield outside.jpg
  • 0

#38
DonB0130

DonB0130

    Member

  • Topic Starter
  • Member
  • PipPip
  • 85 posts
both the case and the power supply have been delivered....ready to go!!
  • 0

#39
iammykyl

iammykyl

    Tech Staff

  • Technician
  • 7,659 posts
Great, some more instructions. If you have question or get stuck, please post before carrying on.
Remember to turn of the power and take anti static measure.
When you have prepared the case, installed the I/O shield.
Look carefully at the plate where you fasten down the Mobo, there may be standoffs already installed. The must match exactly the pattern and number of screw holes in the MB, no extra ones, (if there are, unscrew them) look at the ones in your old case.


You have the manuals to look at for reference but will find it a little easer if you procede in these order.
Install the PSU.
Install the Optical Drive to the top bay.
Install the HDD in the second bay up from the bottom.
You should have the MB with the CPU/Heat-sink/fan and RAM already installed..
Install the MB


Connection. Try to keep the cables as neat as possible and where you can, run the wires in the cable management side of the case.
Connect the (2) Power cables to the MB.
Connect the SATA power cables to the drives,
Connect the SATA DATA cables to the drives.
Connect the USB 2.0 plug from the front case to the header on the MB.
Connect the front sound plug to the header on the MB.
Connect the front panel wires to the header pins on the MB. Your MB has s speaker onboard so do not use the little one that came with the case.
Connect the case fan/s

Check over the wiring, double check that the CPU fan plug is properly installed to the CPU fan header on the MB.

Connect the Monitor and switch on.
Connect the PSU and switch on.
Press the power on button. I have my fingers crossed.


  • 0

#40
DonB0130

DonB0130

    Member

  • Topic Starter
  • Member
  • PipPip
  • 85 posts
does it make any difference which way the fan in the power unit faces?....
  • 0

Advertisements


#41
iammykyl

iammykyl

    Tech Staff

  • Technician
  • 7,659 posts

does it make any difference which way the fan in the power unit faces?

If the case has an intake grill on the bottom of the case? Install with the fan facing down.
Do you have carpet on the floor?


  • 0

#42
DonB0130

DonB0130

    Member

  • Topic Starter
  • Member
  • PipPip
  • 85 posts
to keep you up to date....
put the psu in with the fan facing up...had trouble getting the i/o shield in. so when i put the motherboard in there were two screws that i couldn't get in....off by just a little though....i hooked up one of the case fans to the motherboard....the other two go to the PSU?....should have rest connected sometime today....providing cables to mobo for the optical and hard drive are long enough...
i might be able to get the i/o shield in better if i bend/cut off the little grab tabs and just let the mobo pressure it from the inside...
  • 0

#43
DonB0130

DonB0130

    Member

  • Topic Starter
  • Member
  • PipPip
  • 85 posts
yes...carpet is on the floor
  • 0

#44
DonB0130

DonB0130

    Member

  • Topic Starter
  • Member
  • PipPip
  • 85 posts
have run into some issues...
mobo connector is 4 pin.....psu cpu connector is 8 pin....
some of the sata connectors are very tight....wasn't sure how much pressure i should be putting on it....i tested out
the connectors on the hard drive....some i could connect, at least one i was not sure i wanted to keep pushing...
the case fans have two white connectors that if you pull off you are left with the mobo connector...i can link one of the fans
to the mobo...if i leave the white connectors on, then i guess that i should be connecting to the psu....but not sure how to do it...since there is only one psu connector...
would it be helpful if i used pictures when talking about this stuff?
  • 0

#45
DonB0130

DonB0130

    Member

  • Topic Starter
  • Member
  • PipPip
  • 85 posts
somehow i missed this response.....yes i have carpet on the floor....
  • 0


Similar Topics

0 user(s) are reading this topic

0 members, 0 guests, 0 anonymous users

As Featured On:

Microsoft Yahoo BBC MSN PC Magazine Washington Post HP