Jump to content

Welcome to Geeks to Go - Register now for FREE

Need help with your computer or device? Want to learn new tech skills? You're in the right place!
Geeks to Go is a friendly community of tech experts who can solve any problem you have. Just create a free account and post your question. Our volunteers will reply quickly and guide you through the steps. Don't let tech troubles stop you. Join Geeks to Go now and get the support you need!

How it Works Create Account
Photo

Windows 10 HP Laptop Is Running Extremely Slow

- - - - -

Best Answer vtmckoy , 09 June 2019 - 04:38 AM

phillpower2, I live about 100 miles from him.  When I got back into town, I just left it with him and that night he started running diagnostics, which didn't look too good.  But, yes... Go to the full post »


  • Please log in to reply

#16
vtmckoy

vtmckoy

    Member

  • Topic Starter
  • Member
  • PipPip
  • 68 posts

Yes, there is data that I definitely need from the hard drive.  I took a backup previously; but since then I've created some new files.  And, I am currently, on the road, away from home. 


In Windows RE, there's "Choose an option" ---> Continue (Exit and continue to Windows 10) Use a device (Use a USB drive, network connection or Windows recovery DVD) Troubleshoot (Reset your PC or see advanced options) and Turn off your PC.  When I go into Troubleshoot, it's "Reset this PC" (Lets you choose to keep or remove your personal files, and then reinstalls Windows), recovery Manager (HP backup and recovery or contact HP support) & Advanced options. 


Under Advanced options, you have the following:

  System Restore (Use a restore point recorded on your PC to restore Windows) 

  Startup Repair (Fix problems that keep Windows from loading)

  Go back to the previous version

  Command Prompt (Use the Command Prompt for advanced troubleshooting)

  System Image Recovery (Recover Windows using a specific system image file) 

  UEFI Firmware Settings (Change settings in your PC's UEFI firmware)

  Startup Settings (Change Windows startup behavior)


Thanks,


  • 0

Advertisements


#17
phillpower2

phillpower2

    Mechanised Mod

  • Global Moderator
  • 24,749 posts

Please try the following option first;


System Restore (Use a restore point recorded on your PC to restore Windows) 


If there is no restore point try;


"Reset this PC" (Lets you choose to keep or remove your personal files, and then reinstalls Windows)


We can try as much as we can with the available options or if you would prefer we can provide a way of attempting to recover your data first.


  • 0

#18
vtmckoy

vtmckoy

    Member

  • Topic Starter
  • Member
  • PipPip
  • 68 posts

Can we try to recover my data first?  Thx...


  • 0

#19
phillpower2

phillpower2

    Mechanised Mod

  • Global Moderator
  • 24,749 posts

Check for a restore point first please, even if you do not use one it would be good to know that they are available, for the data recovery see Puppy Linux info below;


=================== 

***Required Hardware*** 

CD Burner (CDRW) Drive, 

Blank CD, 

Extra Storage Device (USB Flash Drive, External Hard Drive)  

=================== 


1. Save these files to your Desktop/Burn Your Live CD:

  • Download Latest Puppy Linux ISO (i.e.: lupu-528.iso) 

    Download BurnCDCC ISO Burning Software 


    There are instructions on how to boot from flash drive with puppy here; http://www.pendrivel...e-from-windows/ 


  • Open BurnCDCC with Windows Explorer 

  • Extract All files to a location you can remember 

  • Double Click 1%20BurnCDCC%20Icon.PNG BurnCDCC 

  • Click Browse 2%20BurnCDCC%20Browse%20Button.PNG and navigate to the Puppy Linux ISO file you just downloaded 

  • Open/Double Click that file 

    IMPORTANT: Adjust the speed bar to CD: 4x DVD: 1x 

  • Click Start 3%20BurnCDCC%20Start%20Button.PNG 

  • Your CD Burner Tray will open automatically 

  • Insert a blank CD and close the tray 

  • Click OK 

Puppy Linux Live CD will now be created 


2. Set your boot priority in the BIOS to CD-ROM first, Hard Drive Second 

  •  

  • Start the computer/press the power button 

  • Immediately start tapping the appropriate key to enter the BIOS, aka "Setup" 

    (Usually shown during the "Dell" screen, or "Gateway" Screen) 

  • Once in the BIOS, under Advanced BIOS Options change boot priority to: 

    CD-ROM 1st, Hard Drive 2nd 

  • Open your ROM drive and insert the disk 

  • Press F10 to save and exit 

  • Agree with "Y" to continue 

  • Your computer will restart and boot from the Puppy Linux Live CD 
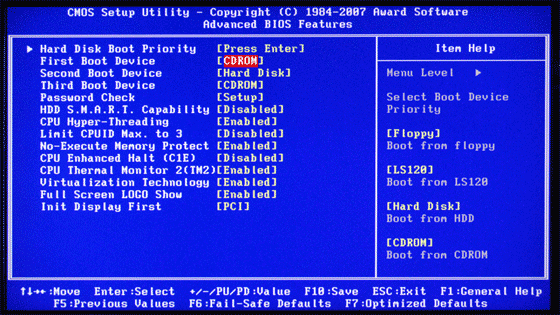
     

    4%20BIOSBootPriorityImage.png 


3.  Recover Your Data 

  • Once Puppy Linux has loaded, it is actually running in your computer's Memory (RAM).  You will see a fully functioning Graphical User Interface similar to what you normally call "your computer".  Internet access may or may not be available depending on your machine, so it is recommended you print these instructions before beginning.  Also, double clicking is not needed in Puppy.  To expand, or open folders/icons, just click once.  Puppy is very light on resources, so you will quickly notice it is much speedier than you are used to.  This is normal.  Ready?  Let's get started. 


    3a. Mount Drives 

  • Click the Mount Icon located at the top left of your desktop. 5%20Puppy%20Linux%20Mount%20Icon.PNG 

  • A Window will open.  By default, the "drive" tab will be forward/highlighted.  Click on Mount for your hard drive. 

  • Assuming you only have one hard drive and/or partition, there may be only one selection to mount. 

  • USB Flash Drives usually automatically mount upon boot, but click the "usbdrv" tab and make sure it is mounted. 

  • If using an external hard drive for the data recovery, do this under the "drive" tab.  Mount it now. 


3b. Transfer Files.

  •  

  • At the bottom left of your desktop a list of all hard drives/partitions, USB Drives, and Optical Drives are listed with a familiar looking hard drive icon. 

  • Open your old hard drive i.e. sda1 

  • Next, open your USB Flash Drive or External Drive. i.e. sdc or sdb1 

  • If you open the wrong drive, simply X out at the top right corner of the window that opens. (Just like in Windows) 

  • From your old hard drive, drag and drop whatever files/folders you wish to transfer to your USB Drive's Window. 


For The Novice:  The common path to your pictures, music, video, and documents folders for XP is: Documents and Settings >> All Users (or each individual name of each user, for Vista and above  C:\Users\$USERNAME\[...]. CHECK All Names!) >> Documents >> You will now see My Music, My Pictures, and My Videos


Remember to only click once!  No double clicking!  Once you drag and drop your first folder, you will notice a small menu will appear giving you the option to move or copy.  Choose COPY each time you drag and drop. 


YOU ARE DONE!!!  Simply click Menu >> Mouse Over Shutdown >> Reboot/Turn Off Computer.  Be sure to plug your USB Drive into another working windows machine to verify all data is there and transferred without corruption. Congratulations! 
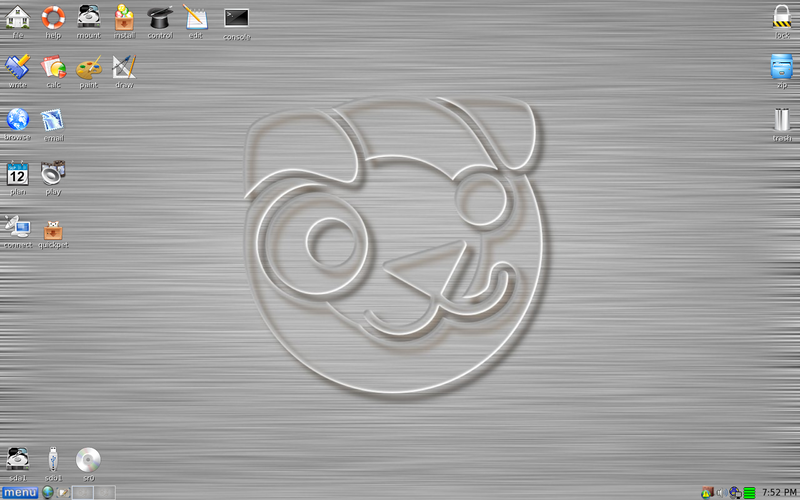


PuppyLinux528screenshot.png 


For computers that have UEFI as opposed to legacy BIOS, to be able to boot from your USB device you may need to disable secure boot and change UEFI to CSM Boot, not all computers and BIOS are the same, please refer to your user manual if you have one as the following steps are only one such example.

While the computer is re-starting,you will need to continually tap or hold down the particular key that will allow you to access the BIOS on your computer, we will use the F2 key as an example here;

After restarting the computer, when the screen goes black, press and hold down the F2 key, wait for the BIOS to load.

Select Security -> Secure Boot and then Disabled.

Select Advanced -> System Configuration and then Boot Mode.

Change UEFI Boot to CSM Boot.

Save the changes and Exit the BIOS, commonly F10.

If your computer will not boot into Windows at all, power up or restart the computer continually tap or hold down the key that will allow you to access the BIOS on your computer and then do the following;

Select Security -> Secure Boot and then Disabled.

Select Advanced -> System Configuration and then Boot Mode.

Change UEFI Boot to CSM Boot.

Save the changes and Exit the BIOS, commonly F10.


  • 0

#20
vtmckoy

vtmckoy

    Member

  • Topic Starter
  • Member
  • PipPip
  • 68 posts

Wow...this is a lot of information.  I just checked for the System Restore and it states the following:

No restore points have been created on your computer's system drive.  To create a restore point open "system protection".


When I click on "system protection", it states:  "system Protection is available only in online operating system.".


  • 0

#21
phillpower2

phillpower2

    Mechanised Mod

  • Global Moderator
  • 24,749 posts

Yes there is a fair bit so take your time to go through it Puppy Linux is an invaluable tool and I would recommend that you keep it handy for the future.


Shame about the restore points, that message means that they have never been set up on the computer, I always set them up when I build a new computer but unfortunately large OEM companies like Dell and HP etc don`t set them up, time is money to them  :(


  • 0

#22
vtmckoy

vtmckoy

    Member

  • Topic Starter
  • Member
  • PipPip
  • 68 posts

Hi,


I think I'm hosed.  As I previously stated, I'm away from home helping out with my mom.  And, I can't get to a store to purchase any CDs plus my brother's PC doesn't even have a CD device.  But, I had a USB drive that I put Lucid Puppy on.  However, I've been trying to get into the BIOS on my computer to allow it to boot from the USB drive and I can't.  Also, it looks like I'm losing options when I come up in WIN Re.  I no longer see:  "Use a device (Use a USB drive, network connection or Windows recovery DVD)"


Under "Choose an Option", I only see "Troubleshoot" and "Turn off your PC".


Under Troubleshoot, I see "Recovery Manager" and "Advanced Options"


Under "Advanced Options", I see System Restore, Startu Repair, Go back to the previous version, Command Prompt, System Image Recovery and UEFI Firmware Settings


Under "UEFI Firmware Settings", when I click on Restart I get the Startup Menu

  F1   System Information

  F2   System Diagnostics

  F9   Boot Device Options

  F10  BIOS Setup

  F11  System Recovery


ENTER - Continue Startup


Under F9 Boot Device Options, I see

  OS boot Manager (UEFI) - Windows Boot Manager (Toshiba MQ01ABD100)

  Boot From EFI File


Under F10 BIOS Setup, I see:  Main/Security/System Configuration/Exit


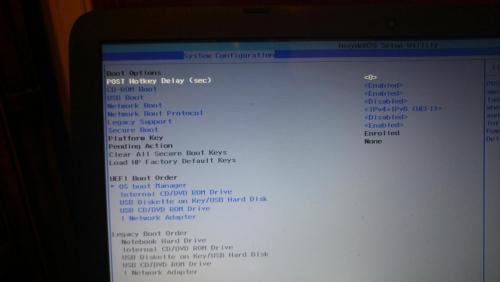
Under System Configuration, I see Boot Options

   POST Hotkey Deleay (sec)     0

   CD-ROM Boot                       Enabled

   USB Boot                             Enabled

   Network Boot                       Disabled

   Network Boot Protocol           IPv4 + IPv6  (UEF1)

   Legacy Support                     Disabled

   Secure Boot                          Enabled


I have no CD inserted.  Shouldn't it go to the USB Boot device next?  It's not booting from the USB Device.


Thx.


  • 0

#23
phillpower2

phillpower2

    Mechanised Mod

  • Global Moderator
  • 24,749 posts

Hello vtmckoy,


Glad you post back rather than trying the F2 System Diagnostics option which many folk would have done, reason I mention this is because testing a HDD that is potentially failing could actually cause it to fail, so well done for not being tempted by the option.


To boot from your USB device the boot settings need to be changed as follows;


Under System Configuration, I see Boot Options
 
   POST Hotkey Deleay (sec)     0
 
   CD-ROM Boot                       Enabled
 
   USB Boot                             Enabled This would be better be placed first but should be ok with no disk in the optical drive.
 
   Network Boot                       Disabled
 
   Network Boot Protocol           IPv4 + IPv6  (UEF1)
 
   Legacy Support                     Enabled
 
   Secure Boot                          Disabled
 
 
Please note that if your notebook has both USB 2.0 and USB 3.0 ports that you should use the USB 2.0 option, these ports are black while USB 3.0 ports are blue.

  • 0

#24
vtmckoy

vtmckoy

    Member

  • Topic Starter
  • Member
  • PipPip
  • 68 posts

Hi phillpower2,


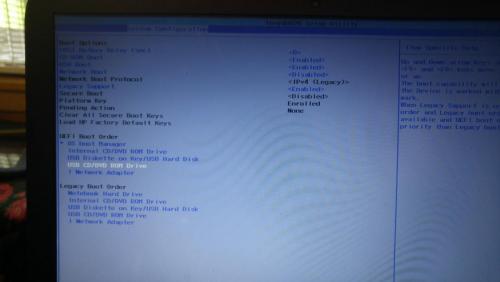
I still have not tried to reboot from the usb drive because when I went in and made the recommended changes, some sysconfig settings changed.  Before the changes, the Legacy Boot Order was grayed out.  After, I Enabled the Legacy Support, the "Legacy Boot Order" was changeable.  I am attaching a picture of both the sysconfigs--before I made the changes and after I made the changes.  I have exited out and not saved any changes.  I just wanted you to review the additional settings that are now available to see if I should make any additional changes, especially under the Legacy Boot Order.


Thank you,

Attached Thumbnails

  • sysConfig-BeforeChanges.jpg
  • sysConfig-AfterChanges.jpg

  • 0

#25
phillpower2

phillpower2

    Mechanised Mod

  • Global Moderator
  • 24,749 posts

Hello vtmckoy,


We understand that computer issues can be stressful so please do not worry and take your time with this, as per my reply #19 regarding UEFI BIOS and booting from a USB device.


For computers that have UEFI as opposed to legacy BIOS, to be able to boot from your USB device you may need to disable secure boot and change UEFI to CSM Boot, not all computers and BIOS are the same, please refer to your user manual if you have one as the following steps are only one such example.

While the computer is re-starting,you will need to continually tap or hold down the particular key that will allow you to access the BIOS on your computer, we will use the F2 key as an example here;

After restarting the computer, when the screen goes black, press and hold down the F2 key, wait for the BIOS to load.

Select Security -> Secure Boot and then Disabled.

Select Advanced -> System Configuration and then Boot Mode.

Change UEFI Boot to CSM Boot.

Save the changes and Exit the BIOS, commonly F10.

If your computer will not boot into Windows at all, power up or restart the computer continually tap or hold down the key that will allow you to access the BIOS on your computer and then do the following;

Select Security -> Secure Boot and then Disabled.

Select Advanced -> System Configuration and then Boot Mode.

Change UEFI Boot to CSM Boot.

Save the changes and Exit the BIOS, commonly F10.


USB Diskette on key/USB Hard Disk in the Legacy Boot Order settings is the one that you need to enable.


  • 0

Advertisements


#26
vtmckoy

vtmckoy

    Member

  • Topic Starter
  • Member
  • PipPip
  • 68 posts
My issue is that what you are stating, I am not seeing.  Maybe I am in the wrong place.  In Windows RE, I am seeing some UEFI Firmware options; but when I go to:
Advanced Options/UEFI Firmware Settings--click Restart, I get the Startup Menu, which is basically the BIOS.
 
In the BIOS under the Security tab, I am seeing the following:
   a)  Administrator Password Clear
   b)  Power-On Password Clear
   c)  TPM Device Available
   d)  TPM State Enabled
   d)  Clear TPM No
   e)  Intel Software Guard Extensions (SGX)   S/W Controlled
   f)  Restore Security settings to Factory Defaults
 
In the System Configuration tab, I am seeing the following:
 
UEFI Boot Order
   OS boot Manager   Windows Boot Manager (Toshiba MQ01ABD100)
   Internal CD/DVD ROM Drive
   USB Diskette on Key/USB Hard Disk
   USB CD/DVD ROM Drive
   ! Network Adapter
 
Legacy Boot Order
   Notebook Hard Drive
   Internal CD/DVD ROM Drive
   USB Diskette on Key/USB Hard Disk
   USB CD/DVD ROM Drive
   ! Network Adapter
 
 
You say:  "Change UEFI Boot to CSM Boot".  Where is CSM Boot?  I see CSM stands for Compatibility Support Module; but will a value actually display as "CSM" or is the Windows Boot Manager Toshiba MQ01ABD100 the actual CSM?
 
 
The bottom line:  is it sufficient enough for me to just ensure that Legacy Support is Enabled and Secure Boot is Disabled; and hopefully the USB ThumbDrive will get booted with the Liquid Puppy OS?
 
Thanks...

  • 0

#27
phillpower2

phillpower2

    Mechanised Mod

  • Global Moderator
  • 24,749 posts
The bottom line:  is it sufficient enough for me to just ensure that Legacy Support is Enabled and Secure Boot is Disabled; and hopefully the USB ThumbDrive will get booted with the Liquid Puppy OS?


Correct, as said above the guide is but one example of one brand of computer BIOS.


  • 0

#28
vtmckoy

vtmckoy

    Member

  • Topic Starter
  • Member
  • PipPip
  • 68 posts

Hi,


I'm batting a 1000 here. I made the appropriate changes ( Legacy Support is Enabled and Secure Boot is Disabled), entered the pass code displayed on the screen and hit enter accept the pending changes.  The Liquid Puppy OS USB Thumb drive was inserted in the usb port.  It's 3 usb ports and all are black in color.  The thumb drive never lit up and I received the same error booting to windows.  So, it looks like it booted straight to the hard drive. 
 
I changed USB ports and tried again.  At the beginning of the sequence, I saw the USB disk light blink a few times.  But, it eventually booted up to Windows, presented the date/time and gave me the background screen; then got the failure again.  One time, it even presented the login screen, I typed in my pin and thought maybe it was going to be ok; then it failed with the same message.  
 
So far, we've tried System Restore; however, there are no restore points set up.  The Startup Repair doesn't work.  I see Command Prompt, System Image Recovery and Go back to the previous version.  At this point, it looks like I can't restore the files that I wanted; I do have a pretty current backup on my external disk.  Do you think any commands from the command prompt can be done or will the "Go back to the previous version" do anything for me?  I'm assuming the System Image Recovery might not work because I don't really have an image to recover from.  Also, I see HP Recovery Manager that has a System Recovery underneath it that states restore your computer to its original factory condition.  Any thoughts?  Thanks...

  • 0

#29
phillpower2

phillpower2

    Mechanised Mod

  • Global Moderator
  • 24,749 posts

Nothing is being made easy for you with this so well done for not letting it get to you  :thumbsup:


Two suggestions, check your Linux USB device on another computer to make sure that it is good and in the Windows RE select the Command Prompt option and then try the following commands one at a time;


1: Enter DISM.exe /Online /Cleanup-image /Restorehealth (note the spaces before each "/"). Press Enter

2: Enter sfc /scannow (note the space between "sfc" and "/"). Press Enter


Regarding the HP Recovery Manager, using this would erase your data and may not even work if the HDD itself is failing, last throw of the dice before using the recovery option would be to download Windows 10 to a thumbdrive and attempting a repair installation of Windows, you would need an 8GB or above USB thumbdrive for this.


  • 0

#30
vtmckoy

vtmckoy

    Member

  • Topic Starter
  • Member
  • PipPip
  • 68 posts

Thanks for your words of encouragement; but I'm about to give up...lol.  Anyway, I ran the command you provided:


 Enter DISM.exe /Online /Cleanup-image /Restorehealth (note the spaces before each "/"). Press Enter


I had issues and did a little research; I found the answer here:  


So, I ran:  c:\>dism.exe /Image:C:\ /Cleanup-Image /Restorehealth
 
And, received this:
 
The scratch directory size might be insufficient to perform this operation.  This can cause unexpected behavior.  Use the ?ScratchDir option to point to a folder with sufficient scratch space.  The recommended size is at least 1024 MB
 
It ran for a bit; then I got this message @ 84.8%
 
Error:  0x800f081f   
The source files could not be found.
Use the "Source" option to specify the location of the files that are required to restore the feature.  For more information on specifying a source location, see http:/go.microsoft.com/fwlink/?LinkId=243077.
 
The DISM log file can be found at X:\Windows\Logs\dism.log


Thanks...

  • 0


Similar Topics

0 user(s) are reading this topic

0 members, 0 guests, 0 anonymous users

As Featured On:

Microsoft Yahoo BBC MSN PC Magazine Washington Post HP