Jump to content

Welcome to Geeks to Go - Register now for FREE

Need help with your computer or device? Want to learn new tech skills? You're in the right place!
Geeks to Go is a friendly community of tech experts who can solve any problem you have. Just create a free account and post your question. Our volunteers will reply quickly and guide you through the steps. Don't let tech troubles stop you. Join Geeks to Go now and get the support you need!

How it Works Create Account
Photo

Printer insufficient disk space


  • Please log in to reply

#46
yorkielady007

yorkielady007

    Member

  • Topic Starter
  • Member
  • PipPip
  • 48 posts
Its me again!

I came across some info and what is your oppion, can I use the run system file checker using my restore disk,

You might also want to run system file checker. To do this, go to start ==> run and type cmd. Now at the command prompt type sfc /scannow, you will need your Windows disk. This utility will re-install all Windows related files on your system, but you will not lose your data.

Will I not lose my data with the restore disk?
Please advise
  • 0

Advertisements


#47
anzenketh

anzenketh

    BSOD Warrior/Computer Surgeon

  • Technician
  • 2,854 posts
yorkie,

NO sfc /scannow will only run with a windows Operating system Disk. Might want to call your computer manufacture a try see if they will be willing to send you one.
  • 0

#48
yorkielady007

yorkielady007

    Member

  • Topic Starter
  • Member
  • PipPip
  • 48 posts
Tuxmaster

Im having a problem getting e machine {Gateway} to understand exactly what Im in need of, they are trying to give me a restore disk which I already have!!

What exactly do you call the disk in the post above? {windows Operating system Disk? }
Explain exacty what it will do?

Thanks
  • 0

#49
anzenketh

anzenketh

    BSOD Warrior/Computer Surgeon

  • Technician
  • 2,854 posts
yorkielady,

It is the OEM copy of your Windows Operating system disk. Tell them you need to do a repair install.
  • 0

#50
yorkielady007

yorkielady007

    Member

  • Topic Starter
  • Member
  • PipPip
  • 48 posts
Tuxmaster

Finally it appears I have what I need, below is the instructions. :)

NOTE: In most cases this will not resolve issues related to virus
infection, but will in most cases resolve the majority of Windows
functionality problems. Using this Windows Repair Procedure is at your

discretion and provides a non-destructive alternative.

This should not affect any personal files on your system. *** However
you will want to backup your Favorites folder, email address book and
any files in the "My Documents" folder. *** The preinstalled programs
should still be working correctly and not need to be reinstalled. You
will want to reinstall any Microsoft Critical Security updates.

NOTE: *** Please be advised that if the repair procedure does not
correct the issue you will need to run a full restore on your system.
***

Repairing a Windows XP installation:

If you cannot boot into Windows Normal Mode then you will need to try
booting into Safe Mode. To do this, turn on the computer and
immediately start tapping the F8 key about two times per second until
you get the Startup menu with several options to choose from. Using
the
arrow keys on the keyboard, highlight the option for Safe Mode and
press
the Enter key. This will take you to a screen where you will need to
choose "Microsoft Windows XP Home Edition", again by pressing the Enter

key. At the login screen, choose the Administrator account. There
should be no password for the default Safe Mode Administrator account.

If a password has been set for the Safe Mode Administrator account and
you do not know what the password is, then you will need to run a full
restore instead of this repair operation.

1. Click on "Start".
2. Click on "Run".
3. In the Run box type the following: "c:\Windows\i386\winnt32.exe"
without the quotes.
4. Press the "Enter" key. This will start the Windows Installation
Program.
5. This brings up an error window titled "Windows Setup". The option
to upgrade will not be available at this time because setup was unable
to load the file c\:Windows\I386\winntupg /netupgrd.dll
6. Click on "OK" to bypass the upgrade error.
7. The next window that opens will say, "Welcome to Windows Setup".
8. Click on "Next".
9. Then a window will open concerning the License Agreement.
10. Select "I accept this agreement".
11. Click on "Next".
12. On the next window, you will need to enter the following Product
Key.

edited to remove product key

13. Enter your "Product Key".
14. Click on "Next".
15. The next screen that is displayed is your "Setup Options".
16. Click on "Next".
17. The next window will ask if you want to download the updated setup

files.
18. Select "No", as it is advisable that you select the option, “No
skip this step and continue installing….” to avoid potential
Internet
connectivity issues.
19. Click on "Next".
20. The computer will then begin the "Preparing installation" process.


21. When the computer reboots it will automatically enter setup.
22. The screen that is displayed will display the following:


------------------------------------------------------------------------
--------------

Windows XP Home Edition setup

Welcome to setup

This portion of the setup program prepares Microsoft Windows XP to run
on your computer.
To setup Windows XP now: press Enter.
To repair a Windows XP installation using recovery console: press R
To quit setup without installing Windows XP: press F3


------------------------------------------------------------------------
--------------

23. Press "Enter".
24. On the next screen, it will say the following:


------------------------------------------------------------------------
--------------

If one of the following Windows XP installations is damaged, setup can
try to repair it.
To repair the selected Windows XP installation: Press R.
To continue installing a fresh copy of Windows XP without repairing:
Press ESC.


------------------------------------------------------------------------
--------------

NOTE: If you press the ESC key at the screen options shown just above
a
fresh copy of XP will be installed and all installed programs, user
data
folders, profiles and settings may be lost.

25. Use the up and down arrow keys on your keyboard to select an
installation.

26. Press R to repair the installation. Setup will now continue with
the repair process, which may take up to 45 minutes or more.

NOTE: In some cases during the installation, a dialog box will pop up
asking for a specific file located on a specific CD. If this occurs,
click on the Cancel button and the install will then proceed normally
to
completion.

27. Follow the prompts to complete the repair.
28. Once this completes it will take you through the initial setup
procedure.
29. Follow the onscreen prompts to complete the repair
  • 0

#51
yorkielady007

yorkielady007

    Member

  • Topic Starter
  • Member
  • PipPip
  • 48 posts
Tuxmaster

Finally it appears I have what I need, below is the instructions. :)

NOTE: In most cases this will not resolve issues related to virus
infection, but will in most cases resolve the majority of Windows
functionality problems. Using this Windows Repair Procedure is at your

discretion and provides a non-destructive alternative.

This should not affect any personal files on your system. *** However
you will want to backup your Favorites folder, email address book and
any files in the "My Documents" folder. *** The preinstalled programs
should still be working correctly and not need to be reinstalled. You
will want to reinstall any Microsoft Critical Security updates.

NOTE: *** Please be advised that if the repair procedure does not
correct the issue you will need to run a full restore on your system.
***

Repairing a Windows XP installation:

If you cannot boot into Windows Normal Mode then you will need to try
booting into Safe Mode. To do this, turn on the computer and
immediately start tapping the F8 key about two times per second until
you get the Startup menu with several options to choose from. Using
the
arrow keys on the keyboard, highlight the option for Safe Mode and
press
the Enter key. This will take you to a screen where you will need to
choose "Microsoft Windows XP Home Edition", again by pressing the Enter

key. At the login screen, choose the Administrator account. There
should be no password for the default Safe Mode Administrator account.

If a password has been set for the Safe Mode Administrator account and
you do not know what the password is, then you will need to run a full
restore instead of this repair operation.

1. Click on "Start".
2. Click on "Run".
3. In the Run box type the following: "c:\Windows\i386\winnt32.exe"
without the quotes.
4. Press the "Enter" key. This will start the Windows Installation
Program.
5. This brings up an error window titled "Windows Setup". The option
to upgrade will not be available at this time because setup was unable
to load the file c\:Windows\I386\winntupg /netupgrd.dll
6. Click on "OK" to bypass the upgrade error.
7. The next window that opens will say, "Welcome to Windows Setup".
8. Click on "Next".
9. Then a window will open concerning the License Agreement.
10. Select "I accept this agreement".
11. Click on "Next".
12. On the next window, you will need to enter the following Product
Key.

edited to remove product key

13. Enter your "Product Key".
14. Click on "Next".
15. The next screen that is displayed is your "Setup Options".
16. Click on "Next".
17. The next window will ask if you want to download the updated setup

files.
18. Select "No", as it is advisable that you select the option, “No
skip this step and continue installing….” to avoid potential
Internet
connectivity issues.
19. Click on "Next".
20. The computer will then begin the "Preparing installation" process.


21. When the computer reboots it will automatically enter setup.
22. The screen that is displayed will display the following:


------------------------------------------------------------------------
--------------

Windows XP Home Edition setup

Welcome to setup

This portion of the setup program prepares Microsoft Windows XP to run
on your computer.
To setup Windows XP now: press Enter.
To repair a Windows XP installation using recovery console: press R
To quit setup without installing Windows XP: press F3


------------------------------------------------------------------------
--------------

23. Press "Enter".
24. On the next screen, it will say the following:


------------------------------------------------------------------------
--------------

If one of the following Windows XP installations is damaged, setup can
try to repair it.
To repair the selected Windows XP installation: Press R.
To continue installing a fresh copy of Windows XP without repairing:
Press ESC.


------------------------------------------------------------------------
--------------

NOTE: If you press the ESC key at the screen options shown just above
a
fresh copy of XP will be installed and all installed programs, user
data
folders, profiles and settings may be lost.

25. Use the up and down arrow keys on your keyboard to select an
installation.

26. Press R to repair the installation. Setup will now continue with
the repair process, which may take up to 45 minutes or more.

NOTE: In some cases during the installation, a dialog box will pop up
asking for a specific file located on a specific CD. If this occurs,
click on the Cancel button and the install will then proceed normally
to
completion.

27. Follow the prompts to complete the repair.
28. Once this completes it will take you through the initial setup
procedure.
29. Follow the onscreen prompts to complete the repair
  • 0

#52
anzenketh

anzenketh

    BSOD Warrior/Computer Surgeon

  • Technician
  • 2,854 posts
Yorkie,

Please do not put any product keys into any of your posts. This has a possibility of invalidating your Windows Operating System I have called a Moderator over here to remove the key.

I would not do the repair installation just yet. Is the steps above what E-machines told you to do If they did I would not recommend doing a repair installation that way. Call E-machines back and ask for a Operating System Disk. The reason why I said tell them you need to do a repair installation is because you need the operating system disk to do one.
  • 0

#53
yorkielady007

yorkielady007

    Member

  • Topic Starter
  • Member
  • PipPip
  • 48 posts
Yes those are the instructions they give me, I have ask them three times for an Operating System Disk and the first reply back only ignored the request and give me instructions for a complete restore. I wrote them again saying we had a communication gap, asking again for an Operating System Disk, the instructions I posted you is what they sent me back. I will get to the bottom of this yet!!

Wondering ? if I could purchase one somewhere and how much would it cost?
  • 0

#54
anzenketh

anzenketh

    BSOD Warrior/Computer Surgeon

  • Technician
  • 2,854 posts
Yorkie,

The Operating Systems Disks at a lot of computer manufactures are not so easily available. However Should be able to be provided. You may have to pay a small fee for it. If you just go out and buy the disk it may cost up in the hundreds.

I am currently doing research on the Instructions they provided to see exactly what it does on one of my Virtual Machines. The Operating system Disk is still useful however. I will also take a look at the Microsoft instructions and tell you any revisions that may need to be made because you do not have a Operating system disk.
  • 0

#55
yorkielady007

yorkielady007

    Member

  • Topic Starter
  • Member
  • PipPip
  • 48 posts
Here is e-machine or Gateway's responce after requesting an Operating System Disk three times!
What they have suggested I have already tried and posted back in previous post!
Waitng back on your replys.


I apologize however we do not send out Operating System CD. In
accordance with our license agreement with Microsoft, the version of
Windows that came pre-installed is bundled with other software in a
Ghost Image format.

Because of this, individual files or programs cannot be extracted from
the CD, except for the device drivers, which can be loaded individually

from the Restore CD.

If you want to obtain a separate Operating System CD, you may consider
purchasing a retail version of the Windows XP Operating System
software.


However, if you are experiencing issues with your computer getting
16-bit Subsystem error, you may consider the information below to fix
this.

Click Start, and then click Run.
In the Open box, type CMD, and then click OK.
At the command prompt, type the following commands, pressing ENTER
after
each command:


CD \Windows\Repair
Copy *.nt C:\Windows\System32
Exit


Start the program you are having issues with. If the issue is resolved,

do not complete the remaining steps. If the issue is not resolved, go
to
the next step.

Click Start, and then click Run.
In the Open box, type CMD, and then click OK.
At the command prompt, type the following commands, pressing ENTER
after
each command:

Note: When typing C:\windows\i386, the i in i386 is the letter i as in
indigo, not the number 1 or a lower cased L.

expand C:\WINDOWS\i386\config.nt_ c:\windows\system32\config.nt
expand C:\WINDOWS\i386\autoexec.nt_ c:\windows\system32\autoexec.nt
expand C:\WINDOWS\i386\command.co_ c:\windows\system32\command.com
exit

I hope this reply has provided you the information to deal with your
concern in the best possible way
  • 0

Advertisements


#56
anzenketh

anzenketh

    BSOD Warrior/Computer Surgeon

  • Technician
  • 2,854 posts
Lets Make sure you can write to that directory.

Using Windows Explorer (to get there right-click your Start button and go to "Explore"), please go to the following location. Replace yourusernamehere with the username that you use to login.
C:\Documents and Settings\yourusernamehere\Local Settings\Temp

Try to create a file in there.

Go ahead and post back the results.

Edited by tuxmaster, 14 October 2007 - 08:20 AM.

  • 0

#57
yorkielady007

yorkielady007

    Member

  • Topic Starter
  • Member
  • PipPip
  • 48 posts
Tuxmaster


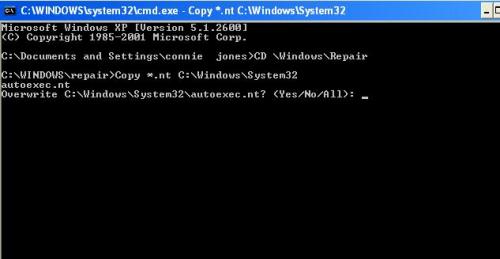
Thought Id try the commands again, I noticed a slight difference, then the one I tried on the Mircosoft site. I have gotten a responce for the command!! The instructions from E machines left this one out! {Im not surprised}
I need to know weather to press the Yes or ALL!

Attached Thumbnails

  • .ntcommand.JPG

  • 0

#58
anzenketh

anzenketh

    BSOD Warrior/Computer Surgeon

  • Technician
  • 2,854 posts
Yorkie,

Go ahead and respond with a Yes
  • 0

#59
yorkielady007

yorkielady007

    Member

  • Topic Starter
  • Member
  • PipPip
  • 48 posts
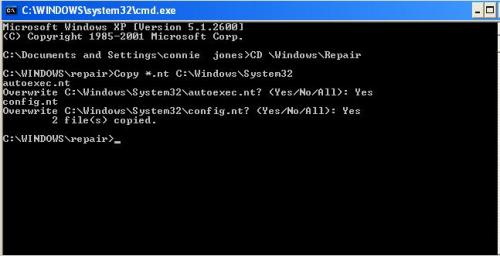
Im lost now Where do I go from here?

If I exit will it then peform the operation?

Advice please

Attached Thumbnails

  • .ntcommand2.JPG

  • 0

#60
anzenketh

anzenketh

    BSOD Warrior/Computer Surgeon

  • Technician
  • 2,854 posts
yorkie,

The operating is already preformed. You just type exit to close the box.

Did it work?
  • 0


Similar Topics

0 user(s) are reading this topic

0 members, 0 guests, 0 anonymous users

As Featured On:

Microsoft Yahoo BBC MSN PC Magazine Washington Post HP