

BLUE SCREEN, (Solved)
Started by
Lexy610
, Jan 14 2014 02:31 AM
#196
: post #196")
 Posted 03 March 2014 - 08:21 PM
Lexy610
- Topic Starter
-
- Member
-

- 743 posts
Member

#197
Posted 04 March 2014 - 05:35 AM
rshaffer61
-

- Moderator
-

- 34,114 posts
Moderator
Can you boot into Safe Mode and see if the kb and mouse work there. If so then we know it is a driver issue as only the windows default usb drivers are loaded. If it does you can uninstall the old drivers and then reboot back into normal mode allowing Windows to install the old drivers.
#198
Posted 04 March 2014 - 07:13 AM
Lexy610
- Topic Starter
-
- Member
-
- 743 posts
Member
Just booted to safe mode .... still not working.
#199
Posted 04 March 2014 - 07:31 AM
rshaffer61
-
- Moderator
-
- 34,114 posts
Moderator
I dare to say it is not a driver issue then. In safe mode windows loads only the basic default drivers and nothing upgraded. Either we have a bad kb and mouse or bad USB ports.
Are there USB ports on the front of the computer? If so have you tried using those?
Do you have access to another USB kb you can try?
Are there USB ports on the front of the computer? If so have you tried using those?
Do you have access to another USB kb you can try?
#200
Posted 04 March 2014 - 07:44 AM
Lexy610
- Topic Starter
-
- Member
-
- 743 posts
Member
Hello
Yes I just tried the ports on the front of the tower and nothing. I also moved it around on to the other ports on the back and noticed two ports on the back was not working bc the kb and mouse would not light up. But the ones that allowed my kb & mouse to light up still wasn't working.
I then used a kb & mouse that I have been using with no problem on another desktop and they don't work on that tower. Not one port worked on that kb or mouse.
#201
Posted 04 March 2014 - 08:22 AM
rshaffer61
-
- Moderator
-
- 34,114 posts
Moderator
OK can you boot into the bios and check the onboard peripherals like the USB and make sure that it is enabled.
#202
Posted 04 March 2014 - 08:31 AM
Lexy610
- Topic Starter
-
- Member
-
- 743 posts
Member
Yes it is "on"
I do notice on there that there is another option besides on and off called "no boot" which apparently means the usb controller is enabled; however, the bios will not recognize usb storage devices.
Just thought Id share that with you .. not sure if its useful information.
I do notice on there that there is another option besides on and off called "no boot" which apparently means the usb controller is enabled; however, the bios will not recognize usb storage devices.
Just thought Id share that with you .. not sure if its useful information.
#203
Posted 04 March 2014 - 09:07 AM
rshaffer61
-
- Moderator
-
- 34,114 posts
Moderator
Yes that is what I was looking at. The kb works as you found out you could go around the bios with no problem. It is something in Windows for sure but the fact it isn't working with only the default drivers has me baffled.
I'm still talking tot he other techs and with everything looking to be set right we are all trying to come up with a direction to take.
I'm still talking tot he other techs and with everything looking to be set right we are all trying to come up with a direction to take.
#204
Posted 04 March 2014 - 02:50 PM
Lexy610
- Topic Starter
-
- Member
-
- 743 posts
Member
I understand .. thank you all for all of your time AND HELP.
I am certainly extremely worried!! I am just as baffled ... all was working well after the blue screen fiasco then once I started d/l the updated drivers all went haywire ... :'(
I am certainly extremely worried!! I am just as baffled ... all was working well after the blue screen fiasco then once I started d/l the updated drivers all went haywire ... :'(
#205
Posted 04 March 2014 - 03:16 PM
rshaffer61
-
- Moderator
-
- 34,114 posts
Moderator
The updated driver should not have done this. Maybe in normal Windows but not in Safe mode. If we could just get the recovery console to work with the kb then we can restore back.
#206
Posted 04 March 2014 - 03:22 PM
Lexy610
- Topic Starter
-
- Member
-
- 743 posts
Member
Ok I understand ... Do you think this can be resolved?
#207
Posted 04 March 2014 - 03:28 PM
rshaffer61
-
- Moderator
-
- 34,114 posts
Moderator
One way or another. I'm just interested to know if we try the following if the kb will work.
UPDATED April 20, 2012
Use Puppy Linux Live CD to Recover Your Data:
===================
***Required Hardware***
CD Burner (CDRW) Drive,
Blank CD,
Extra Storage Device (USB Flash Drive, External Hard Drive)
===================
1. Save these files to your Desktop/Burn Your Live CD:
2. Set your boot priority in the BIOS to CD-ROM first, Hard Drive Second
3. Recover Your Data
Remember to only click once! No double clicking! Once you drag and drop your first folder, you will notice a small menu will appear giving you the option to move or copy. Choose COPY each time you drag and drop.
YOU ARE DONE!!! Simply click Menu >> Mouse Over Shutdown >> Reboot/Turn Off Computer. Be sure to plug your USB Drive into another working windows machine to verify all data is there and transferred without corruption. Congratulations!
If you're doing this to recover from a virus or malware infection, (or even if you're not), DO NOT copy executable files (.exe, .scr. etc...) if any of these files are infected you could be copying the corruption over to any new device/computer. just copy documents, pictures, music, or videos.
UPDATED April 20, 2012
Use Puppy Linux Live CD to Recover Your Data:
===================
***Required Hardware***
CD Burner (CDRW) Drive,
Blank CD,
Extra Storage Device (USB Flash Drive, External Hard Drive)
===================
1. Save these files to your Desktop/Burn Your Live CD:
- Download Latest Puppy Linux ISO (i.e.: lupu-528.iso)
Download BurnCDCC ISO Burning Software
There are instructions on how to boot from flash drive with puppy here; http://www.pendrivel...e-from-windows/
- Open BurnCDCC with Windows Explorer
- Extract All files to a location you can remember
- Double Click
 BurnCDCC
 - Click Browse
 and navigate to the Puppy Linux ISO file you just downloaded
 - Open/Double Click that file
IMPORTANT: Adjust the speed bar to CD: 4x DVD: 1x - Click Start

- Your CD Burner Tray will open automatically
- Insert a blank CD and close the tray
- Click OK
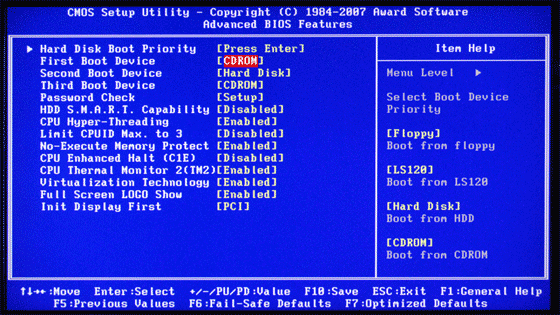
2. Set your boot priority in the BIOS to CD-ROM first, Hard Drive Second
- Start the computer/press the power button
- Immediately start tapping the appropriate key to enter the BIOS, aka "Setup"
(Usually shown during the "Dell" screen, or "Gateway" Screen) - Once in the BIOS, under Advanced BIOS Options change boot priority to:
CD-ROM 1st, Hard Drive 2nd - Open your ROM drive and insert the disk
- Press F10 to save and exit
- Agree with "Y" to continue
- Your computer will restart and boot from the Puppy Linux Live CD
3. Recover Your Data
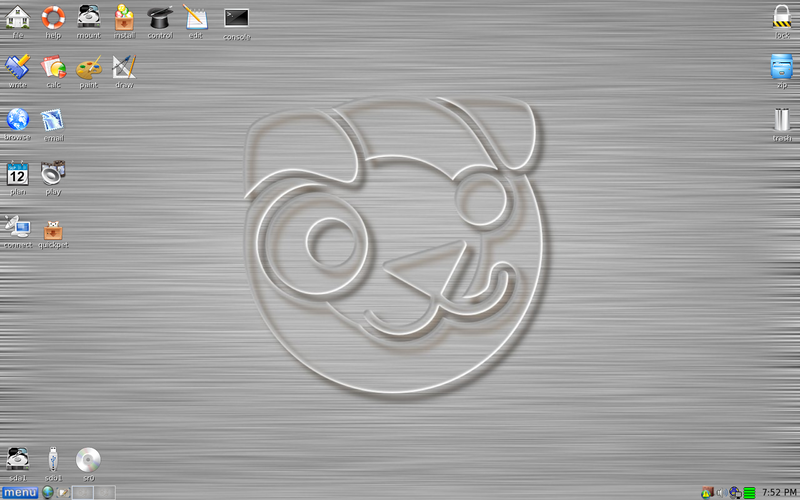
- Once Puppy Linux has loaded, it is actually running in your computer's Memory (RAM). You will see a fully functioning Graphical User Interface similar to what you normally call "your computer". Internet access may or may not be available depending on your machine, so it is recommended you print these instructions before beginning. Also, double clicking is not needed in Puppy. To expand, or open folders/icons, just click once. Puppy is very light on resources, so you will quickly notice it is much speedier than you are used to. This is normal. Ready? Let's get started.
3a. Mount Drives - Click the Mount Icon located at the top left of your desktop.

- A Window will open. By default, the "drive" tab will be forward/highlighted. Click on Mount for your hard drive.
- Assuming you only have one hard drive and/or partition, there may be only one selection to mount.
- USB Flash Drives usually automatically mount upon boot, but click the "usbdrv" tab and make sure it is mounted.
- If using an external hard drive for the data recovery, do this under the "drive" tab. Mount it now.
- At the bottom left of your desktop a list of all hard drives/partitions, USB Drives, and Optical Drives are listed with a familiar looking hard drive icon.
- Open your old hard drive i.e. sda1
- Next, open your USB Flash Drive or External Drive. i.e. sdc or sdb1
- If you open the wrong drive, simply X out at the top right corner of the window that opens. (Just like in Windows)
- From your old hard drive, drag and drop whatever files/folders you wish to transfer to your USB Drive's Window.
Remember to only click once! No double clicking! Once you drag and drop your first folder, you will notice a small menu will appear giving you the option to move or copy. Choose COPY each time you drag and drop.
YOU ARE DONE!!! Simply click Menu >> Mouse Over Shutdown >> Reboot/Turn Off Computer. Be sure to plug your USB Drive into another working windows machine to verify all data is there and transferred without corruption. Congratulations!
If you're doing this to recover from a virus or malware infection, (or even if you're not), DO NOT copy executable files (.exe, .scr. etc...) if any of these files are infected you could be copying the corruption over to any new device/computer. just copy documents, pictures, music, or videos.
#208
Posted 04 March 2014 - 06:51 PM
Lexy610
- Topic Starter
-
- Member
-
- 743 posts
Member
Once I d/l and save those two files ... and burn my cd ... do I have to do steps 3, 3a, 3b & 3c?? These steps are confusing me .. I have not lost files .. b4 I begin can I get a clearer explanation as to why do all this?? Please thank you.
#209
Posted 04 March 2014 - 07:25 PM
rshaffer61
-
- Moderator
-
- 34,114 posts
Moderator
The whole purpose of this is to see if using a Linux Live cd will allow the kb and mouse to work in a different OS. If so then the issue is with your windows completely. If it does prove that then we may need to do the ultimate resolution which is to format and reinstall your OS fresh. If it does prove this then having the Linux Live cd will allow you to backup all your important files so you don't lose them.
#210
Posted 04 March 2014 - 07:35 PM
Lexy610
- Topic Starter
-
- Member
-
- 743 posts
Member
Ok thank you so much for explaining this to me .. I was confused lol. I will start this procedure in a few. Will update you soon
Edited by Lexy610, 04 March 2014 - 10:48 PM.

Similar Topics
1 user(s) are reading this topic
0 members, 1 guests, 0 anonymous users
As Featured On:


 Sign In
 Create Account
